
Building a database with Kexi
Data friend

© hypermania2, 123RF
Kexi, part of the KOffice suite, allows anyone to create, populate, and maintain a database.
The open source world offers a number of solutions for managing data. SQLite is a tiny yet powerful database; MySQL is extremely popular with web developers; and PostgreSQL boasts transactional features on par with Oracle. All three solutions have command-line and programmatic interfaces, and both MySQL and PostgreSQL have support for browser-based management [1] [2]. SQLite, MySQL, and PostgreSQL all have strengths and weaknesses, and each is capable, but sadly, none of the three is suitable for the new Linux netbook owner or casual desktop user. Indeed, Linux users have had few options for a friendly, graphical, and lightweight database solution akin to Microsoft Access.
A Windows user can build tables, enter data, formulate queries, and craft reports in Access with little more than a mouse. The OpenOffice.org Base tool attempts a similar mission within Linux environments, but some popular distros don't include Base with the default desktop, and many Linux users are still searching for other options.
The Kexi database development tool [3] is another alternative for many Linux users. Kexi, billed as "Access for Linux," has been available since 2006, and the latest stable release, Kexi 1.1.3, is part of the KOffice 1.6 suite [4]. Kexi 1.1.3, which I used for this article, dates to April 2008, but Kexi 2.0 is marching through a series of pre-releases, with the intention to ship by the end of the year.
Introducing Kexi
Kexi, like Microsoft Access, offers a friendly user interface to create, populate, and maintain a database. Many tasks in Kexi are like filling out a spreadsheet. For example, to create a table, you fill out a row for each field in the table. Then you name each field, assign a type (such as date, integer, or text), and perhaps link the new field to an existing field in another table, thereby relating the two tables (hence the name "relational database"). Once you define a table, you can populate it with data as you would a spreadsheet.
Crafting queries in Kexi is a little more involved but does not require any knowledge of SQL. Instead, a query is largely drag and drop: Choose one or more tables, relate one field to another by point and click, and select the fields you want to display. Kexi also offers drag-and-drop form building to create interfaces to enter data, and like Access, Kexi either can use its own database format or can connect to another engine for more oomph. In Kexi's case, you can use MySQL. If you dislike the phpMyAdmin interface, try Kexi to browse an existing MySQL database.
Kexi is modal. The Design View creates and edits tables, queries, and forms, whereas the Data View shows the end result. Building an application in Kexi is typified by switching from one mode to the other. First I'll use Kexi to build an application, exploring its features along the way.
Installing Kexi
The easiest and fastest way to install Kexi is via your package manager. On Debian and Ubuntu variants, use apt-get or one of the equivalent graphical front ends:
$ sudo apt-get update
$ sudo apt-get install kexi
Kexi depends on KDE [5]. If you do not use KDE or any of its components, the addition of Kexi, KDE, and the latter package's attendant dependencies could add some 100 packages to your system, including the KOffice suite. Otherwise, the process is very quick.
After the installation finishes, run Kexi:
$ kexi
When the Choose Project window pops up, choose Blank Database and click OK. The next prompt asks where you would like to create the database. The two choices are in a file or in a MySQL database server. To keep things simple, choose New Project Stored in File. When Kexi asks for a database name, enter Example One, click OK, and use the browse dialog to choose a location for the file on your disk.
The main Kexi window resembles Figure 1. The pane on the left collects your tables, queries, forms, and scripts (the latter is an experimental feature and is ignored here). Kexi calls each of those entities an object. To create a new table, for example, right-click on Tables and choose Create Object: Table. (From the menubar: Choose Insert | Table.) The tool palette is immediately below the menubar; the list of available tools changes depending on the task at hand.
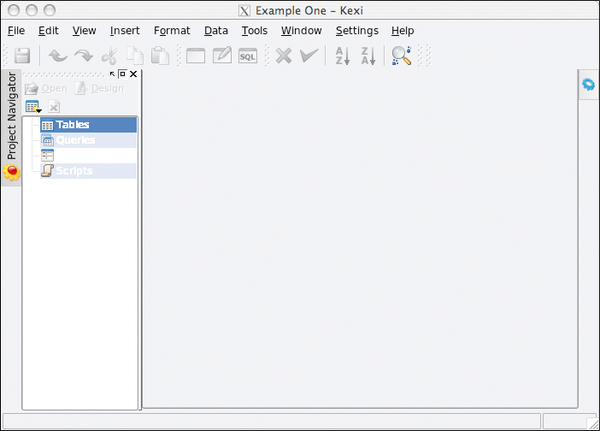 Figure 1: The main Kexi window.
The central area of the Kexi window is the heart of the application, in that most of your work is performed here. The rightmost panel, which is empty in Figure 1 but shown in subsequent figures, is used to edit the attributes of fields.
Building Your First Database
To demonstrate, I'll show you how to construct a database to maintain student grades. The structure of the database, or schema, includes three tables: a table for students, a table for the class curriculum (homework, quizzes, and tests), and a table for scores, which ties a student to a grade for a particular assignment.
- The students table has four fields: a first name, last name, student ID, and birth date.
- The assignments table has four fields: a description, a maximum possible score, a unique ID, and a date to record when the work was assigned.
- The grades table has three fields: a student ID, an assignment ID, and a score.
To create a table, right-click on Tables in the leftmost pane and choose Create Object: Table. To begin, I'll show you how to create the students table.
When the blank table appears in center pane, click in the first row of the table, type id in the Field Caption column and select Integer Number as the Data Type. In the rightmost pane, choose the Properties tab, click on Primary Key and choose Yes. (Whenever you designate a field as a primary key, Kexi automatically sets the other properties to ensure the field is unique.) You will refer to the student ID from the grades table.
Now choose Save from the File menu. When prompted, type students in the Caption field and click OK. Your Kexi window should now look something like Figure 2.
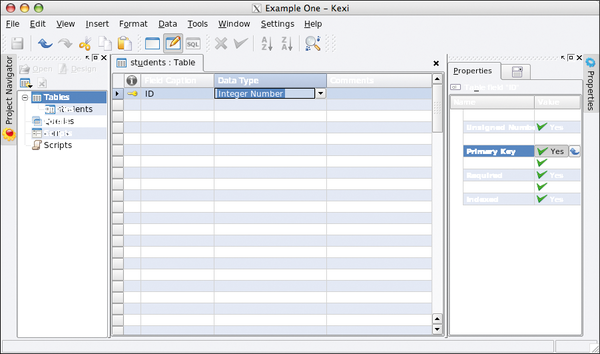 Figure 2: The students table with one field.
To continue, create the fields for the first and last names, using both the table editor and the properties editor. The two fields should be Text, and make sure both are required, are indexed (to speed searches), and have a maximum length of 100 characters. Neither field can be blank, so set the appropriate property to make the fields mandatory. Furthermore, create an additional field to record each student's birth date. Its type should be Date/Time, and specify that the field is required. When the students table is complete, save your work.
Next, create an assignments table for classwork using much the same process you did in the last step. Create an assignment field (Text, required, not blank) to describe the assignment, a maximum_score field (Integer Number, required) to record the maximum score possible, and a date field (Date/Time, required, not blank) to indicate when the assignment was given.
Finally, create the grades table. It ties a student to an assignment and records the student's score. First, create a field named student_id and set its type to Integer Number. In the Properties tab at right, make the field required and make sure it cannot be blank. Next, click on the Associations tab in the rightmost pane (the icon is a little drop-down menu) to define the field as a foreign key, or a key from another table that establishes a connection between one record and another.
Here, the foreign key must be the ID of a student. In the dialog, set Row source to students and choose id as the Bound column. (The ID is now the foreign key that binds two records together.) In addition to this, you can set the Visible column to display a value from the student record that is more meaningful than the ID, such as the student's last_name. Figure 3 shows how the foreign key is defined.
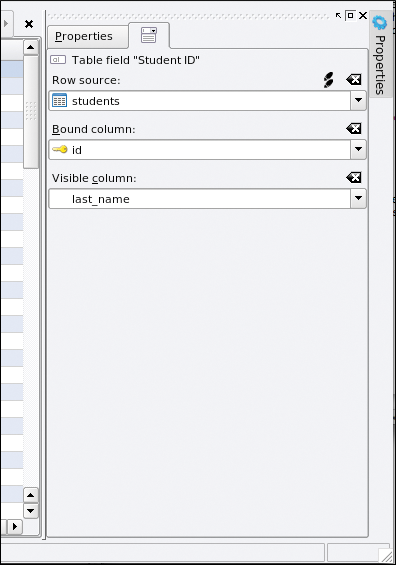 Figure 3: Choose a table and row as a foreign key.
Next, create a field named score as a required Integer Number, then create a field named activity_id. To mirror the student ID, use the tabs in the rightmost pane, but the field should refer to the assignment ID.
If Kexi prompts you to create a primary key for the grades table when you save your work, simply click No. This table does not require a primary key.
Now you have enough structure in place to record student scores and run queries.
So far, you've been working in the Design View. To enter data, choose any of the tables and switch to Data View by choosing View | Data View or by pressing the F6 key. Again, the interface should remind you of a spreadsheet with a header at top to clarify the order of the fields. Here, you can create entries for five or six students and entries for a handful of assignments before you create grades, combine a student record and assignment, and tally a score. Figure 4 shows some possible student records.
Now that you have some data, the next step is to put the information to work.
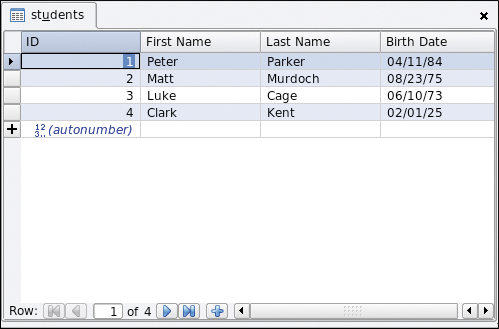 Figure 4: A collection of (very) capable students.
Buy this article as PDF
(incl. VAT)
Buy Linux Magazine
US / Canada
UK / Australia
Subscribe to our Linux Newsletters
Find Linux and Open Source Jobs
Subscribe to our ADMIN Newsletters
Support Our Work
Linux Magazine content is made possible with support from readers like you. Please consider contributing when you’ve found an article to be beneficial.

News
-
Linux Servers Targeted by Akira Ransomware
A group of bad actors who have already extorted $42 million have their sights set on the Linux platform.
-
TUXEDO Computers Unveils Linux Laptop Featuring AMD Ryzen CPU
This latest release is the first laptop to include the new CPU from Ryzen and Linux preinstalled.
-
XZ Gets the All-Clear
The back door xz vulnerability has been officially reverted for Fedora 40 and versions 38 and 39 were never affected.
-
Canonical Collaborates with Qualcomm on New Venture
This new joint effort is geared toward bringing Ubuntu and Ubuntu Core to Qualcomm-powered devices.
-
Kodi 21.0 Open-Source Entertainment Hub Released
After a year of development, the award-winning Kodi cross-platform, media center software is now available with many new additions and improvements.
-
Linux Usage Increases in Two Key Areas
If market share is your thing, you'll be happy to know that Linux is on the rise in two areas that, if they keep climbing, could have serious meaning for Linux's future.
-
Vulnerability Discovered in xz Libraries
An urgent alert for Fedora 40 has been posted and users should pay attention.
-
Canonical Bumps LTS Support to 12 years
If you're worried that your Ubuntu LTS release won't be supported long enough to last, Canonical has a surprise for you in the form of 12 years of security coverage.
-
Fedora 40 Beta Released Soon
With the official release of Fedora 40 coming in April, it's almost time to download the beta and see what's new.
-
New Pentesting Distribution to Compete with Kali Linux
SnoopGod is now available for your testing needs