
Backing up and restoring your system using Systemback
Reverse Gear
To restore a backup, check the box to the right of the corresponding field. Make sure to highlight only one restore point. Clicking System restore will start the restore process. In the dialog shown in Figure 5, Systemback asks which data you want it to restore. Choosing Full restore restores the complete backup.
 Figure 5: Specify what you want Systemback to restore when restoring a backup.
Alternatively, you can restore the system with System files restore or just the configuration files from the home directory with User(s) configuration files restore. In the latter case, you need to set which configuration files Systemback should restore in the drop-down list. Systemback will restore all users' configuration files in their home directories if you select Everyone. The program will overwrite any newer specimens that are already there. Select the Keep newly installed configuration files option to prevent this.
By default, Systemback checks whether the GRUB 2 boot manager is faulty and will try to repair it if that is the case. Uncheck the box to the left of Auto detection to prevent this. Clicking Reinstall GRUB 2 bootloader lets you decide on which partition or hard disk Systemback should install the bootloader. Auto lets the tool make the decision, and Disabled tells Systemback not to touch the boot manager.
When restoring the system, Systemback also overwrites the /etc/fstab file with its older counterpart from the backup. The /etc/fstab file links partitions with their mountpoints. If you have added data storage devices to the system since the backup was created, you should disable Auto detection and check the box to the left of Do not restore fstab file. If in doubt, go for the default functions. In most cases, these will give you the desired behavior: system recovery.
After clicking Next, you need to ensure that no applications are running. Confirm the prompt by clicking Start. Systemback will now restore the backup, which may take some time, especially on older systems without a fast SSD. Then, you can restart the system via Reboot. The computer should now be in the previous state.
Live Wire
In addition to the conventional backup, Systemback also creates a Live system, which then starts from a DVD or a USB flash drive, on request. To do this, click on Live system create in the main window. Systemback does not write the system directly to a stick or a DVD; instead, it first creates an image file. Enter a name for this file in the Name of Live system text box. If you leave the default, auto, the file name will systemback_live with the creation date (Figure 6). You can determine the location under Working directory. Clicking Create new will start creating the Live system.
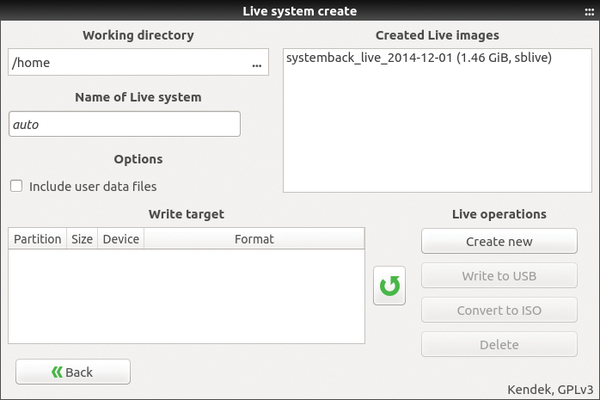 Figure 6: Systemback also produces Live systems with their own settings and programs.
When this step is finished, you will find a new entry in the list at top right with both the names of the image files and their sizes. Consequently, the USB flash drive needs to have at least the same amount of space. Now plug in the flash drive and click on the green curved arrow. An entry for the drive will appear in the list at bottom left. Select it and then uncheck Write to USB. Systemback then writes the Live system to the USB flash drive.
You need to convert the image first if you want to burn the Live system to a DVD. To do this, select the image at top right in the list and click Convert to ISO. Systemback now creates an ISO file (Figure 7), which it stores in the Working directory. You can then transfer the ISO to a CD or DVD using any burning program.
 Figure 7: The Live system behaves like a local installation, including existing user accounts.
Clones
Systemback will also help you transfer the system to a new data storage device. It clones the current system by default. In the Systemback main window, check the box to the right of an existing backup to use as a starting point. In any case, make sure that the target disk is connected; then, click System copy.
You now need to partition the target disk for your intended use (Figure 8). Generally, you will need at least one partition for the system and another for the swap partition. Partitioning itself is somewhat tedious: !Delete! will delete all partitions in the list that are currently selected or highlighted in orange. However, you should consider your actions carefully before clicking, because Systemback removes the partitions in question without verification. Empty spaces on the data storage device appear in italics. After selecting an item, you can create a new partition. To do this, enter the appropriate size in the input field and press the green arrow.
 Figure 8: Systemback copies the system on the sdb1 partition; sdb2 can be used later as a swap partition.
After entering the partitions, you need to assign each of these a Mount point. If, for example, you want the sdb1 partition to contain all the home directories, then select sdb1 from the list and under Mount point choose /home. Finally, set up the filesystem you will be using in the drop-down box. The default ext4 is usually suitable. You will also want to check Format. As soon as you press the green arrow, Systemback formats the partition and assigns the corresponding mountpoint, which then appears in the New mount point column. Assign the SWAP mountpoint to the swap partition.
If you want to transfer the user configuration files to the cloned system, check the box to the left for Transfer user configuration files. Finally, the drop-down for Install GRUB 2 bootloader lets you choose the path in which Systemback stores the GRUB 2 boot manager. You can usually leave the default setting with Auto. Once all the data is correct, press Next and confirm by pressing Start. Systemback now copies the system onto the designated disk, with which you can then restart your cloned system.
The system user accounts are kept when cloning. Click System install in the main window if you prefer to create new ones. Systemback now requests the credentials for the new user account and the root password (Figure 9). You can then proceed to set up the hard disk as described by clicking Next. After clicking Next again, Systemback copies the system, but not the user accounts.
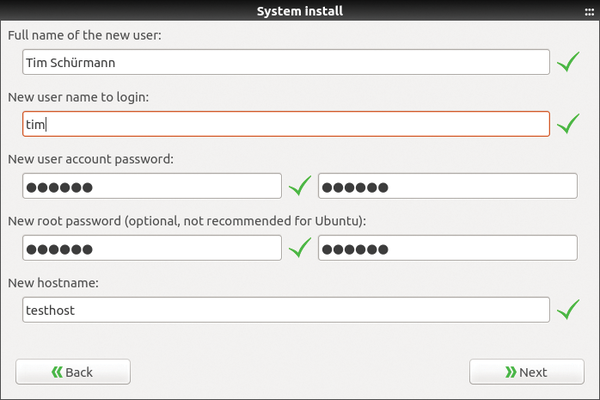 Figure 9: You can enter new credentials for root and a new user on the cloned system.
« Previous 1 2 3 Next »
Buy this article as PDF
(incl. VAT)
Buy Linux Magazine
US / Canada
UK / Australia
Subscribe to our Linux Newsletters
Find Linux and Open Source Jobs
Subscribe to our ADMIN Newsletters
Support Our Work
Linux Magazine content is made possible with support from readers like you. Please consider contributing when you’ve found an article to be beneficial.

News
-
TUXEDO Computers Unveils Linux Laptop Featuring AMD Ryzen CPU
This latest release is the first laptop to include the new CPU from Ryzen and Linux preinstalled.
-
XZ Gets the All-Clear
The back door xz vulnerability has been officially reverted for Fedora 40 and versions 38 and 39 were never affected.
-
Canonical Collaborates with Qualcomm on New Venture
This new joint effort is geared toward bringing Ubuntu and Ubuntu Core to Qualcomm-powered devices.
-
Kodi 21.0 Open-Source Entertainment Hub Released
After a year of development, the award-winning Kodi cross-platform, media center software is now available with many new additions and improvements.
-
Linux Usage Increases in Two Key Areas
If market share is your thing, you'll be happy to know that Linux is on the rise in two areas that, if they keep climbing, could have serious meaning for Linux's future.
-
Vulnerability Discovered in xz Libraries
An urgent alert for Fedora 40 has been posted and users should pay attention.
-
Canonical Bumps LTS Support to 12 years
If you're worried that your Ubuntu LTS release won't be supported long enough to last, Canonical has a surprise for you in the form of 12 years of security coverage.
-
Fedora 40 Beta Released Soon
With the official release of Fedora 40 coming in April, it's almost time to download the beta and see what's new.
-
New Pentesting Distribution to Compete with Kali Linux
SnoopGod is now available for your testing needs
-
Juno Computers Launches Another Linux Laptop
If you're looking for a powerhouse laptop that runs Ubuntu, the Juno Computers Neptune 17 v6 should be on your radar.