
Intrusion Detection with the Snort IDS
Safety Snort

© pcphotos, Fotolia
Search out hidden attacks with the Snort intrusion detection system.
R ecently, I implemented an Intrusion Detection System (IDS) for a remotely hosted web farm. After the initial setup, I began testing and configuring to streamline the system. As soon as the system was switched on, I noticed the sort of traffic that shouldn't be internal to a DMZ. The ISP-controlled firewall had been misconfigured to allow almost all traffic.
In the short time the test was running, the IDS logged a large number of port scans and access attempts on the main servers. From these logs, it was obvious that the servers were receiving the wrong sort of attention.
The moral of the story is to keep an eye on your network. Even if you don't have a misconfigured firewall, your systems could benefit from the attention of an IDS. At the most basic level, an IDS captures network traffic. Then it compares the contents of these packets against specific rules to check for known vulnerabilities or malicious code.
When the IDS discovers something that matches a rule, it triggers a pre-configured action. The action varies depending on the configuration, however, in basic IDS mode, the system simply logs the offending traffic or sends an alert. An IDS sensor on the network perimeter keeps a watchful eye on traffic that the firewall lets through; a sensor located outside of the firewall lets you watch access attempts.
Snort [1] is an open source IDS alternative. As with many open source projects over the past few years, Snort now has a corporate arm, Sourcefire [2], but the good news is that Snort is still freely available under the GPL.
In this article, I describe how to start watching your network with Snort.
Installation
Snort is usually easy to install. Those with .deb or .rpm package managers should find Snort in the list of available software for your distros; however, it might be an older version.
At this time of writing, the latest version is 2.8.0.2. Installing from source isn't as easy as setting up Snort with apt-get, but you'll have many more options for customizing your system. To build Snort, you need to download the source tarball and, optionally, the MD5 hash to run a file check.
wget http://www.snort.org/dl/current /snort-2.8.0.2.tar.gz
Optional:
wget http://www.snort.org/dl/current /snort-2.8.0.2.tar.gz.md5
Optional:
md5sum -c snort-2.8.0.2.tar.gz.md5
tar -xvf snort-2.8.0.2.tar.gz
cd snort-2.8.0.2
When the source is uncompressed and at your mercy, figure out where you want to store the logs and alerts. Also, you can always stick with the simple option of logging all output to /var/log/snort/, or you can go the more flexible and scalable route. Snort supports a wide range of databases that allow you to centralize the data easily. The choice depends on what you want to achieve and how much traffic you expect to handle. The general rule of thumb is to take the estimated traffic level and multiply it by 10. Most of the time, the sheer amount of traffic takes people by surprise and can easily overload your logging system if you're not prepared. This example installs MySQL as the database back end. If you want to run another database, you can build in support through command switches available in ./configure. To view a full list of the supported options, run ./configure -h.
./configure --with-mysql
make
sudo make install
If you encounter errors running the build process, you might be missing some required headers. In particular, you need to ensure you have pcre.h, pcap.h, pcap-bpf.h, and mysql.h present in the /usr/include directory. If these files are missing, some of the dependencies might not be installed properly (Listings 1 and 2). It's also possible to have issues with the libpcap.so file. On certain distros, you need to recreate this symbolic link by running ln -s /usr/lib/libpcap.so.<version> /usr/lib/libpcap.so. Once you've run make and sudo make install cleanly, you're ready to do some final touches before heading into the MySQL database configuration. Before moving on to the database, create a new user for Snort. (After all, you don't want the service running as root.) To create a new user, run the following commands:
groupadd snortgrp
useradd -g snortgrp snortusr
These commands will create the snortgrp group and the new user snortusr. Before continuing, make sure you are in the directory where you untarred Snort. The following commands create the required directories for the Snort configuration, rules, and logfiles, copying the required files to the newly created /etc/snort directory.
mkdir -p /etc/snort/rules
mkdir /var/log/snort
touch /var/log/snort/snort.log
touch /var/log/snort/alert
chown -R snortusr.snortgrp /var/log/snort
cp etc/* /etc/snort/
To download the latest rules, connect to the Snort website [1] and register. The website offers both free and paid registration options, depending on how up to date you need your rule set. Members who have a paid subscription have access to newly updated rules 30 days before the normal registered users. It is better not to use the rules provided at version release, as these rules are quickly outdated against new attacks. Once you have registered (or subscribed), you can download the new rule set and extract it into /etc/snort/rules. Don't forget to use md5sum to check the tar.
Listing 1
Snort Dependencies
* Libpcap
 * Libpcap-dev
 * PCRE
 * PCRE-dev
 * Libnet-1.0.2.a
 * MySQL-Server-5.0 (for MySQL support)
 * MySQL-Client (for MySQL support)
 * MySQL-dev (for MySQL support)
Listing 2
BASE Dependencies
* apache(-ssl)
 * php5
 * php5-mysql
 * php5-gd
 * libphp-adodb
What is MD5?
MD5 is a cryptographic hash function that provides a 128-bit hash based on the contents of file. When downloading a program or document, you can use the md5sum command to ensure the download you have is the same as the original. Md5sum compares the hash value of the download to an MD5 hash of the trusted version. Many software projects now provide an MD5 hash of binaries. The MD5 is usually found on the project website in the download section. Running this check against your download can help you avoid installing corrupted or malicious software.
Preparing the Database
Now that the basic system is installed, it's time to prep the database. Once the MySQL server is running (run a ps -A | grep mysqld to check), the configuration can begin.
The database configuration is divided into separate steps. First, you will need to set an appropriate password, create the required database, and define the table structure. Connect to the MySQL service as root and create the database and permissions for snortusr. To open the MySQL command processor, run mysql -u root -p at the prompt. Then, you will be prompted for the root user password and given a mysql> prompt. Enter the following commands to complete the first phase of the setup. Because these are database commands, you need to make sure each line is terminated with a ";" character.
When creating the passwords for the user, make sure to use passwords that will stand a better chance in a brute force attack. A minimum of eight characters is suggested – with uppercase letters, lowercase letters, numbers, and special characters.
create database snort;
grant INSERT, SELECT on root.* to snort@localhost;
set PASSWORD for snort@ localhost=PASSWORD ('Desired_$n0rt_pa55word');
grant CREATE, INSERT, SELECT, DELETE, UPDATE on snort.* to snort@localhost;
grant CREATE, INSERT, SELECT, DELETE, UPDATE on snort.* to snort;
exit
Each command should return a Query OK response. If not, make sure you have terminated with a ";" character. The second stage of the installation process includes a simple script that is passed to the MySQL command processor. Make sure you are in the directory where you untarred Snort, then run the following command:
mysql -u root -p schemas /create_mysql snort
Now that both steps are complete, make sure all the pieces are in place. To confirm everything is ready, enter the MySQL command processor as the Snort user created earlier. Check the database and table structure with the following commands:
show databases;
use snort;
show tables;
exit
Once the database is ready, you're ready to begin configuring Snort.
Snort Configuration
Once the preparations are finished, it is time to dive into the Snort configuration. The main Snort configuration file, snort.conf (Figure 1), is located in the /etc/snort directory. Bring this file up in the editor of your choice and take a quick look at the various sections. The conf file contains a wealth of helpful hints about configuring your IDS. For example, you'll need to add information about the network and servers so that Snort can map rules correctly. To ensure the system monitors the correct traffic, the var HOME_NET and var EXTERNAL_NET need to be configured to reflect the network infrastructure. On a simple network, HOME_NET will probably be set to a private IP range, like 192.168.0.0/24. This means that all traffic originating from the 192.168.0.1-255 IP range will be classified as internal traffic. The details will vary, depending on your configuration. If you have multiple subnets on your internal network, you can add each subnet with a comma between them. The EXTERNAL_NET entry is a list of specific external addresses to classify as external. The simplest method to configure this is to use the !$HOME_NET setting, which will be translated by Snort as all addresses except HOME_NET.
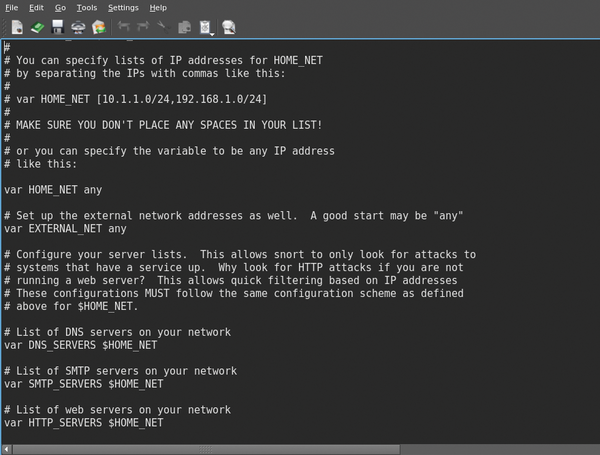 Figure 1: The snort.conf is a central point for Snort configuration.
Specify the location of the Snort rules through the configuration. If you download the rules to /etc/snort/rules, add this path to the var RULE_PATH line. The last, and important, variable to set is used by the IDS system to log data to the database. Near the bottom of snort.conf is a section for configuring the output plug-ins. Here the output database: log, mysql ~ line must be uncommented and replaced with the location of the MySQL database (Figure 2).
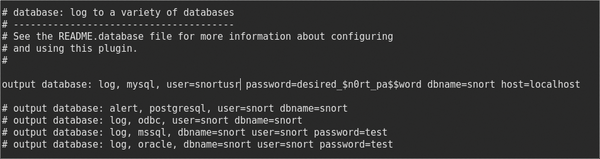 Figure 2: Configuring MySQL settings in snort.conf.
Once the settings are completed, you have the basis of a working server. However, you're going to need to set up Snort to run on start-up and ensure it is running under the newly created snortusr account. At this point, you can test Snort from the command line using snort -u snortusr -g snortgrp -c /etc/snort/snort.conf. Snort will run under the supplied credentials and begin to log or alert on any captured traffic. When terminated, Snort displays session statistics (Figure 3). This screen report is nice, but it is not a perfect solution.
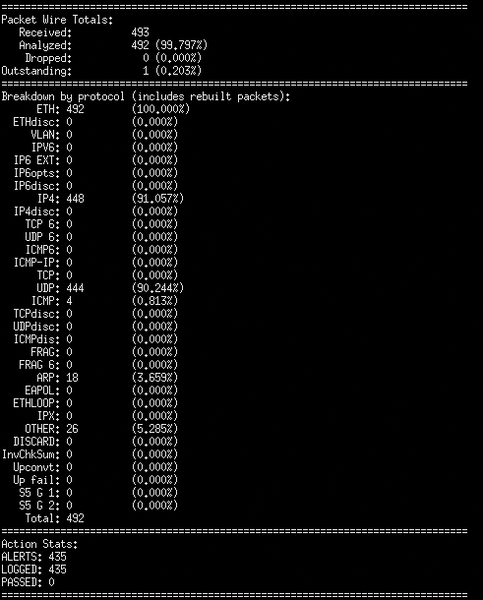 Figure 3: Snort displays session stats at termination.
To get Snort to start on boot, insert a simple shell script into the /etc/init.d folder. To create this script, open your favorite editor and enter the following lines:
#!/bin/bash
#
# Snort startup script - /etc/init.d/snortstart
#
/usr/local/bin/snort -Dq -u snortusr -g snortgrp -c /etc/snort/snort.conf
With this script in place, run chmod +x /etc/init.d/snortstart to make it executable and update-rc.d /etc/init.d/snortstart defaults 95 to enter the necessary symbolic links into the required directories. This process might be slightly different depending on your Linux distro.
Buy this article as PDF
(incl. VAT)
Buy Linux Magazine
US / Canada
UK / Australia
Subscribe to our Linux Newsletters
Find Linux and Open Source Jobs
Subscribe to our ADMIN Newsletters
Support Our Work
Linux Magazine content is made possible with support from readers like you. Please consider contributing when you’ve found an article to be beneficial.

News
-
Linux Servers Targeted by Akira Ransomware
A group of bad actors who have already extorted $42 million have their sights set on the Linux platform.
-
TUXEDO Computers Unveils Linux Laptop Featuring AMD Ryzen CPU
This latest release is the first laptop to include the new CPU from Ryzen and Linux preinstalled.
-
XZ Gets the All-Clear
The back door xz vulnerability has been officially reverted for Fedora 40 and versions 38 and 39 were never affected.
-
Canonical Collaborates with Qualcomm on New Venture
This new joint effort is geared toward bringing Ubuntu and Ubuntu Core to Qualcomm-powered devices.
-
Kodi 21.0 Open-Source Entertainment Hub Released
After a year of development, the award-winning Kodi cross-platform, media center software is now available with many new additions and improvements.
-
Linux Usage Increases in Two Key Areas
If market share is your thing, you'll be happy to know that Linux is on the rise in two areas that, if they keep climbing, could have serious meaning for Linux's future.
-
Vulnerability Discovered in xz Libraries
An urgent alert for Fedora 40 has been posted and users should pay attention.
-
Canonical Bumps LTS Support to 12 years
If you're worried that your Ubuntu LTS release won't be supported long enough to last, Canonical has a surprise for you in the form of 12 years of security coverage.
-
Fedora 40 Beta Released Soon
With the official release of Fedora 40 coming in April, it's almost time to download the beta and see what's new.
-
New Pentesting Distribution to Compete with Kali Linux
SnoopGod is now available for your testing needs