
Using the Nintendo Wiimote with Linux
Wii Fly

© Christophe Schmid, Fotolia
Nintendo's Wii game console includes the popular Wiimote control. Have you ever wondered whether the Wiimote works with Linux?
Nintendo Wii users have become quite adept at slashing the wireless Wii remote (Wiimote) control through the air to score points with tennis players, golfers, space aliens, and other forms of virtual gladiators. If you like the Wiimote but you'd rather be on Linux, the transition is not as difficult as you might expect. A number of open source projects provide support for Wii with Linux. For instance, the CWiid toolset [1] includes:
- libcwiid – an API for supporting the Wiid environment
- wmgui – a GUI control panel app
- wminput – an event/mouse/joystick driver
- wmdemo – a demo and testing application
The WiiLi project [2] offers a complete Linux port for the Wii itself, and the WiiBrew Wiki [3] provides resources for Wii-with-Linux users and developers.
From a technical point of view, the Wiimote is nothing more than a Bluetooth device. To let your system talk to the device, you'll need a Bluetooth adapter plus the necessary collection of components and drivers. Some Linux distros build in Wiimote support; others offer binary packages for download. If necessary, you can download and build the CWiid tools to integrate the Wiimote with your Linux environment. In this article, I show you how to get started with your Wiimote on Kubuntu and openSUSE systems. The details are similar for other distros.
Installation
First you'll need a Bluetooth adapter to communicate with the Wiimote device. In our lab, I used a tiny Bluetooth USB stick. Some Linux distros include the Wiimote tools in the default configuration; others provide binary packages for download. On Kubuntu 8.10 with KDE 4.1, start by installing a couple of packages at the console:
$ sudo apt-get install bluez lswm wmgui wminput autoconf build-essential libcwiid1-dev xpdf
Next, plug your Bluetooth stick into the USB slot, if you are using a stick, and scan for the Wiimote. To do this, type hcitool scan while pressing 1 and 2 at the same time on the remote. After a while, the console will display something like:
00:1F:32:A9:6B:4D Nintendo RVL-CNT-01
Although the numbers will be different, this is your Wiimote's Bluetooth address. Make a note of the address (only the numbers); you will need it later.
On openSUSE 11.0 with KDE 4.1, start by running YaST to install a couple of packages: Go to Software, click Software management, and install the following packages: bluez-libs, autoconf, xpdf, and python-devel. Then you need the developer tools. To install them, select Schemes as your Filter and check Basic developer environment (Figure 1).
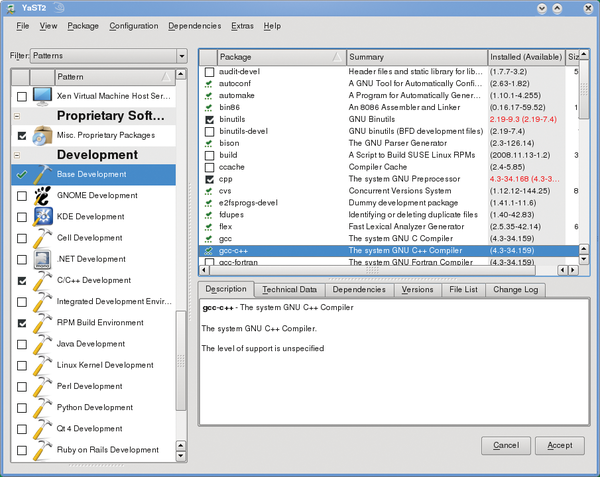 Figure 1: On openSUSE 11.0, you can use YaST to install the developer tools before building a Wiimote-enabled application from the source code.
From the CWiid project website [1], obtain the cwiid-0.6.00 archive and place it in a folder below your home directory. At the console, type tar xvzf cwiid-0.6.00.tgz to unpack the archive, then change to the new directory and use the normal procedure (configure, make, make install) to build and install the software. (Make sure you are root for the last command.)
The rest of the installation steps are the same as for Kubuntu: Plug your Bluetooth stick into the USB slot, run hcitool scan to scan for the Wiimote, and make a note of the Bluetooth address. With openSUSE, enter su root and type the root password to become root instead of running sudo.
Wiimote in Action
After completing the installation, you need to enable the device. Giving the wmgui command launches a small graphical interface (Figure 2) that shows all of the Wiimote's buttons in the top left corner. First you must register the remote control with the GUI. To do so, press Ctrl+C. This pops up a window that prompts you to press 1 + 2 on the Wiimote. Then click OK with the mouse: It might take a while before the Wiimote is ready for action. Now press some of the Wimote's buttons – say, 1 and 2: The corresponding fields in the top left corner of the GUI should show green (see Figure 3).
 Figure 2: Check the graphical interface to discover whether Linux has correctly identified the Wiimote buttons.
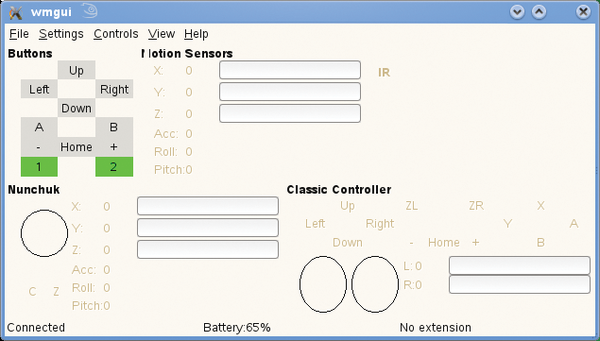 Figure 3: The Wiimote key presses show up in green in wmgui. Pressing Ctrl+A enables the Motion Sensors.
Pressing Ctrl+A enables the Motion Sensors, which register Wiimote movements and return them in the form of numeric output. Pressing this shortcut again disables the function. Pressing Ctrl+E displays the movement data for a Wiimote extension – such as a Nunchuk device (which is used for playing two-handed games like boxing). Pressing Ctrl+R twice enables and disables the internal vibration function, which uses up a fair amount of battery power.
One option is to use the Wiimote to replace the mouse. To do so, quit wmgui then type sudo modprobe uinput to load the kernel module that handles the alternative input device. Add a modprobe uinput line to your /etc/rc.local file to tell Linux to automatically load the module at startup time. Now type
$ sudo wminput 00:1F:32:A9:6B:4D
and press 1 and 2 at the same time on the Wiimote, before pressing Enter to send the command. If Ready is displayed at the prompt, the connection is working and you can now use the Wiimote to move the mouse pointer. A is the right mouse button, and B the left button. Moving the Wiimote up and down moves the cursor in the same directions; flipping your wrist left or right will move the mouse cursor left and right, too. Now you can control any program that you normally control with the mouse.
PDFs with Wiimote
WiiPDF[4] is a free PDF full-screen viewer designed to work with the Wiimote. For instance, you can press A and B on the Wiimote to go to the next or previous slides. First, download WiiPDF from the project website, then change to your home directory and give the tar -xvzf wiipdf-1.0.tar.gz command to unpack. Next, change to the new directory and type make to build the program from source code. After this, type sudo make install; you can then launch WiiPDF. To do so, you need your Wiimote's Bluetooth address. Once you have it, type the following:
$ wiipdf 00:1F:32:A9:6B:4D /path/to/PDF/file.pdf
The /path/to/PDF/ is replaced with the absolute path to the required document, and be sure to use the Bluetooth address for your own Wiimote. After a while, the PDF document should load, and you should be able to browse it by pressing A and B.
Other Ideas
Another option is to use your Wiimote to browse collections of pictures or control a multimedia center such as MythTV [5]. For the latter, you need to connect your computer to your TV set, launch the GUI, and use your Wiimote to zap through the channels. The Ardour audio editor, version 2.7 or newer, also supports Wiimote controls, although the feature is currently experimental.
Buy this article as PDF
(incl. VAT)
Buy Linux Magazine
US / Canada
UK / Australia
Subscribe to our Linux Newsletters
Find Linux and Open Source Jobs
Subscribe to our ADMIN Newsletters
Support Our Work
Linux Magazine content is made possible with support from readers like you. Please consider contributing when you’ve found an article to be beneficial.

News
-
XZ Gets the All-Clear
The back door xz vulnerability has been officially reverted for Fedora 40 and versions 38 and 39 were never affected.
-
Canonical Collaborates with Qualcomm on New Venture
This new joint effort is geared toward bringing Ubuntu and Ubuntu Core to Qualcomm-powered devices.
-
Kodi 21.0 Open-Source Entertainment Hub Released
After a year of development, the award-winning Kodi cross-platform, media center software is now available with many new additions and improvements.
-
Linux Usage Increases in Two Key Areas
If market share is your thing, you'll be happy to know that Linux is on the rise in two areas that, if they keep climbing, could have serious meaning for Linux's future.
-
Vulnerability Discovered in xz Libraries
An urgent alert for Fedora 40 has been posted and users should pay attention.
-
Canonical Bumps LTS Support to 12 years
If you're worried that your Ubuntu LTS release won't be supported long enough to last, Canonical has a surprise for you in the form of 12 years of security coverage.
-
Fedora 40 Beta Released Soon
With the official release of Fedora 40 coming in April, it's almost time to download the beta and see what's new.
-
New Pentesting Distribution to Compete with Kali Linux
SnoopGod is now available for your testing needs
-
Juno Computers Launches Another Linux Laptop
If you're looking for a powerhouse laptop that runs Ubuntu, the Juno Computers Neptune 17 v6 should be on your radar.
-
ZorinOS 17.1 Released, Includes Improved Windows App Support
If you need or desire to run Windows applications on Linux, there's one distribution intent on making that easier for you and its new release further improves that feature.