
Free SME server
Out of the Box

© Philip Barker, 123RF
eBox bundles intelligent and useful services needed to set up a small- to medium-sized network: DHCP, DNS, and web servers.
If you are looking to set up a small home network with a print server, file server, and maybe even a mail server, you can be entirely satisfied with what Linux offers you out of the box. Your distribution's package manager will let you install all the software you need, although you might break a sweat when you start configuring and coordinating the individual services. This learning experience is useful but also takes a fair amount of time.
The eBox SME server can help shorten your configuration marathon. SME stands for "small- to medium-sized enterprise" and describes the typical environment for the server. That said, eBox is a useful server product for more challenging home networks and for small business offices. The software, which has Ubuntu underpinnings, offers users a unified (web) interface – similar to YaST on openSUSE – that lets you manage the full set of services. The modular system then feeds your input to the corresponding configuration files behind the scenes.
Before you deploy eBox, it makes sense to know something about networks, such as why you need a DNS server and what a DHCP server does. The manual that comes with the software [1] is dozens of pages thick, so I can only give you a short overview of the server's versatility. The modules include a DNS server, a DHCP server, a print and file server, an http proxy, a mail server, an OpenVPN module, a groupware server, a firewall, and more.
The interface lets you manage certificates; control the firewall; and set up users, groups, and shares, as well as handle traffic balancing (distributing access to a specific resource to avoid overload) and traffic shaping (ensuring that competing uploads and downloads between servers and clients don't get in each other's way). The eBox portfolio is impressive in its own right, but the eBox developers' main claim to fame is the clever way in which they integrate all of these services.
The project is maintained primarily by Spanish developers. The software arose from a cooperation between DBS Servicios Informaticos and Warp Networks in 2004. eBox was designed as an easy-to-manage server and is now in the hands of eBox Technologies. eBox is GPLd, so the company relies on capital from investors, subsidies, and commercial support to earn a living. Version 1.0 of the software was released recently.
Why eBox?
The eBox user should be familiar with the details of how the eBox services work. That said, the software also targets less experienced users. In this case, some caution is advisable: If you configure eBox incorrectly, you can block your network. eBox helps experienced admins avoid manual parameterization of individual services.
eBox is accessible on the local network in its file and print server roles. If you use a server with two network cards, you can set the machine up as a gateway that gives you safe and quick Internet access. eBox can replace a router in this case, and an internal firewall keeps the server secure.
Out of the box, the server runs on Ubuntu "Hardy Heron" (version 8.04); however, the eBox package released with Ubuntu "Intrepid Ibex" (8.10) reportedly does not install properly. Packages are available for either distribution from the PPA for eBox Platform site [2]. A standalone distribution with an installer and a Live CD are available as well. The Live version lets you test eBox without risking your network setup while allowing you to gain initial experience with the interface.
Getting Started
To launch the Live version at boot time, type live. The password for logging in to the eBox web interface is ebox. The distribution gives you a plain IceWM desktop equipped with the Firefox browser, the Mutt email client and the text-based W3m and Links browsers. At the web interface, you can set up various services – the configuration settings are shown to the right in each window, with the services and the configurable areas on the left. To start, create a new password and click Change, followed by Save changes, and finally Save to make the change permanent – a somewhat convoluted approach.
Selecting Dashboard at the top left takes you to an overview with the details for your network interfaces, as well as for active and disabled services (Figure 1). At the bottom right below "DHCP leases," you can see the computers that are currently and have recently logged on to the server. Farther down, you see an overview of the active and inactive services (Figure 2). The widgets on the desktop change to reflect what you are doing with eBox.
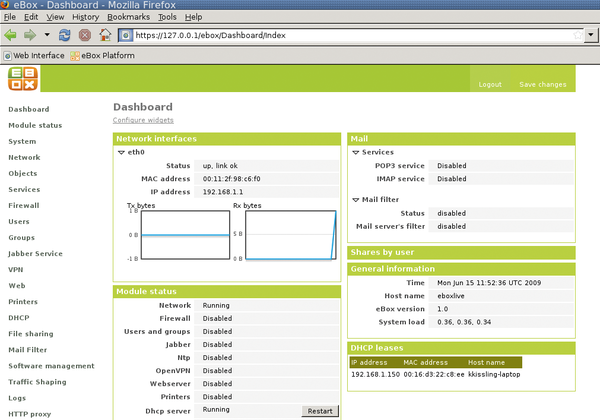 Figure 1: The eBox dashboard: It adapts to suit the user's requirements and provides a useful overview of current activities.
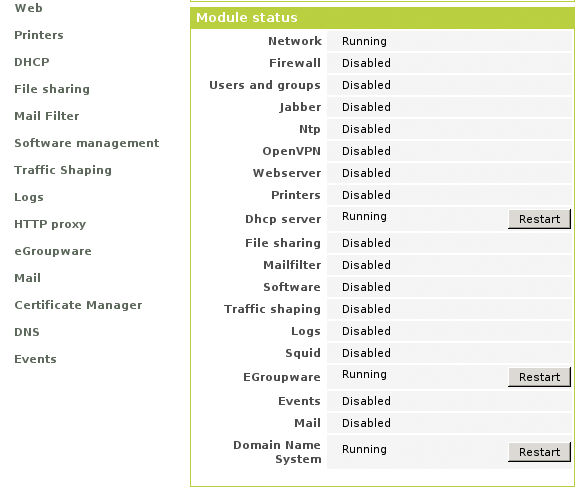 Figure 2: The dashboard also shows you which services are currently running.
The Module Status item in the list on the left lets you enable and disable modules. For example, if you do not explicitly launch a DHCP server as a service after configuring it, the server will refuse to work later on. Most modules are disabled by default to prevent potential attackers from invading your network while you are busy finishing your eBox configuration. Before you can start some modules, you need to launch dependent modules first; for example, the Squid HTTP Proxy requires the Network and Firewall modules. For traffic shaping and balancing, to control incoming and outgoing network traffic, you need to set up at least two gateways.
When you make a change, the box to the top right beside Save changes turns red. Clicking the box applies your changes. In some cases, the software will ask you whether you want to save the changes. In other cases – in line with Debian policy – you need to manually and individually confirm changes to critical configuration files.
Case Studies
A step-by-step tutorial is available from the eBox forum [3] to guide you through the initial setup scenario. The tutorial assumes that you will be setting up a server with two network adapters: One adapter links your network to your provider, and the other serves the local users and has a private IP address. This scenario also assumes that your network includes a standard router that uses DHCP to assign IP addresses.
The ability to configure eBox from another computer is interesting. To do so, you just need to plug the machine's Ethernet cable into your router and do the same for your eBox server. After you complete the installation, eBox will not boot to a graphical desktop – in contrast to the Live system – and this makes configuration on the server machine fairly tricky.
When you boot eBox, the internal network cards are assigned IP addresses, which you can discover with /sbin/ifconfig: In this example, I will be using 192.168.0.12. Armed with the addresses, you can then go to your client machine and use https (https://192.168.0.12) to connect with the server. When I tried http, I was told It works!, but I did not see the eBox login.
After logging in to the eBox interface and typing the ebox password, you need to configure the other network card that eBox is not currently using and assign a static IP address. eBox will use this address later to assign IP addresses on the local network. At each step, save the changes you make and then go to System | Date/Time to set up an NTP server that will retrieve the current time from the Internet. Then go to DNS and set up your nameserver and assign a domain name to your private network, such as ebox.net.
In the DHCP item, configure the DHCP server for the network interface with the static IP address. The important thing is to specify a range of IP addresses for the DHCP server to assign in Add a new range, such as the addresses between 192.168.1.100 and 192.168.1.150 (Figure 3). Now select eBox as your gateway, and the local DNS server you just set up as your primary nameserver – don't forget to visit the Module Status section to enable the DHCP and DNS servers after you have finished configuring them.
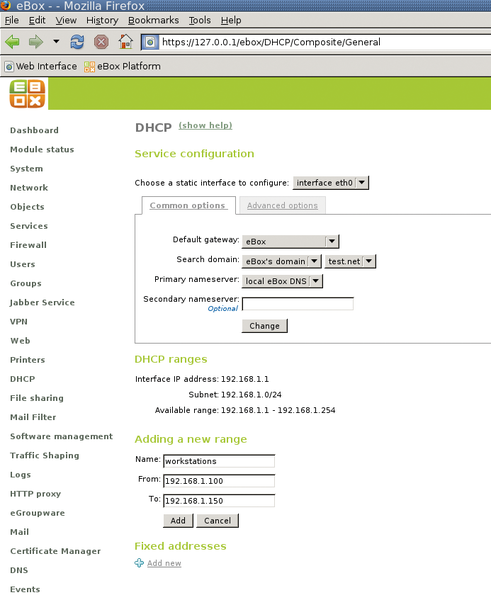 Figure 3: Setting up a DHCP server: Don't forget to specify a range of IP addresses for the server to assign.
The next step is to set up a user and a group, before preparing eBox for life as a file server. The feature for this is File sharing | General settings. Don't forget to set a Quota limit to keep your users from filling your hard disk up to the brim. Then in the File sharing | Share section, set up a share folder to allow users to access the eBox shares (Figure 4). eBox creates this directory in /home/samba/shares if you select Directory under eBox. In the List of samba shares table, click the icon in the Access Control column to, for example, assign user permissions for access to the share.
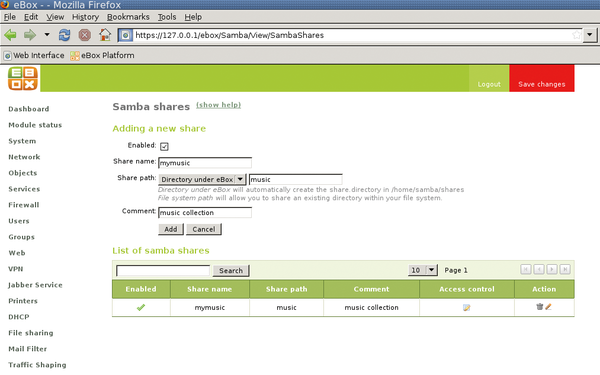 Figure 4: eBox lets you set up Samba shares with a couple of clicks, removing the need to edit the /etc/samba/smb.conf file manually.
Buy Linux Magazine
US / Canada
UK / Australia
Subscribe to our Linux Newsletters
Find Linux and Open Source Jobs
Subscribe to our ADMIN Newsletters
Support Our Work
Linux Magazine content is made possible with support from readers like you. Please consider contributing when you’ve found an article to be beneficial.

News
-
Linux Servers Targeted by Akira Ransomware
A group of bad actors who have already extorted $42 million have their sights set on the Linux platform.
-
TUXEDO Computers Unveils Linux Laptop Featuring AMD Ryzen CPU
This latest release is the first laptop to include the new CPU from Ryzen and Linux preinstalled.
-
XZ Gets the All-Clear
The back door xz vulnerability has been officially reverted for Fedora 40 and versions 38 and 39 were never affected.
-
Canonical Collaborates with Qualcomm on New Venture
This new joint effort is geared toward bringing Ubuntu and Ubuntu Core to Qualcomm-powered devices.
-
Kodi 21.0 Open-Source Entertainment Hub Released
After a year of development, the award-winning Kodi cross-platform, media center software is now available with many new additions and improvements.
-
Linux Usage Increases in Two Key Areas
If market share is your thing, you'll be happy to know that Linux is on the rise in two areas that, if they keep climbing, could have serious meaning for Linux's future.
-
Vulnerability Discovered in xz Libraries
An urgent alert for Fedora 40 has been posted and users should pay attention.
-
Canonical Bumps LTS Support to 12 years
If you're worried that your Ubuntu LTS release won't be supported long enough to last, Canonical has a surprise for you in the form of 12 years of security coverage.
-
Fedora 40 Beta Released Soon
With the official release of Fedora 40 coming in April, it's almost time to download the beta and see what's new.
-
New Pentesting Distribution to Compete with Kali Linux
SnoopGod is now available for your testing needs