
Efficient clipboard with CopyQ
Extended Memory
Productive work processes typically require extensive use of copy and paste. CopyQ expands your desktop's short-term memory, giving you quick access to previously copied content.
The clipboard is an extremely valuable tool for creating documents and writing computer code, as well as copying text, images, and files. But, what if you need to interrupt your work to continue it days later? Wouldn't it be nice to have access to material previously copied to the clipboard?
CopyQ [1] converts the standard clipboard into an archive of content from previous copy commands that you can access at any time. For this to happen, CopyQ provides a searchable and editable copy history that includes text, photos and drawings, and command lines, in addition to plain text copied within a console session.
CopyQ is written in the Qt programming language and docks in the system panel when launched; from there, you can access previously copied content with just a few clicks (Figure 1). To make the job even easier for experienced users, CopyQ supports various keyboard shortcuts that you can set via the program's settings.
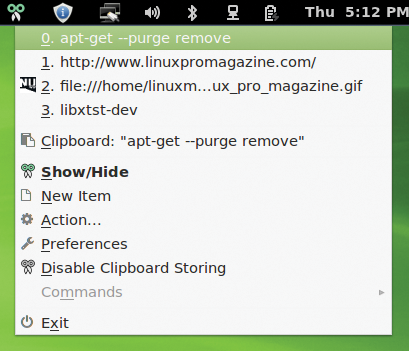 Figure 1: The system panel gives users quick access to recently copied content.
Installation
On Ubuntu 12.04 ("Precise"), 12.10 ("Quantal"), or 13.04 ("Raring"), CopyQ can be installed easily via a PPA using the commands:
$ sudo add-apt-repository ppa:samrog131/ppa
$ sudo apt-get update
$ sudo apt-get install copyq
A word of caution: The CopyQ repository added in the first step also contains a number of other packages, some of which have not yet achieved a stable state. Therefore, you should remove the repo again after setting up CopyQ for safety's sake. To do this, use the command:
$ sudo add-apt-repository -r ppa:samrog131/ppa
CopyQ itself was stable in all tests and ran without errors. After installation, launch CopyQ with the copyq command, or via the Ubuntu start menu.
Getting Started
After launching CopyQ, each copy action is logged and stored permanently in a history. By default, the application stores 200 entries. You can insert the four most recent entries with just one click on the CopyQ icon in the system panel. To do this, move the cursor to the location into which you want to paste – say, your word processor – then right-click the icon in the system panel and the entry.
To view the entire copy history, right-click the panel icon and choose Show/Hide in the context menu. A new window opens with the CopyQ Clipboard tab (Figure 2).
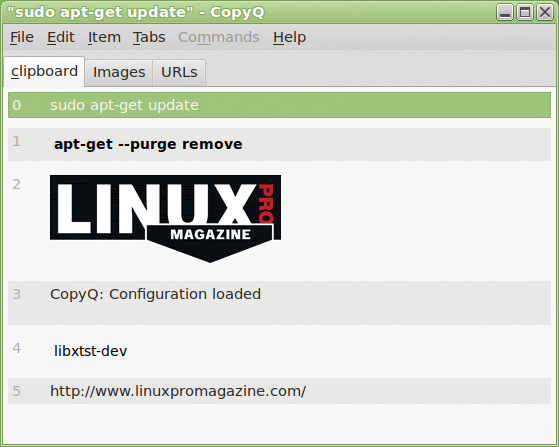 Figure 2: The CopyQ window displays the complete copy history and allows you to move entries back into the clipboard.
Right-clicking any of the entries in this overview offers additional functions, such as moving something to the clipboard to be pasted elsewhere. Additionally, you can display the entry format by selecting Show Content. For graphics, this view is especially helpful because it shows image format information. You can also discover the source of the copy or the application from which the entry was copied.
Working with Entries
Other useful functions are available via the context menu. For example, you can edit individual text messages and save your changes for pasting later.
To keep track of many items, you can organize your content in tabs. Although the handling is not what is commonly referred to as user friendly, it is still good enough to let you use the function effectively. To begin, you need to create a new tab by selecting Tabs | New tab and assigning an intuitive name. To move entries into this tab, you need to switch to the tab in the CopyQ window to enable it. Now, when you copy something, it ends up in this tab.
You can categorize your entries during the copying process, taking into account your current projects and interests. Unfortunately, CopyQ cannot move individual entries to other tabs. To do this, you need to set up a "command" in CopyQ.
On My Mark
Thanks to commands, you can specify what to do with special content in the clipboard when you execute a command that you have defined. For example, you can set up a command to determine which browser to use to open web links. You could also set up commands to move entries into other tabs or to generate QR codes from URLs.
To define commands, you need to open the program settings by right-clicking the panel icon and choosing Preferences. The necessary functions are in the Commands tab (Figure 3). To start the definition, press the small plus icon at the bottom left, then select one of the predefined commands, such as Open in Browser.
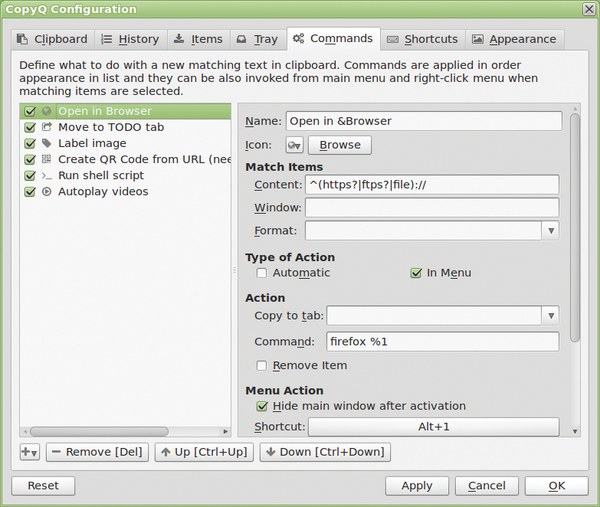 Figure 3: Commands let you define your own functions that allow you to, for example, open links in the clipboard in the browser of your choice.
This command is added to a list of commands in the left panel; in the right panel, you adjust the command properties. For the Open in Browser command, you can specify in the Content box which items in the command will be available later via the icon in the system panel. The default setting here is ^(https?|ftps?|file)://. To match HTTP content, add http? | to the items in the parentheses. The result should then look like this:
^(http?|https?|ftps?|file)://
The Command box under Action already contains an entry for launching in Firefox. To use Chromium to open links, you would simply enter chromium-browser %1.
Finally, you can assign a keyboard shortcut by clicking on the button beside Shortcut then pressing the keyboard shortcut you require (e.g., Alt+1). Finally, clicking Apply or OK confirms the changes. Now the command is available via the icon in the system panel after copying a link to the clipboard. For general program functions, you can define your own keyboard shortcuts in the Shortcuts tab in the same way.
For other commands, what you enter for Content and what you select in the Format list is important. The appropriate commands entered in the Command fields generally need to be constructed so that a %1 follows the start command; this is a placeholder for the content that is currently in the clipboard.
Buy this article as PDF
(incl. VAT)
Buy Linux Magazine
US / Canada
UK / Australia
Subscribe to our Linux Newsletters
Find Linux and Open Source Jobs
Subscribe to our ADMIN Newsletters
Support Our Work
Linux Magazine content is made possible with support from readers like you. Please consider contributing when you’ve found an article to be beneficial.

News
-
TUXEDO Computers Unveils Linux Laptop Featuring AMD Ryzen CPU
This latest release is the first laptop to include the new CPU from Ryzen and Linux preinstalled.
-
XZ Gets the All-Clear
The back door xz vulnerability has been officially reverted for Fedora 40 and versions 38 and 39 were never affected.
-
Canonical Collaborates with Qualcomm on New Venture
This new joint effort is geared toward bringing Ubuntu and Ubuntu Core to Qualcomm-powered devices.
-
Kodi 21.0 Open-Source Entertainment Hub Released
After a year of development, the award-winning Kodi cross-platform, media center software is now available with many new additions and improvements.
-
Linux Usage Increases in Two Key Areas
If market share is your thing, you'll be happy to know that Linux is on the rise in two areas that, if they keep climbing, could have serious meaning for Linux's future.
-
Vulnerability Discovered in xz Libraries
An urgent alert for Fedora 40 has been posted and users should pay attention.
-
Canonical Bumps LTS Support to 12 years
If you're worried that your Ubuntu LTS release won't be supported long enough to last, Canonical has a surprise for you in the form of 12 years of security coverage.
-
Fedora 40 Beta Released Soon
With the official release of Fedora 40 coming in April, it's almost time to download the beta and see what's new.
-
New Pentesting Distribution to Compete with Kali Linux
SnoopGod is now available for your testing needs
-
Juno Computers Launches Another Linux Laptop
If you're looking for a powerhouse laptop that runs Ubuntu, the Juno Computers Neptune 17 v6 should be on your radar.