
Sensor & Sensoribility
Reading Sensors
The next step is actually making the app do something; this is when things got hairy. Cordova relies heavily on plugins to extend functionality. There is a nicely stocked repository online [4], and searching for "sensors" coughed up some interesting results.
Besides, you can install plugins quite easily with:
docker run --rm -i -v /$PWD:/workspace -w /workspace --privileged beevelop/cordova cordova plugin add <plugin location>
But I found that some of the sensor plugins were surprisingly old and unmaintained. Others had emptied out repositories, or the plugin list links that led to 404 errors. And then there were those loudly labeled as obsolete.
It was very confusing. It made no sense that really no one was interested in maintaining plugins that accessed a mobile phone's sensors.
Unless there was no point, of course.
The clue came from one plugin that said the work had been obsolete ever since the World Wide Web Consortium (W3C, the organization that establishes what goes into HTML, CSS, and JavaScript) had decided to take on the standardization of how to interact with mobile-device sensors [5]. That's right: The reason there is no need for plugins is because reading sensors is now as part of the web as the <blink> and <marquee> tags.
This means two things:
1. You can now have web pages like, (Figure 7) [6] that integrate sensor data from the visitor's device into the content
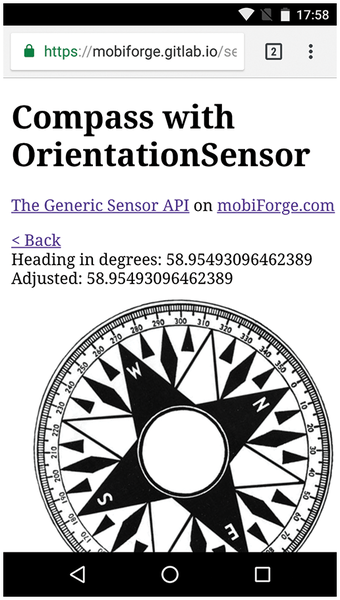 Figure 7: A web page with an integrated working compass. Warning: This will not work on devices without magnetometers.
2. You can integrate sensor data into your Cordova apps.
The good news is that initializing, starting, and reading from a sensor using JavaScript is mercifully simple. First, you create a sensor object by initializing the sensor you want to read from:
var <sensor_object> = new <Sensor_name>();
For example, to initialize the accelerometer, you would do:
var my_sensor = new Accelerometer();
The W3C spec lists 10 sensors you can pick from: Accelerometer, AmbientLightSensor, Magnetometer, Gyroscope, OrientationSensor, LinearAccelerationSensor, AbsoluteOrientationSensor, RelativeOrientationSensor, GeolocationSensor, and ProximitySensor. Note that not all sensors will work on all devices, and there are some that won't work on any device, since there are no web engines that have implemented them yet.
You can include as a parameter in the initialization the frequency with which you will be polling the sensor. To poll the accelerometer 60 times a second, you can do:
var my_sensor = new Accelerometer({frequency: 60});Next, you have to define a callback function for the sensor, that is, the function that will run every time there is new data from the sensor:
my_sensor.addEventListener( 'reading', <function>);
addEventListener() is a method that is a standard part of JavaScript. It listens for the events you specify. You could add a 'click' event to a listener for a button, or a 'change' event to a text box for when someone types something new in it. For a sensor, you use the special 'reading' event.
You can call the callback function by name, like in:
sensor.addEventListener( 'reading', listener);
[...]
function listener( event ) {
[...]
Or you can do like in Listing 3, line 12, and embed the function directly into the addEventListener() method.
Listing 3
index.js
01 var sensorSelect = document.getElementById("sensor");
02 var startButton = document.getElementById("start");
03 var dataText = document.getElementById("data");
04
05 startButton.onclick = function() {
06  if (startButton.innerHTML == "Start") {
07   startButton.innerHTML = "Stop";
08   try {
09    var sensor = new window[sensorSelect.value]();
10    dataText.innerHTML = sensorSelect.value;
11
12    sensor.addEventListener('reading', function(event) {
13     dataText.innerHTML= 'x: ' + event.target.x + ' y: ' + event.target.y + ' z: ' + event.target.z;
14    });
15    sensor.start();
16
17    } catch(error) {
18    dataText.innerHTML = 'Error creating sensor';
19   }
20  } else {
21   startButton.innerHTML = "Start";
22   dataText.innerHTML = "";
23  }
24 };
Finally, you start listening to your sensor with:
sensor.start();
There's not much more to it. Listing 3 shows how things would work when you put everything together for your app. Lines 1 to 3 map HTML elements (the select field, button, and text area) to JavaScript variables; then, on line 5, you listen for a click event on the button.
When a user clicks the button, you take the value from the selector (Accelerometer, Gyroscope, or LinearAccelerationSensor) and use it to initialize the sensor (line 9).
As you are only going to print the data out, the callback function (lines 12 to 14) is short. The callback function takes a parameter (event) that holds the data from the sensor.
The event's target retrieves the element that triggered the event, in this case, the sensor itself. The x, y, and z attributes are common to the three sensors in the list – which is why they are in the list, as other sensors have different properties. The point is you print out the sensor's x, y, and z values on line 13.
And that's it. All told, the HTML for the front end is just 30 lines long, including the head section that you haven't even touched. And the code is fewer than 25 lines of pretty straightforward, uncomplicated JavaScript.
Trial Run
To build the app and launch it on your phone, first make sure your phone is in developer mode by going to Settings | About phone and scrolling down until you see the Build number section. Tap on that several times until your phone says you are a developer.
Connect your phone to your computer using a USB cable and move back to Settings. You will see there is a new submenu called Developer options. Tap on that and scroll down until you see the USB debugging option. Activate it.
Now check that Cordova can talk to your device by running the following instruction:
docker run --rm -i --privileged -v /dev/bus/usb:/dev/bus/usb beevelop/cordova adb devices
Cordova is using the Android Debug Bridge (adb) to try and locate your phone. The devices option shows a list of connected devices.
The first time around, your device may show up as unauthorized. This is normal. Go into Settings | Developer options again and make sure you have enabled USB debugging. While you are there, run
docker run --rm -i --privileged -v /dev/bus/usb:/dev/bus/usb beevelop/cordova adb devices
again, and a dialog will pop up on your phone asking you to authorize your computer. Give your computer permission, and try listing your devices again. Your phone should now appear as available.
Now you can push your app to your phone with:
docker run --rm -i -v /$PWD:/workspace-w /workspace --privileged -v /dev/bus/usb/:/dev/bus/usb/ beevelop/cordova cordova run android
Cordova will automatically install and run the app. The final result will look like Figure 8.
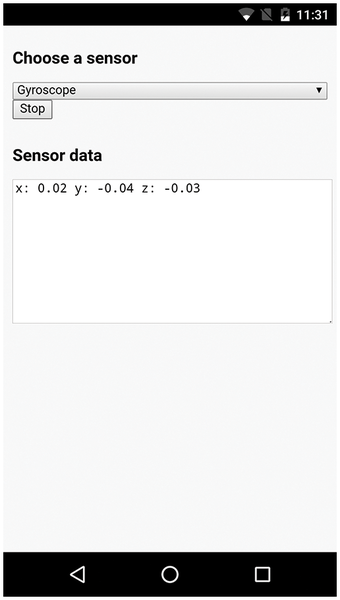 Figure 8: Your first sensor-aware Cordova app.
Conclusion
The universal sensor API combined with Cordova makes building sophisticated, sensor-enabled mobile apps ridiculously easy. If you know HTML and some basic JavaScript, you have all you need to get started.
In my next installment, you will learn how to extend your Cordova app, so it can transfer data to you computer. You will also learn how to integrate the data into a desktop application, so you can use your phone as a controller.
Infos
- "Tutorial – GPSD" by Paul Brown, Linux Magazine, issue 210, May 2018, p. 90: http://www.linux-magazine.com/Issues/2018/210/Tutorial-gpsd/
- SSJ Creator: https://play.google.com/store/apps/details?id=hcm.ssj.creator
- "Tutorial – Docker 101" by Paul Brown, Linux Magazine, issue 215, October 2018, p. 90: http://www.linux-magazine.com/Issues/2018/215/Tutorials-Docker
- Cordova's plugin repository: https://cordova.apache.org/plugins/
- The W3C's Generic Sensor API: https://www.w3.org/TR/generic-sensor/
- A web page with a compass: https://mobiforge.gitlab.io/sensors/compass.html
« Previous 1 2
Buy this article as PDF
(incl. VAT)
Buy Linux Magazine
US / Canada
UK / Australia
Subscribe to our Linux Newsletters
Find Linux and Open Source Jobs
Subscribe to our ADMIN Newsletters
Support Our Work
Linux Magazine content is made possible with support from readers like you. Please consider contributing when you’ve found an article to be beneficial.

News
-
TUXEDO Computers Unveils Linux Laptop Featuring AMD Ryzen CPU
This latest release is the first laptop to include the new CPU from Ryzen and Linux preinstalled.
-
XZ Gets the All-Clear
The back door xz vulnerability has been officially reverted for Fedora 40 and versions 38 and 39 were never affected.
-
Canonical Collaborates with Qualcomm on New Venture
This new joint effort is geared toward bringing Ubuntu and Ubuntu Core to Qualcomm-powered devices.
-
Kodi 21.0 Open-Source Entertainment Hub Released
After a year of development, the award-winning Kodi cross-platform, media center software is now available with many new additions and improvements.
-
Linux Usage Increases in Two Key Areas
If market share is your thing, you'll be happy to know that Linux is on the rise in two areas that, if they keep climbing, could have serious meaning for Linux's future.
-
Vulnerability Discovered in xz Libraries
An urgent alert for Fedora 40 has been posted and users should pay attention.
-
Canonical Bumps LTS Support to 12 years
If you're worried that your Ubuntu LTS release won't be supported long enough to last, Canonical has a surprise for you in the form of 12 years of security coverage.
-
Fedora 40 Beta Released Soon
With the official release of Fedora 40 coming in April, it's almost time to download the beta and see what's new.
-
New Pentesting Distribution to Compete with Kali Linux
SnoopGod is now available for your testing needs
-
Juno Computers Launches Another Linux Laptop
If you're looking for a powerhouse laptop that runs Ubuntu, the Juno Computers Neptune 17 v6 should be on your radar.