Netbook-friendly Linux distributions
Little Buddies

© NatUlrich, Fotolia
Would you like to change the Linux distro that came with your netbook or convert your Windows-based netbook into a Linux machine? We take a look at some netbook-friendly Linux alternatives.
When ASUSTek started shipping Eee PC 701, who would have thought that the concept of a little laptop with a puny processor, paltry storage, and a minuscule screen would be such a phenomenal success? Besides making computing on the move truly affordable, the rise of the netbook also gave an important boost to Linux as a viable desktop alternative and spurred a few Linux distributions designed specifically for the new platform. In this article, I'll look at how to replace the Linux distro that comes with your netbook or convert your Windows-based netbook into a Linux machine.
None of the currently available netbooks include an optical drive, so first you must figure out how to install a Linux distro. If you have an external CD/DVD burner, you can download an ISO image of the distro you like, burn it onto a CD, and install the system on your netbook. Otherwise, you can use the UNetbootin utility [1] to create a bootable USB stick with a Live Linux distro on it. The use of UNetbootin is pretty straightforward: Download the latest release of the utility and an ISO image of the Linux distro you want to install, plug a USB stick into your machine, launch UNetbootin by double-clicking on the downloaded unetbootin-linux-xxx file (you might need to make it executable with the chmod +x command), choose the Diskimage option, and select the downloaded ISO image. Then select the USB stick from the Drive drop-down list, and press OK to create a ready-to-go bootable USB stick.
To create a USB stick containing a Ubuntu-based netbook distro, such as Eeebuntu or Easy Peasy, you might want to use a utility that ships with the latest version of Ubuntu. It allows you not only to create a bootable USB disk from an ISO image, but also a persistent home for storing all your settings and changes you make to the live USB system. This can come in handy if you want to try an Ubuntu-based Linux distro without installing it on your netbook. To create a bootable USB stick with the utility, choose Preferences | Make USB Startup Disk. Select the ISO image of the distro and the target USB disk. If you want to create a persistent home, select the Store in reserved extra space option, and press the Make Startup Disk.
Eeebuntu
Eeebuntu [2] is based on the latest version of Ubuntu 8.10 Intrepid Ibex and is designed for Eee PCs. Eeebuntu is available in three editions: Standard, Base, and Netbook. The Standard edition offers a conventional desktop and comes with all the applications and utilities you need to be productive right out of the box. The Base edition is similar to Eeebuntu Standard, but it comes with no additional software, except Firefox, which makes it a perfect choice if you need a lean system that you can customize to your specific needs. The Netbook edition comes with the same assortment of software as Eeebuntu Standard, but it's based on the Ubuntu Netbook Remix interface designed for netbooks.
To put Eeebuntu through its paces, I installed the Standard edition on an Eee PC 701SD. Eeebuntu uses the standard Ubiquity installer, so the entire installation process is pretty painless. The system recognized all hardware components, including the wireless and wired interfaces, the microphone, the webcam, and the SD card slot. The function (Fn) keys that control sound volume and display brightness worked out of the box. This wasn't the case, however, with the keys that toggle the wireless connection and allow you to switch between the internal and external displays.
Eeebuntu makes a very good first impression. Everything from the boot screen and the login window to the default desktop theme has a consistent and visually appealing design. However, there is a tiny fly in the ointment: the Alt drag trick that allows you to move windows around the screen doesn't always work, and because not all windows in Eeebuntu fit the screen, this can be a bit of an issue.
When it comes to eye candy, Eeebuntu doesn't disappoint. The Standard edition comes with the Compiz 3D desktop engine (Figure 1) and a slew of visual effects enabled by default. The CompizConfig Settings Manager, which is accessible via the System | Preferences menu item, allows you to enable, disable, and tweak the available effects. Avant Window Navigator (AWN) is another nifty tool installed by default. It adds a Mac OS X-like dock that lets you launch applications with a single click. Besides that, you can add all kinds of applets to AWN, so you can use it for a wide range of tasks – from controlling your media player and checking your email, to managing your to-do list and keeping an eye on RSS feeds.
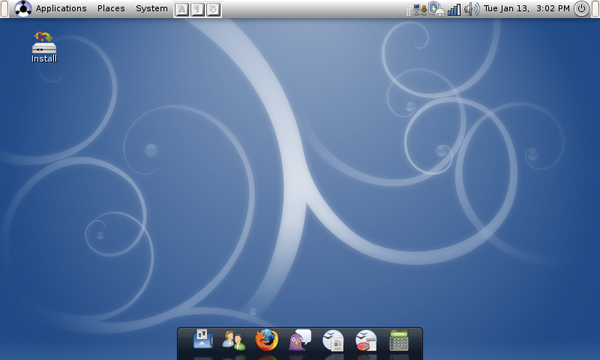 Figure 1: Eeebuntu sports a sleek interface and 3D visual effects.
Eeebuntu also features the custom Eeebuntu Config tool (Figure 2), which allows you to enable additional features and tweak the system settings. To launch Eeebuntu Config, choose it from the Application | System menu. The utility is easy to use: Select the options you want and press the Execute button. The only problem here is that some of the options are not very descriptive, so figuring out what each option actually does can be rather tricky. To view the script attached to the specific option, switch to the editing mode with the Edit button, but this solution works only for experienced users familiar with shell scripting.
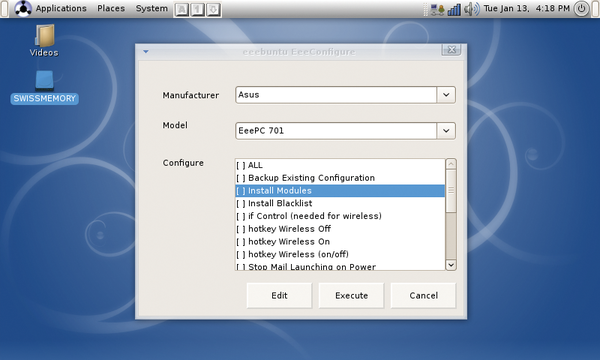 Figure 2: The Eeebuntu Config tool lets you tweak the installed system.
The Standard edition sports a reasonable selection of applications, including the usual suspects, such as the Pidgin IM client, Thunderbird email application, and Firefox browser. The latter comes with Adobe Flash Player, so you can watch YouTube and visit Flash-enabled Web sites right away. Among the preinstalled applications, you'll also find the F-Spot photo manager which you can use to organize and tweak your photos. The excellent Banshee player can help you manage your music collection, whereas the VLC media player takes care of video files in virtually any format. iPod owners have two useful utilities: gtkpod for managing songs and playlists and GPixPod for organizing photos. The Eeebuntu developers chose to stick to OpenOffice.org 2.4, so if you want to install the latest version of the productivity suite, you have to do this manually. Unlike Ubuntu, however, the OpenOffice.org installation on Eeebuntu includes the Base database application. However, to make OpenOffice.org fully functional you still have to install the Sun Java Runtime Environment, which is not installed by default. The Eeebuntu software bundle also includes Conduit, a must-have synchronization utility that can sync data between different sources and Web-based services. For example, you can synchronize photos stored on your netbook with your Flickr account, or you can upload documents to your Google Docs account. Better yet, Conduit allows you to create synchronization rules graphically by choosing the desired sources and services and specifying connections between them.
Easy Peasy
Easy Peasy [3] started its life under the name Ubuntu Eee, and the first release of the distro was designed exclusively for Eee PCs. Later, the distro was renamed to Easy Peasy and changed its mission to providing support for other netbook models. Besides Eee PCs, the current release 1.0 of Easy Peasy supports Acer Aspire One. Similar to Eeebuntu, Easy Peasy is built upon Ubuntu 8.10 and the Array kernel [4], but unlike Eeebuntu, Easy Peasy has only one version based on the Ubuntu Netbook Remix interface (Figure 3). To test Easy Peasy, I installed it on an Aspire One A150 with 1GB of RAM and a 160GB hard disk. Although Easy Peasy is based on the Array kernel designed for Eee PC, pretty much all Aspire One hardware worked out of the box, including the wireless and wired cards, the webcam, the microphone, and the sound card. The SD card slots turned out to be more problematic. The left slot designed to use SD cards as expanded storage didn't work at all, whereas the right slot only worked when an SD card was inserted before the boot. Things that didn't work include the wireless switch and the network activity LED.
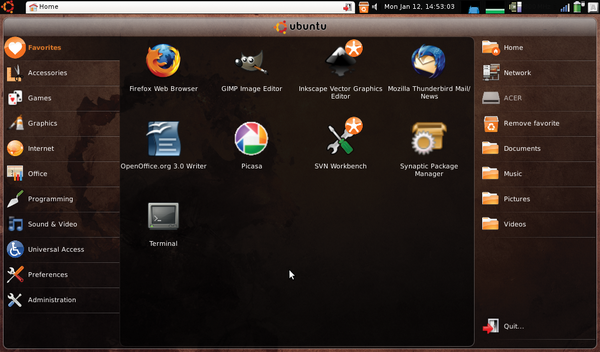 Figure 3: Easy Peasy uses the Ubuntu Netbook Remix interface.
Easy Peasy's appearance is somewhat bland compared with Eeebuntu. Although the boot screen is a tad garish, the default desktop wallpaper is downright ugly. But these are, of course, minor niggles. On boot, you are greeted with the Ubuntu Netbook Remix (UNR) interface, which is radically different from the conventional desktop. The core of UNR is the Netbook Launcher interface, which vaguely resembles Eee PC's Easy Mode. The Netbook Launcher replaces the desktop with a panel that provides easy access to the installed applications and system functions. The panel itself is divided into three panes. The pane to the left contains tabs that provide quick access to specific application groups (i.e., Internet, Graphics, Office, etc.) and system settings (Preferences and Administration). The pane in the middle displays applications in the currently selected tab. Finally, the pane to the right gives you access to the available storage devices and often-used folders such as Home, Documents, Pictures, etc. The windows switcher in UNR is also different from the conventional one. An active window in UNR appears as a tab in the top bar. When not in focus, the window's tab turns into an icon. This clever approach allows you to manage multiple windows easily on a small screen.
In addition to the essential applications, such as Mozilla Firefox, Evolution, and Pidgin, Easy Peasy's software bundle sports a few other useful tools. Skype users will appreciate the latest version of the application installed by default. The photo management duties in Easy Peasy are handled by Google Picasa, and the Songbird application can help you to manage and listen to your music collection. Easy Peasy ships with version 3.0 of OpenOffice.org; the bad new is, though, that it doesn't include the Base application. Worse, the repository contains only an older version of Base. So if you need this application for your work, you'd be better off removing OpenOffice.org from Easy Peasy and installing the full version of the productivity suite manually. While you're at it, you might want to install the Sun Java Runtime Environment, too.
Fluxflux-eee
Fluxflux-eee [5] might not enjoy the same popularity as Eeebuntu and Easy Peasy, but this little distro has a lot going for it. For starters, it's based on PCLinuxOS, an excellent desktop Linux distribution that rivals Ubuntu in ease of use and hardware support (Figure 4). Instead of Gnome or Ubuntu Netbook Remix, Fluxflux-eee's users can choose between Openbox or Fluxflux lightweight graphical desktop environments. Being a one-man project (the bulk of the work is done by Fluxflux-eee's sole developer Thomas Schönhütl), the distro supports only a few Eee PC models, including 70x, 900/A, 901, and 1000H. Besides that, the Fluxflux-wind edition of the distro supports the MSI Wind and Medion Akoya netbooks.
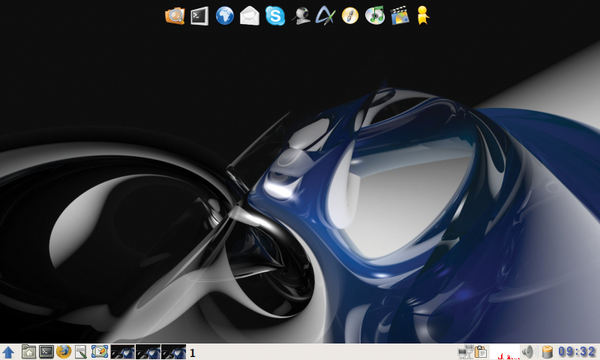 Figure 4: Fluxflux-eee is based on PCLinuxOS and the Openbox graphical desktop environment.
Fluxflux-eee's hardware support is exemplary: Not only did it detect all hardware components on Eee PC 701 4G, it also discovered and properly configured a USB Bluetooth dongle, too. Another pleasant surprise was full support for the Fn keys. The Wireless On/Off, Brightness, Display, Sound, and Mute Fn keys were functional right out of the box. Better yet, Fluxflux-eee popped up an on-screen display when a specific Fn key was in use. Fluxflux-eee couldn't detect the wireless card on the Eee PC 701SD because it uses a different wireless chipset than the original Eee PC 701. But to be fair, the 701 model is not on the list of supported Eee PC models.
Thanks to the lightweight graphical environment, Fluxflux-eee is extremely fast. The distro uses Thunar and Rox as its default file managers, which also adds to the overall responsiveness of the system. Fluxflux-eee inherits a few nifty tools from PCLinuxOS, including the excellent PCLinuxOS Control Center, which provides a one-stop solution for all your configuration needs. With it, you can configure wired and wireless connections, add and remove fonts, manage users, configure sharing options, and much more.
The Synaptic package manager is another clever utility borrowed from PCLinuxOS. It provides a graphical interface for the apt-rpm tool for managing and installing software packages. Although Fluxflux-eee's default software bundle features Mozilla Firefox, Thunderbird, Skype, and Pidgin, the distro favors lightweight alternatives such as AbiWord instead of OpenOffice.org, the Audacious player instead of Banshee or Amarok, and mtPaint instead of GIMP. The distro also comes with a few custom scripts that allow you to perform a variety of tasks, from taking a screenshot and transferring files to your mobile phone via Bluetooth to controlling the netbook's fan manually and configuring a 3G connection. In addition to the standard taskbar, Fluxflux-eee provides quick access to the installed application via the Wbar launch bar.
Finally, Fluxflux-eee comes with a custom utility called fluxDesk that replaces the desktop with a simple front end similar to Eee PC's Easy Mode (Figure 5).
 Figure 5: Fluxflux-eee offers its own simplified interface called fluxDesk.
DIY Netbook Distro
If none of the existing netbook-friendly distros tickle your fancy, why not take a stock Linux distribution and tweak it to work on your netbook? It's not as difficult as you might think, especially if you want to install an Ubuntu-based distribution on an Eee PC. This only requires you to replace the generic kernel with the Array kernel to enable support for Eee PC hardware and make a couple of tweaks to the system itself.
As an example, I'll look at how to install Xubuntu (an Ubuntu derivative that uses the Xfce graphical desktop environment) on an Eee PC 701. The first order of business is obviously to install the latest Xubuntu 8.10 on your netbook. During the installation, you have to decide whether you want to use a swap partition or not. Eee PC 701 uses a solid-state disk (SSD) that supports a limited number of writes, and adding a swap partition can have a significant effect on the disk's life. On the other hand, without a swap partition, your system will be less functional (e.g., the system won't support suspend and hibernate). A compromise is to create a swap partition and then tweak the system to reduce its swappiness (yes, that's an official term). It's also a good idea to choose the ext2 file system for the root partition. Unlike the more popular ext3 file system, ext2 doesn't use journaling, so it wears less on the SSD.
Once the system is installed, you have to install the Array kernel. Use the wired interface to connect your netbook to the Internet, launch the terminal, and run the following commands:
wget http://www.array.org/ubuntu/array-intrepid.list
sudo mv -v array-intrepid.list /etc/apt/sources.list.d/
wget http://www.array.org/ubuntu/array-apt-key.asc
sudo apt-key add array-apt-key.asc
sudo apt-get update
sudo apt-get install linux-eeepc
Reboot your netbook, and all its hardware should now work.
Next, you have to reduce swappiness to prolong the SSD's life. To do this, launch the terminal, run the sudo mousepad /etc/sysctl.conf command to open the sysctl.conf file for editing, and add the following line to the end of the file:
vm.swappiness=0
Now save the file, and you are done. To reduce the number of writes even further, you might want to force the system to write temporary files and logfiles into RAM instead of the SSD. To do this, run the sudo mousepad /etc/fstab command in the terminal and add the lines in Listing 1 to the fstab file.
Listing 1
Write Files into RAM
Your netbook system is now ready to go, but you can make it even more netbook friendly by installing the Ubuntu Netbook Remix interface. Launch the Synaptic package manager and choose Settings | Repository, switch to the Third-Party Software tab, and press the Add button. In the APT line field, enter the repository address:
deb http://ppa.launchpad.net/netbook-remix-team/ubuntu intrepid main
Next, press the Add Source button and close Synaptic. In the terminal, run the following command to install the required components:
sudo apt-get update && sudo apt-get install go-home-applet human-netbook-theme maximus netbook-launcher window-picker-applet
Finally, choose System | Preferences | Sessions and add Maximus (the maximus command) and Netbook-launcher (the netbook-launcher command) to the Startup Programs section, so they start automatically on boot. Reboot your netbook, and you should see Ubuntu Netbook Remix in all its beauty.
Puppy Linux
Ubuntu is not the only Linux distribution that can be tweaked to run on your netbook. In fact, if you want to turn your netbook into a lean and fast mobile companion, you ought to take a look at Puppy Linux. This tiny Linux distro is blazingly fast and you can make it work on Eee PC and Aspire One with minimum tweaking. All you need to do is to install a few .pet packages to enable support for your netbook's wireless card, sound, and other components (Figure 6). All the required packages can be found in the Extra Drivers for Puppy 4.1 thread [6] in the Puppy Linux forum. If you don't feel like doing all the manual work, you can download ready-to-use Puppy derivatives for Aspire One [7] and Eee PC [8], although the latter is based on the older Puppy Linux 3.0.1 and it doesn't support newer Eee PC models. What makes Puppy Linux a perfect distro for your netbook is its ability to run from an SD card. This allows you to bypass the internal SSD altogether, thus prolonging its life. Better yet, when the disk becomes non-functional, you can still continue using your netbook by running Puppy Linux from the SD card.
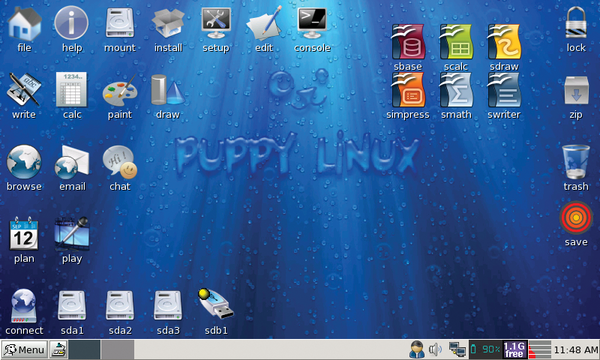 Figure 6: Making Puppy Linux run on your Eee PC or Aspire One is a matter of installing the necessary drivers.
Of course, the enterprising Linux community managed to make most mainstream Linux distributions work on both Eee PC and Aspire One, including Debian [9] [10], openSUSE [11] [12], and Arch Linux [13] [14].
Final Word
As you can see, plenty of options are available to you if you want to replace the default system on your netbook. No matter what netbook you are using, you can choose from a few solid netbook-friendly Linux distributions. To find the one that fits your needs best, you might want to try a few of them, and you can even customize a stock Linux distro to run on your netbook.
Infos
- UNetbootin: http://unetbootin.sourceforge.net
- Eeebuntu: http://www.eeebuntu.org
- Easy Peasy: http://www.geteasypeasy.com
- Array kernel: http://www.array.org/ubuntu/
- Fluxflux-eee: http://fluxflux.net/fluxflux-eee/index-en.html
- Puppy Linux drivers: http://www.murga-linux.com/puppy/viewtopic.php?t=34159
- Puppy Linux for Acer Aspire One: http://www.murga-linux.com/puppy/viewtopic.php?t=35407
- Pupeee: http://murga-linux.com/puppy/viewtopic.php?t=25896
- Debian on Aspire One: http://wiki.debian.org/DebianAcerOne
- Debian on Eee PC: http://wiki.debian.org/DebianEeePC
- openSUSE on Aspire One: http://en.opensuse.org/OpenSUSE_on_the_Aspire_One
- openSUSE on Eee PC: http://en.opensuse.org/OpenSUSE_on_the_EeePC
- Arch Linux on Aspire One: http://wiki.archlinux.org/index.php/Acer_Aspire_One
- Arch Linux on Eee PC: http://wiki.archlinux.org/index.php/Installing_Arch_Linux_on_the_Asus_EEE_PC