Turn your desktop computer into a high-performance cluster with PelicanHPC
Clutter to Cluster

© Andrea Danti, Fotolia
Crunch big numbers with your very own high-performance computing cluster.
If your users are clamoring for the power of a data center but your penurious employer tells you to make do with the hardware you already own, don't give up hope. With some some time, a little effort, and a few open source tools, you can transform your mild-mannered desktop systems into a number-crunching super computer. For the impatient, the PelicanHPC Live CD will cobble off-the-shelf hardware into a high-performance cluster in no time.
The PelicanHPC project is the natural evolution of ParallelKnoppix, which was a remastered Knoppix with packages for clustering. Michael Creel developed PelicanHPC for his own research work. Creel was interested in learning about clustering, and because adding packages was so easy, he added PVM, cluster tools like ganglia monitor, applications like GROMACS, and so forth. He also included some simple examples of parallel computing in Fortran, C, Python, and Octave to provide some basic working examples for beginners.
However, the process of maintaining the distribution was pretty time consuming, especially when it came to updating packages such as X and KDE. That's when Creel discovered Debian Live, spent time wrapping his head around the live-helper package, and created a more systematic way to make a Live distro for clustering. So in essence, PelicanHPC is a single script that fetches required packages off a Debian repository, adds some configuration scripts and example software, and outputs a bootable ISO.
Boot PelicanHPC
Later in the article, I'll use the script to create a custom version. For now, I'll use the stock PelicanHPC release (v1.8) from the website [1] to put those multiple cores to work. Both 32-bit and 64-bit versions are available, so grab the one that matches your hardware.
The developer claims that with PelicanHPC you can get a cluster up and running in five minutes. However, this is a complete exaggeration – you can do it in under three.
First, make sure you get all the ingredients right: You need a computer to act as a front-end node, and others that'll act as slave computing nodes. The front-end and the slave nodes connect via the network, so they need to be part of a local LAN. Although you can connect them via wireless, depending on the amount of data being exchanged, you could run into network bottlenecks. Also, make sure the router between the front end and the slaves isn't running a DHCP server because the front end doles out IP addresses to the slaves.
Although you don't really need a monitor or keyboard or mouse on the slave nodes, you need these on the front end. If you have a dual core with enough memory, it wouldn't be a bad idea to run the front end on a virtual machine and the slave on physical machines. Primarily, PelicanHPC runs on memory, so make sure you have plenty. If you're doing serious work on the cluster, you can make it save your work on the hard disk, in which case, make sure you have a hard disk attached. In fact, to test PelicanHPC, you can run it completely on virtual hardware with virtual network connections, provided you have the juice on the physical host to power so much virtual hardware.
With the hardware in place, pop in the Live CD in the front-end node and let it boot. If you want to choose a custom language or turn off ACPI or tweak some other boot parameters, you can explore the boot options from the F1 key; press Enter to boot with the default options.
During bootup, PelicanHPC prompts you thrice. First it wants you to select a permanent storage device that'll house the /home directory. The default option ram1 stores the data on the physical RAM. If you want something more permanent, you just need to enter the device, such as hda1 or sda5. The device can be a hard disk partition or a USB disk – just make sure it's formatted as ext2 or ext3. If you replace the default option ram1 with a device, PelicanHPC will create a user directory at the root of that device.
Next, PelicanHPC asks whether it should copy all the configuration scripts and the examples to the home directory on the specified device. If this is the first time you are running PelicanHPC, you'll want to choose Yes. If you've selected a permanent storage location, such as a partition of the disk, on subsequent boots, you should choose No here. Of course if you are running PelicanHPC from RAM, you'll always have to choose Yes.
Finally, you're prompted to change the default password. This password will be for the user user on the front-end nodes, as well as on the slave nodes. PelicanHPC is designed for a single user, and the password is in cleartext.
When it has this info, PelicanHPC will boot the front-end node and drop off into the Xfce desktop environment.
Set Up the Cluster
Now that the front-end node is up and running, it's time to set it up for clustering. PelicanHPC has a set of scripts for this purpose. Either call the scripts manually or use the master pelican_setup script, which calls all the other scripts that start the various servers and connects with the slave nodes.
To start setting up the cluster, open a terminal window and type:
sh pelican_hpc
If you have multiple network interfaces on the machine, you'll be asked to select the one that is connected to the cluster. Next, you're prompted to allow the scripts to start the DHCP server, followed by confirmation to start the services that'll allow the slave nodes to join the cluster. At first, the constant confirmations seem irritating, but they are necessary to prevent you from throwing the network into a tizzy with conflicting DHCP services or from accidentally interrupting on-going computations.
Once it has your permission to start the cluster, the script asks you turn on the slave nodes.
Slave nodes are booted over the network, so make sure the Network boot option is prioritized over other forms of booting in the BIOS. When it sees the front-end node, the slave displays the PelicanHPC splash screen and lets you enter any boot parameters (language, etc.), just as it did on the front-end node earlier.
Instead of booting into Xfce, when it's done booting, the slave node displays a notice that it's part of a cluster and shouldn't be turned off (Figure 1). Of course, if your slave nodes don't have a monitor, just make sure the boot parameters in the BIOS are in the correct order and turn it on.
 Figure 1: If your slave node isn't headless, this is what it'll say.
When the node is up and running, head back to the front end and press the No button, which rescans the cluster and updates the number of connected nodes (Figure 2). When the number of connected nodes matches the number of slaves you turned on, press Yes. PelicanHPC displays a confirmation message and points you to the script that's used to reconfigure the cluster when you decide to add or remove a node (Figure 3).
To resize the cluster, run the following script:
sh pelican_restarthpc
That's it. Your cluster is up and running, waiting for your instructions.
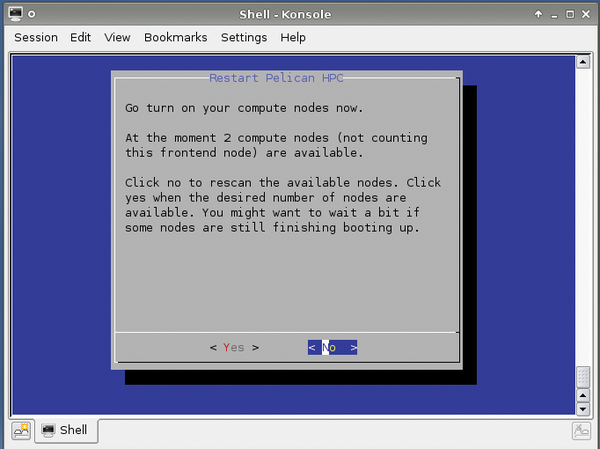 Figure 2: Two nodes up and running; continue scanning for more.
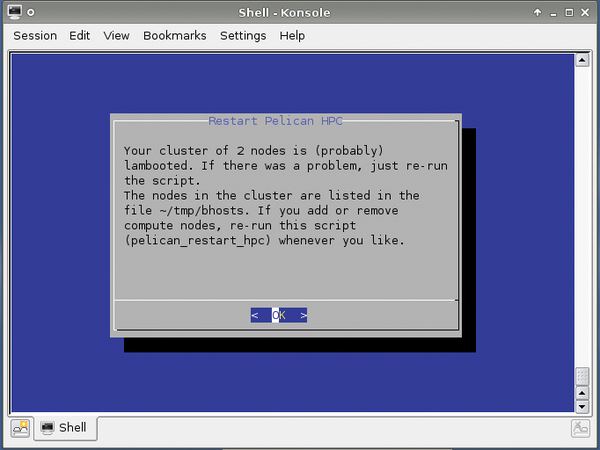 Figure 3: Two nodes are up and running besides the front end.
Crunchy Bar
The developer, Creel, is a professor of economics at the Autonomous University of Barcelona in Catalonia, Spain. He works in econometrics, which involves a lot of number crunching. Therefore, you'll find some text and example GNU Octave code related to Creel's research and teaching. If you're interested in econometrics, the econometrics.pdf file under the /home/user/Econometrics directory is a good starting point. Also check out the ParallelEconometrics.pdf file under /home/user/Econometrics/ParallelEconometrics. This presentation is a nice introduction to parallel computing and econometrics.
For the uninitiated, GNU Octave [2] is "a high-level computational language for numerical computations." It is the free software alternative to the proprietary MATLAB program, both of which are used for hardcore arithmetic.
Some sample code is in the /home/user/Econometrics/Examples/ directory for performing tests such as kernel density [3] and maximum likelihood estimations, as well as for running the Monte Carlo simulations of how a new econometric estimator performs.
Run Tests
To run the tests, open a terminal and start GNU Octave by typing octave on the command line, which brings you to the Octave interface.
Here you can run various examples of sample code by typing in a name. For example, the kernel estimations are performed by typing kernel_example.
Similarly, pea_example shows the parallel implementation of the parameterized expectation algorithm, and mc_example2, shown in Figure 4, shows the result of the Monte Carlo test.
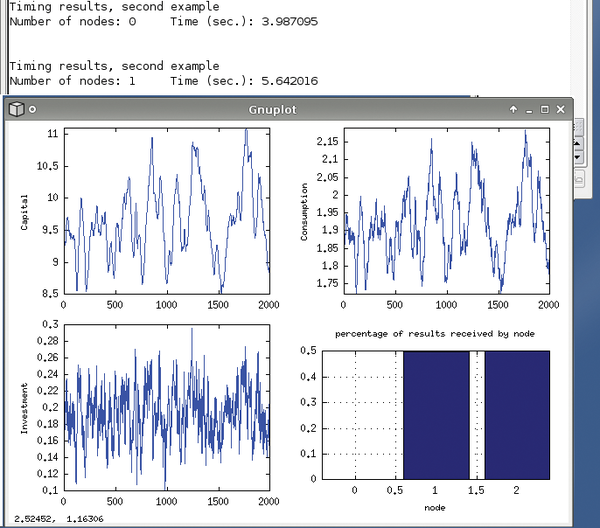 Figure 4: Gnuplot plots the results of a Monte Carlo test example.
Creel also suggests that PelicanHPC can be used for molecular dynamics with the open source software, GROMACS (GROningen MAchine for Chemical Simulations). The distributed project for studying protein folding, Folding@home, also uses GROMACS, and Creel believes that one could also replicate this setup on a cluster created by PelicanHPC.
Creel also suggests that users solely interested in learning about high-performance computing should look to ParallelKnoppix, the last version of which is still available for download [4].
Parallel Programming with PelicanHPC
One of the best uses for PelicanHPC is for compiling and running parallel programs. If this is all you want to use PelicanHPC for, you don't really need the slave nodes because the tools can compile your programs on the front-end node itself.
PelicanHPC includes several tools for writing and processing parallel code. OpenMPI compiles programs in C, C++, and Fortran. SciPy and NumPy [5] are Python-based apps for scientific computing. PelicanHPC also has the MPI toolbox (MPITB) for Octave, which lets you call MPI library routines from within Octave.
Passing the Buck
If you're new to parallel programming, you might not be aware of MPI (Message-Passing Interface), which is key to parallel computing. It is a software system that allows you to write message-passing parallel programs that run on a cluster. MPI isn't a programming language, but a library that can pass messages between multiple processes. The process can be either on a local machine or running across the various nodes on the cluster.
Popular languages for writing MPI programs are C, C++ and Fortran. MPICH was the first implementation of the MPI 1.x specification. LAM/MPI is another implementation that also covers significant bits of the MPI 2.x spec. LAM/MPI can pass messages via TCP/IP, shared memory, or Infiniband. The most popular implementation of MPI is OpenMPI, which is developed and maintained by a consortium and combines the best of various projects, such as LAM/MPI. Many of the Top 500 supercomputers use it, including IBM Roadrunner, which is currently the fastest.
MPI
PelicanHPC includes two MPI implementations: LAM/MPI and OpenMPI. When writing parallel programs in C or C++, make sure you include the mpi.h header file (#include <mpi.h>). To compile the programs, you need mpicc for C programs, mpic++ or mpiCC for C++ programs, and mpif77 for Fortran.
Listing 1 has a sample "Hello World" program in C that uses the MPI library to print a message from all the nodes in the cluster. Compile it with mpicc:
mpicc borg-greeting.c -o borg-greeting
To run the programs you need to use mpirun:
mpirun -np 4 borg-greeting
This command tells the MPI library to explicitly run four copies of the hello app, scheduling them on the CPUs in the cluster in a round-robin fashion. Depending on the number of nodes in your cluster, you'll see something like:
We are borg! I am 1 of 4
We are borg! I am 3 of 4
We are borg! I am 0 of 4
We are borg! I am 2 of 4
Several MPI tutorials reside on the web [6]. Professor José Luis at the University of Seville in Spain uses PelicanHPC to teach his parallel programming course. He recommends that new programmers try the examples available online from Peter Pacheco's book, Parallel Programming with MPI [7].
Listing 1
"Hello, World" in C with MPI
See the OpenMPI website for additional documentation, including a very detailed FAQ [8].
Build Your Own PelicanHPC
If you're just interested in learning parallel programming, PelicanHPC provides more than enough. But the main goal of the Live CD is to help you get a cluster up and running without much effort. The focus is on maintainability and ease of customization, which is why the releases do not include a lot of packages.
Once you test the Live CD and think it'll work for you, you are encouraged to make your own versions via the Debian live-helper package and Pelican's make_pelican script. Also, you'll need a Debian or Ubuntu installation to produce the Live CD, which can be a minimal installation or even a virtual machine on a host with lots of RAM and a fast dual-core processor, which is what I use.
So to roll out your own ISO or USB image, first install a recent Ubuntu or Debian release. I've used Lenny to create a customized PelicanHPC release. Next, grab the live_helper package from the distro's repository. Finally, grab the latest version of the make_pelican script (currently v1.8) from Pelican's download page [4].
Open the script in your favorite text editor. The script is divided into various sections. After the initial comments, which include a brief changelog, the first section lists the packages that will be available on the ISO. Here is where you make the changes.
Listing 2 shows a modified version of this section, in which I've commented out the binary blobs for networking, because I don't need this for my networks. I've also added AbiWord and the GROMACS package. Because these packages are fetched off your distribution's repositories, make sure you spell them as they appear there. GROMACS has several dependencies but you don't have to worry about adding them because they'll be fetched automatically.
Listing 2
Packages For Your PelicanHPC Live CD
The next bit in the make_pelican script you have to tinker with is the architecture you want to build the ISO for and whether you want the ISO or USB image.
This section also specifies the series of network addresses doled out by PelicanHPC:
PELICAN_NETWORK="10.11.12"
MAXNODES="100"
#ARCHITECTURE="amd64"
#KERNEL="amd64"
ARCHITECTURE="i386"
KERNEL="686"
IMAGETYPE="iso"
#IMAGETYPE="usb-hdd"
DISTRIBUTION="lenny"
MIRROR="en"
The rest of the script deals with PelicanHPC internals and shouldn't be tweaked unless you know what you're doing. However, it's advisable to browse through the other sections to get a better idea about how PelicanHPC magically transforms ordinary machines into extraordinary computing clusters.
When you've tweaked the script, execute it from the console:
sh make_pelican
Now sit back and enjoy, or if you have a slow connection and are running this on a slow computer, you better do your taxes because it'll take a while to fetch all the packages and compile them into a distro image.
When it's done, you'll have a shiny new ISO named binary.iso under either the i386/ or the amd64/ directory, depending on the architecture you build for. Now transfer the USB image onto a USB stick, or test the ISO image with VirtualBox or with Qemu before burning it onto a disc. Figure 5 shows the password screen of a modified PelicanHPC Live CD.
 Figure 5: Tweak the make_pelican script to create your custom prompts.
PelicanHPC is designed with ease of use in mind for anyone who wants to use their spare computers to do some serious number crunching. Building on the experience of ParallelKnoppix, the developer has put a lot of effort behind PelicanHPC's no-fuss approach to get your cluster off the ground in a jiffy. The customization abilities are the icing on the cake and make PelicanHPC an ideal platform for building your own custom cluster environment.
Infos
- PelicanHPC: http://pareto.uab.es/mcreel/PelicanHPC/
- GNU Octave: http://www.gnu.org/software/octave/
- Kernel density estimation: http://en.wikipedia.org/wiki/Kernel_density_estimation
- ParallelKnoppix download: http://pareto.uab.es/mcreel/PelicanHPC/download/
- SciPy and NumPy: http://www.scipy.org/
- MPI tutorial: http://www.dartmouth.edu/~rc/classes/intro_mpi/
- Parallel Programming with MPI: http://www.cs.usfca.edu/mpi/
- OpenMPI FAQ: http://www.open-mpi.org/faq/?category=mpi-apps