Building a database with Kexi
Data friend

© hypermania2, 123RF
Kexi, part of the KOffice suite, allows anyone to create, populate, and maintain a database.
The open source world offers a number of solutions for managing data. SQLite is a tiny yet powerful database; MySQL is extremely popular with web developers; and PostgreSQL boasts transactional features on par with Oracle. All three solutions have command-line and programmatic interfaces, and both MySQL and PostgreSQL have support for browser-based management [1] [2]. SQLite, MySQL, and PostgreSQL all have strengths and weaknesses, and each is capable, but sadly, none of the three is suitable for the new Linux netbook owner or casual desktop user. Indeed, Linux users have had few options for a friendly, graphical, and lightweight database solution akin to Microsoft Access.
A Windows user can build tables, enter data, formulate queries, and craft reports in Access with little more than a mouse. The OpenOffice.org Base tool attempts a similar mission within Linux environments, but some popular distros don't include Base with the default desktop, and many Linux users are still searching for other options.
The Kexi database development tool [3] is another alternative for many Linux users. Kexi, billed as "Access for Linux," has been available since 2006, and the latest stable release, Kexi 1.1.3, is part of the KOffice 1.6 suite [4]. Kexi 1.1.3, which I used for this article, dates to April 2008, but Kexi 2.0 is marching through a series of pre-releases, with the intention to ship by the end of the year.
Introducing Kexi
Kexi, like Microsoft Access, offers a friendly user interface to create, populate, and maintain a database. Many tasks in Kexi are like filling out a spreadsheet. For example, to create a table, you fill out a row for each field in the table. Then you name each field, assign a type (such as date, integer, or text), and perhaps link the new field to an existing field in another table, thereby relating the two tables (hence the name "relational database"). Once you define a table, you can populate it with data as you would a spreadsheet.
Crafting queries in Kexi is a little more involved but does not require any knowledge of SQL. Instead, a query is largely drag and drop: Choose one or more tables, relate one field to another by point and click, and select the fields you want to display. Kexi also offers drag-and-drop form building to create interfaces to enter data, and like Access, Kexi either can use its own database format or can connect to another engine for more oomph. In Kexi's case, you can use MySQL. If you dislike the phpMyAdmin interface, try Kexi to browse an existing MySQL database.
Kexi is modal. The Design View creates and edits tables, queries, and forms, whereas the Data View shows the end result. Building an application in Kexi is typified by switching from one mode to the other. First I'll use Kexi to build an application, exploring its features along the way.
Installing Kexi
The easiest and fastest way to install Kexi is via your package manager. On Debian and Ubuntu variants, use apt-get or one of the equivalent graphical front ends:
$ sudo apt-get update
$ sudo apt-get install kexi
Kexi depends on KDE [5]. If you do not use KDE or any of its components, the addition of Kexi, KDE, and the latter package's attendant dependencies could add some 100 packages to your system, including the KOffice suite. Otherwise, the process is very quick.
After the installation finishes, run Kexi:
$ kexi
When the Choose Project window pops up, choose Blank Database and click OK. The next prompt asks where you would like to create the database. The two choices are in a file or in a MySQL database server. To keep things simple, choose New Project Stored in File. When Kexi asks for a database name, enter Example One, click OK, and use the browse dialog to choose a location for the file on your disk.
The main Kexi window resembles Figure 1. The pane on the left collects your tables, queries, forms, and scripts (the latter is an experimental feature and is ignored here). Kexi calls each of those entities an object. To create a new table, for example, right-click on Tables and choose Create Object: Table. (From the menubar: Choose Insert | Table.) The tool palette is immediately below the menubar; the list of available tools changes depending on the task at hand.
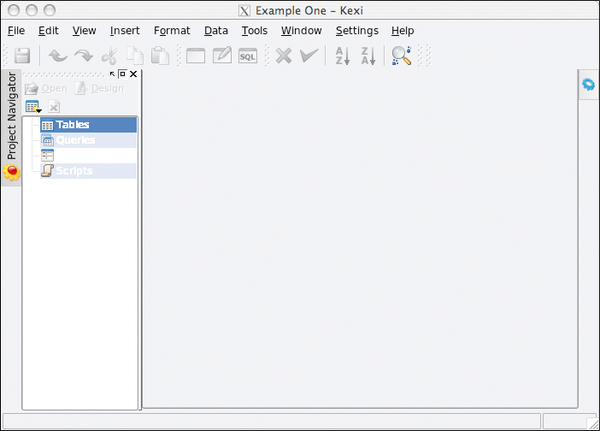 Figure 1: The main Kexi window.
The central area of the Kexi window is the heart of the application, in that most of your work is performed here. The rightmost panel, which is empty in Figure 1 but shown in subsequent figures, is used to edit the attributes of fields.
Building Your First Database
To demonstrate, I'll show you how to construct a database to maintain student grades. The structure of the database, or schema, includes three tables: a table for students, a table for the class curriculum (homework, quizzes, and tests), and a table for scores, which ties a student to a grade for a particular assignment.
- The students table has four fields: a first name, last name, student ID, and birth date.
- The assignments table has four fields: a description, a maximum possible score, a unique ID, and a date to record when the work was assigned.
- The grades table has three fields: a student ID, an assignment ID, and a score.
To create a table, right-click on Tables in the leftmost pane and choose Create Object: Table. To begin, I'll show you how to create the students table.
When the blank table appears in center pane, click in the first row of the table, type id in the Field Caption column and select Integer Number as the Data Type. In the rightmost pane, choose the Properties tab, click on Primary Key and choose Yes. (Whenever you designate a field as a primary key, Kexi automatically sets the other properties to ensure the field is unique.) You will refer to the student ID from the grades table.
Now choose Save from the File menu. When prompted, type students in the Caption field and click OK. Your Kexi window should now look something like Figure 2.
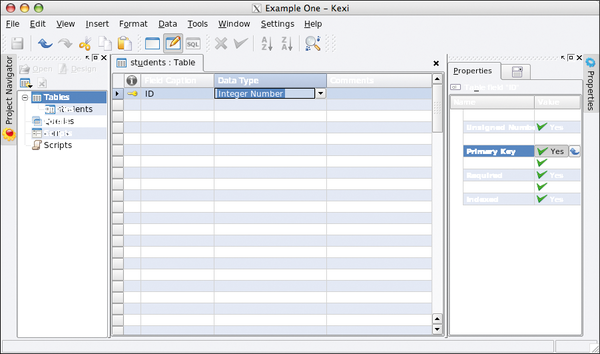 Figure 2: The students table with one field.
To continue, create the fields for the first and last names, using both the table editor and the properties editor. The two fields should be Text, and make sure both are required, are indexed (to speed searches), and have a maximum length of 100 characters. Neither field can be blank, so set the appropriate property to make the fields mandatory. Furthermore, create an additional field to record each student's birth date. Its type should be Date/Time, and specify that the field is required. When the students table is complete, save your work.
Next, create an assignments table for classwork using much the same process you did in the last step. Create an assignment field (Text, required, not blank) to describe the assignment, a maximum_score field (Integer Number, required) to record the maximum score possible, and a date field (Date/Time, required, not blank) to indicate when the assignment was given.
Finally, create the grades table. It ties a student to an assignment and records the student's score. First, create a field named student_id and set its type to Integer Number. In the Properties tab at right, make the field required and make sure it cannot be blank. Next, click on the Associations tab in the rightmost pane (the icon is a little drop-down menu) to define the field as a foreign key, or a key from another table that establishes a connection between one record and another.
Here, the foreign key must be the ID of a student. In the dialog, set Row source to students and choose id as the Bound column. (The ID is now the foreign key that binds two records together.) In addition to this, you can set the Visible column to display a value from the student record that is more meaningful than the ID, such as the student's last_name. Figure 3 shows how the foreign key is defined.
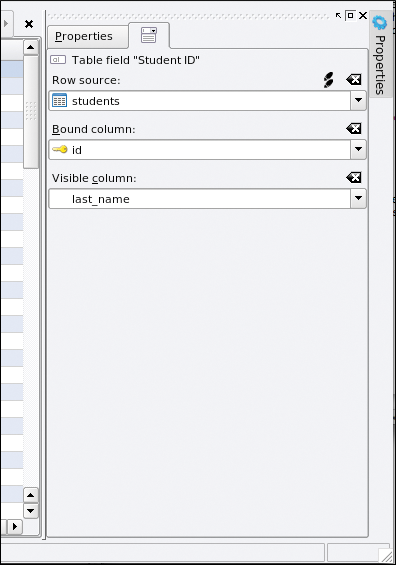 Figure 3: Choose a table and row as a foreign key.
Next, create a field named score as a required Integer Number, then create a field named activity_id. To mirror the student ID, use the tabs in the rightmost pane, but the field should refer to the assignment ID.
If Kexi prompts you to create a primary key for the grades table when you save your work, simply click No. This table does not require a primary key.
Now you have enough structure in place to record student scores and run queries.
So far, you've been working in the Design View. To enter data, choose any of the tables and switch to Data View by choosing View | Data View or by pressing the F6 key. Again, the interface should remind you of a spreadsheet with a header at top to clarify the order of the fields. Here, you can create entries for five or six students and entries for a handful of assignments before you create grades, combine a student record and assignment, and tally a score. Figure 4 shows some possible student records.
Now that you have some data, the next step is to put the information to work.
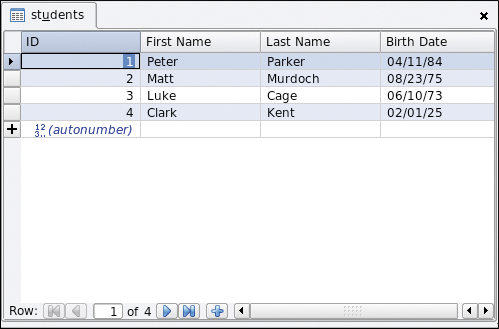 Figure 4: A collection of (very) capable students.
Probing Data with Queries
In addition to persisting data, a database derives information via a query. As mentioned at the outset, it's typical to write queries in SQL, but that's not particularly natural for the ordinary user. Kexi, again like Access, provides a graphical interface in which you can construct queries.
Now I'll show you how to build a query that will summarize all of the scores that have been recorded. To produce the summary, the student's name is drawn from the students table, the assignment details are drawn from the assignments table, and the score is extracted from the grades table. The ID fields scattered throughout the three tables match the corresponding records to one another.
To create the query, choose Insert | Query. In the panel that opens at center, choose a table name from the drop-down menu, and click Add. Do the same for the other two tables until all three are shown in the middle pane.
Next, click on the id field in the assignments table and drag the field to the activity_id field in the grades table. This correlates the fields. Do the same to correlate the id field in the students table with the student_id of the grades table. Your view should now resemble that in Figure 5.
 Figure 5: Correlate fields between two tables to form a query.
The next step is to choose the fields you want to display. If you double-click on first_name, last_name, assignment, and score, these fields drop into the Query Columns list at the bottom. Figure 6 shows the center panel after adding the four fields.
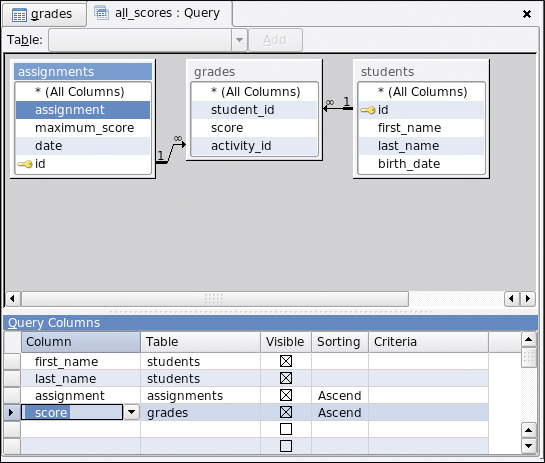 Figure 6: Choose the fields to display.
If you switch to Data View, you should see something like Figure 7. It displays the results of the query.
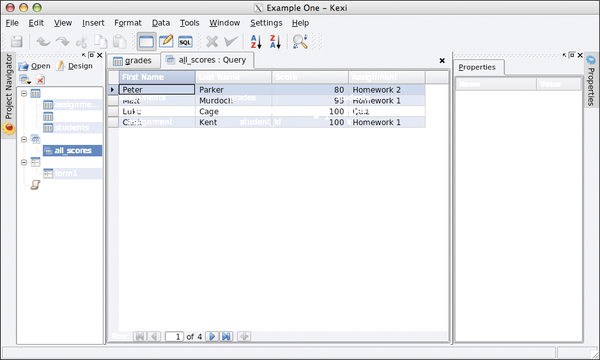 Figure 7: The results of a query.
By assigning values to the Criteria field of a query column, you can limit results just to those in which you are interested. Also, you can sort results by setting the Sorting field. With a combination of tables, correlations, and query columns, you can tailor reports to your specific needs. By the way, if you prefer to write SQL code by hand, the query editor also offers a Text View in which you can author and validate your code.
Forms and More
Kexi also offers a form editor in which you can create data entry interfaces. Other tools import and export data and import database schemas. The current version of Kexi has some quirks, but the Kexi team promises a novel interface in v2.0, in addition to a report designer to produce professional-looking output. According to Kexi developer Jaroslaw Staniek, the forthcoming version of Kexi will connect to more databases – including SQL Server, Oracle, Sybase, and dBase – and feature integration with the entire KOffice 2 suite. For instance, Staniek foresees ODF document generation, without programming, and data sharing across the desktop.
Stay tuned. A future column will revisit Kexi 2 once the software is in widespread beta testing.
Infos
- phpMyAdmin: http://www.phpmyadmin.net/
- PremiumSoft Navicat: http://www.navicat.com/
- Kexi: http://kexi-project.org/about.html
- KOffice: http://www.koffice.org/
- KDE: http://www.kde.org/