Exploring the OpenVAS vulnerability scanner
Scan Free

© Bram Janssens, 123RF
If you prefer to travel light and free, try OpenVAS, a GPLed fork of the Nessus scanning tool.
The Internet has become more dangerous over the years, with constantly changing threats and ever more sophisticated attackers. As have most security professionals, we have seen all manner of clever schemes designed to part businesses from their money and data. To help discover and manage threats, we rely heavily on free software tools. One of the most popular security tools is the Nessus vulnerability scanner by Tenable Network Security [1], which many have used to look for vulnerabilities on customer networks.
The decision by Tenable to change the licensing for commercial use was viewed with frustration by a number of security professionals. Prompted by the final announcement on Slashdot in October 2005 that Nessus would be closed source, Tim Brown made the decision to announce a fork. The result of that effort is OpenVAS [2], a free software fork of the Nessus vulnerability scanner predominantly licensed under the GPL.
At this time, OpenVAS has a thriving community, with contributions from both individuals and corporations from all over the world. The OpenVAS project is a member of Software in the Public Interest, a non-profit organization dedicated to helping organizations develop free software. A recent successful developers conference had 16 participants from four continents, and we have more than 13,000 vulnerability checks committed to our public SVN repository.
In this article, we describe the OpenVAS project and show how to use it to assess your network security systems.
OpenVAS Architecture
As with Nessus, OpenVAS follows a client-server model. A server component is responsible for scheduling and running scans, and a client component is used to configure scans and access the results. The server is normally installed on a Linux or Unix server, and the client is typically run from the administrator's own workstation. Currently, the client must be connected to the server for the entire duration of the scan; however, some of the developers are currently working on a new component that will support much more RESTful interfaces.
The Internet Assigned Numbers Authority officially assigned OpenVAS TCP port 9390. OpenVAS is a security-conscious project, and the connection to this port from an OpenVAS Client is always tunneled over SSL with strong ciphers to ensure that only the intended user can access the data generated by OpenVAS.
Advanced Plugin Preferences
In the Advanced Plugin Preferences area, additional parameters can be passed to modules that were configured earlier. For example, you can activate fragmented packets, NULL scans, and many other Nmap-specific parameters if Nmap is selected as the port scanner. Generally speaking, if additional configuration is necessary for any specific module of OpenVAS, the Advanced Plugin Preferences section is the place to seek answers.
Installation
OpenVAS is available in binary package form for most major Linux distributions, and you can get it from third-party repositories or obtain it directly from the OpenVAS website.
Some Linux distributions ship incompatible versions of the server and client. Version 1 clients are not compatible with version 2 servers. Keep this in mind when installing from your standard Linux distribution repository.
If you would prefer to compile the code yourself, you will find the source code at the OpenVAS website [2] – either in standard tarball form or via anonymous SVN. Compiling is not difficult, but you must compile the openvas-libraries module first. Be sure to meet the following dependencies when compiling: gpgme-devel, gcrypt-devel, gnutls-devel, glib2, glib2-devel, glib2-data, and Gtk+ 2.x (for the Gtk client).
The next step is to add the first OpenVAS user. The OpenVAS server implements user accounts independently of the operating system. (LDAP support is planned for a future version.) To add a user, simply run the openvas-useradd script
# openvas-adduser johndoe
and you will be prompted for rules to supply with the user information. These rules let you specify which nodes an OpenVAS user can and cannot scan. This feature protects some sensitive systems from being scanned without proper supervision.
The rules syntax is
accept|deny ip/mask
default accept/deny
as in:
accept 192.168.1.0/24
default deny
The preceding rules allow the user to scan all systems in the 192.168.1.0 network but deny access to any other network. User settings are stored in the /var/lib/openvas/users/ directory.
Getting Started
As you will learn later in this article, OpenVAS uses plugins to define scanning scenarios. To update the plugins, simply run the following command:
# openvas-nvt-sync
If you run this command regularly, your plugins remain up to date. Without up-to-date plugins, the scanner will miss new vulnerabilities. After you run openvas-nvt-sync, restart the server.
If you installed from a binary package, use the service command to start the server. If you installed from source, start the server by typing:
PATH_TO_SERVER/openvasd -D
Configuration
OpenVAS provides many configuration options (Figure 1), but most of the options have conservative defaults that preserve performance and support functionality. A few of the most important options follow.
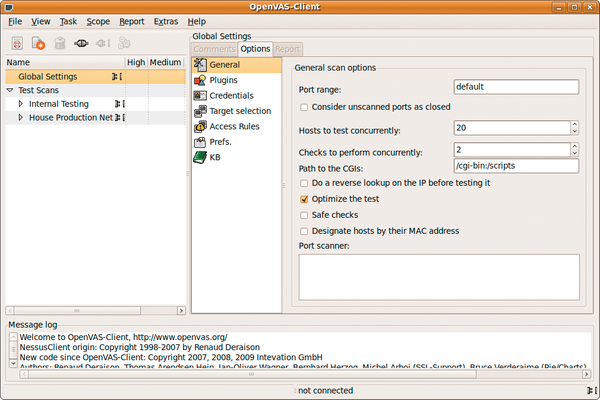 Figure 1: The General configuration section.
- Port Range – This option sets the range of ports for scanning by the OpenVAS server. The default is to scan only ports defined in the openvas-services file, which covers all of the commonly used ports, except for some in the upper end of the port range. To get complete coverage of all ports, specify 1-65535. Scanning a smaller number of ports, including just the default range, will speed up the scan, but you might miss detecting malware such as backdoor daemons on a high number ports.
- Hosts to test concurrently – This option sets the number of hosts that can be scanned in parallel, which has the effect of limiting the load on the OpenVAS server.
- Checks to perform concurrently – This option sets the number of concurrent tests that can run on a single target at one time.
- Safe Checks – This option instructs OpenVAS to rely on banners rather than perform a potentially invasive check of the target service. Turning safe checks off could result in services becoming unavailable to the server or users (Figure 2). A good idea would be to perform a regular check with safe checks set to on, then turn off safe checks for additional scans. For example, if OpenVAS scans are scheduled every Tuesday, the first Tuesday should be run with safe checks off, with systems administrators on hand to respond to any potential disruptions.
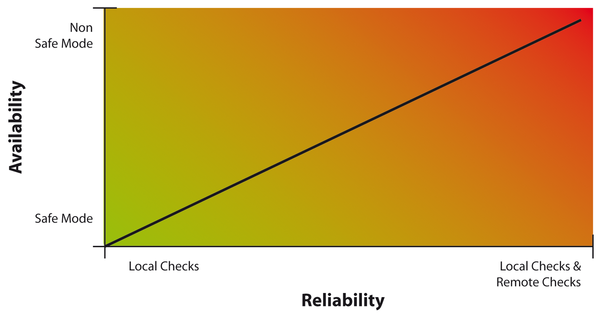 Figure 2: Different scanning choices and their effects.
- Port scanner – A choice of different port scanning options is available. The options range from simple TCP connection attempts (the OpenVAS TCP Scanner) to more sophisticated approaches, such as a SYN scan or an IKE scan. SYN scans can detect ports without completing the normal TCP handshake procedure. IKE scans are designed to locate IPSec, VPNs, and similar connection points.
OpenVAS offers many other configuration options. The OpenVAS website has more information on tailoring the settings to your own environment.
Local Access Credentials
Running a scan in the default configuration leads to a purely remote scan. Although you can get a lot of good information this way, the default settings essentially make OpenVAS into a glorified port scanner. By taking advantage of the local check capabilities, you can get much more accurate results. Local checks allow OpenVAS to determine the state of applications that normally might be inaccessible over the network (such as Wireshark) but that nevertheless might have vulnerabilities. Local checks also help locate vulnerable applications that you might not even know are running on your system.
Version 2.0.2 and higher of OpenVAS Client has a convenient Credentials Manager tool for entering local access credentials to scan target systems (Figure 3). SSH keys are created in RSA PKCS#8 format for compatibility across different implementations of SSH.
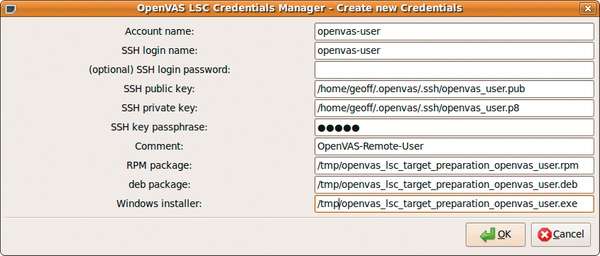 Figure 3: Adding a new local access credential with the Credentials Manager.
Once created, the keys can be installed easily on target systems via the RPM or DEB packages created by the wizard. The locations of the packages are defined during the creation procedure. A Windows installer that is also created prepares Windows targets for scanning with an SMB-based local user.
Getting to Work
Once your system is configured, it is time to run a scan by starting the OpenVAS Client. A dialog box asks for the user login (Figure 4). If this is the first login, you might be asked to save the SSL certificate. At this point, the client will also check for new plugins and plugin dependencies from the server.
 Figure 4: Logging in to the OpenVAS server.
Next, create a new task called Test Scans. A task is equivalent to a logical group. This grouping is completely abstract – the task could refer to a customer network, in the case of a consultant, or a grouping of nodes within a local or remote network, in the case of in an in-house systems administrator.
The next step is to create a new scope called Internal Testing. Scopes are defined within the context of a task. A scope is equivalent to a profile. For instance, a scope might include all Linux nodes or all AIX nodes. The scope can also equate to services rather than nodes, such as all machines running SSH daemons or SMB services. (Scope and tasks are entirely abstract. Currently, OpenVAS does not provide a means to automatically create a task and scope from previous scans or templates.)
With all of the pieces in place, it is time to run the first scan. First, set any desired options, such as preferred port scanners and target access credentials, then execute the scan by clicking on the Execute button. The scan begins at this point. The client will pop up an informational window with the current status of the port scan and checks (Figure 5).
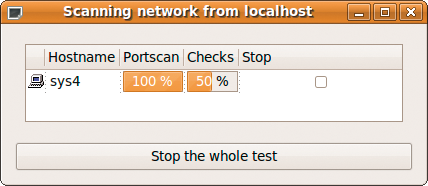 Figure 5: OpenVAS displays scan progress.
Once the scan is complete, a report highlights the number of high-, moderate-, and low-priority issues (Figure 6). The client also can export a report in various formats, including HTML, XML, and PDF.
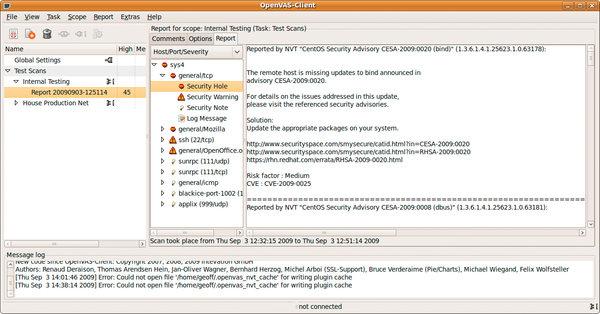 Figure 6: The initial report, with one incident expanded in the viewer.
Validating Your Results
As with most automated procedures that haven't been tuned, the danger of false positives is revealed in the first few OpenVAS scans. The technical staff should analyze each issue to determine whether the item is a false positive. This analysis usually consists of verifying that a reported service is, in fact, running on an open port and is responding. Sometimes false positives are the result of the technical staff modifying the software locally, such as when vendors back-port patches into a supported version of a package. If possible, the quickest way to validate your results is to compare the version of the software running on the remote system against versions listed in the various vulnerability databases.
If the results appear valid, your next step might be simply to trust OpenVAS and follow the recommendations given in the report, which could entail disabling a server or service. However, if you're feeling inquisitive, you might want to recreate the issue manually to better understand the context.
Writing Plugins In NASL
Like Nessus, OpenVAS lets you create your own plugins for custom security checks with the Nessus Attack Scripting Language (NASL). See the NASL Reference Guide, which is available online [3] for more on working with NASL. Listing 1 addresses a few of the basic features you'll need to address when working with NASL.
In Listing 1, the description block holds metadata about the plugin, including a description of the vulnerability, details about the plugin category, and information on any dependencies the script might have. In this case, you can see that the check is for CVE-2009-3023, a stack overflow that was reported in Microsoft's IIS FTP server.
Listing 1
Building an NASL Plugin
Below the description block is a definition of the check itself. As you can see, the script checks to see that the specified port is open and then makes a call to the internal knowledge base to ensure that a writable directory is detected by the dependency plugin ftp_writeable_directories.nasl. If this is the case, the script then connects to the port and fetches the FTP banner. Once it has a banner, it compares the banner against known vulnerable versions and reports as necessary. The check knows that version 5.0 is definitely vulnerable, so it reports a hole in this case, but in other cases where Microsoft FTP server is running, a warning is issued.
The code in Listing 1 is a fairly simple example of a NASL script. NASL is a domain-specific language with a lot of security-specific functions. Although some questioned Tenable's decision to implement a whole new language, NASL is designed to be secure and provide the tools necessary to check even quite complex vulnerabilities. The NASL language includes built-in functions for packet crafting, packet capture, and many other useful tasks.
Conclusions
OpenVAS is a valuable tool for managing vulnerabilities. Although a tool like OpenVAS is very useful for identifying potential issues in targets and products, it is up to the technical staff to act on the reports and resolve the issues.
Infos
- Nessus: http://www.nessus.org/nessus/
- OpenVAS: http://www.openvas.org/
- NASL Reference Guide: http://www.virtualblueness.net/nasl.html