Encrypting files and drives
Lock and Key

The security of personal data is a major topic in the Linux world. zuluCrypt gives users a tool for uncomplicated encryption of any data.
External data media are very popular. They allow you to back up large amounts of data quickly and easily, without spending a fortune on backup media. But, transportable hard disks or USB sticks can be easily lost or stolen because of their compact size and light weight. Therefore, you should never store your personal data on mass storage without protecting it with powerful encryption. With dm_crypt/cryptsetup and the zuluCrypt graphical interface, you can achieve this on Linux in next to no time.
Preparations
Under the free operating system, the standard method of data encryption is a combination of the dm_crypt kernel module and the cryptsetup command-line tool. You can use these to encrypt entire partitions and device files. The Linux Unified Key Setup (LUKS) extension contained in cryptsetup since version 1.0.5 also unifies the file format and allows the use of multiple keys. LUKS expands the encrypted data, adding a 592-byte header that stores the metadata and up to eight keys [1].
Almost all distributions have had cryptsetup in their repositories for some time now, so it can easily be set up using the respective package manager. In contrast, zuluCrypt usually requires a manual install because so far only a few distributions include it in their software collections. Only Arch Linux and PCLinuxOS provide packages for zuluCrypt; Mageia can use the packages from PCLinuxOS.
If you are using a different distribution, download the source tarball for zuluCrypt down from the project site [2]. After unpacking the archive with the command tar xjvf zulucrypt-4.6.2.tar.bz2, change to the newly created subdirectory. Be sure to read the BUILD_INSTRUCTIONS file and follow the instructions for installing the software: ZuluCrypt has a large number of dependencies that must be installed correctly for the program to work properly.
Integrating the PCLinuxOS packages in Mageia is not a smooth process: To satisfy the dependencies – so that the package manager can even install the main package on your disk – you first need to retrieve and install the secondary packages: libcryptsetup, libpwquality, and libZulucrypt [3]. After that, Zulucrypt will install without complaint and create a Zulucrypt in Gnome below the Applications | Tools | System Tools subdirectory; in KDE, you will find the software in the Tools | Configuration.
Systematic
Before you start to use the intuitive program interface to encrypt drives, you will want to visit the zuluCrypt wiki [4] to check up on the recommendations for dealing with different types of partitions. ZuluCrypt distinguishes between system and non-system partitions, and accidental encryption of a system partition can have unforeseen consequences.
For zuluCrypt, all drives in the /etc/fstab file are system partitions. Usually, they will include the actual system volume, the swap partition, and partitions on which user-defined data are stored. In contrast, removable disks do not appear here; zuluCrypt considers them to be non-system partitions.
Getting Started
After it is launched, zuluCrypt comes up with a very simple interface: The program window offers just a menu bar and the table columns Encrypted volume path, Encrypted volume mount point path, and Type.
To begin, you need to create a container in which to store the encrypted files. This container is then assigned a random key. The key should be as complex as possible and consist of uppercase and lowercase letters and numbers in mixed order; this makes it immune to attempted unauthorized decryption using dictionary and brute-force attacks.
Please note that decryption of the container relies on your entering the correct key. If you forget this, or it cannot be reconstructed for other reasons, the stored data are lost. Therefore, zuluCrypt also offers the option of first generating a keyfile that it uses not only to create a container but also to simplify decryption.
You can generate a keyfile using the Create menu, Keyfile feature; you need to specify the file path and the name of the keyfile. For security reasons, you should not put the keyfile in your home directory, but on an external disk if possible; this makes decrypting the container without the external storage medium containing the keyfile impossible (Figure 1).
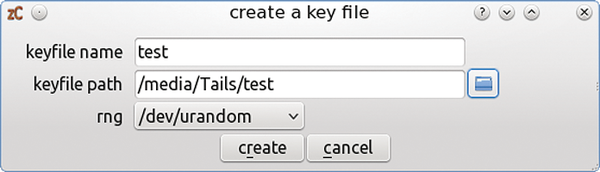 Figure 1: Three steps to generating a keyfile for zuluCrypt.
In the next step, you can now create the container file. It appears later in the file manager as a conventional mounted drive. Before installing a container, you should check whether the destination drive is mounted. You can do this at the command line with the mount command without entering parameters. If the target drive is mounted, remove it from the list of active volumes with the umount <drive> command; zuluCrypt cannot process mounted drives.
Then, open the Create menu to generate the container. Here you have a choice between the options encrypted container in a file and encrypted container in a partition. If you want to encrypt large amounts of data, the option to place the container in a partition is recommended. Before you create the container, however, note that it fills the entire selected partition and you will lose any data that it previously contained.
In the next step, zuluCrypt indicates the possible partitions for creating the container; it does not display any system partitions by default. External drives are listed both by device name and by the associated UUID. If you will frequently be using removable media like USB sticks, external hard drives, or memory cards and accessing the encrypted container on multiple computers, you will want to select Use uuid when creating the encrypted volume. ZuluCrypt then identifies the container by its UUID in the future. This step prevents confusion when using several external drives simultaneously on a computer.
After double-clicking the desired drive, you need to associate the key with the container. If you have already created a keyfile, you can use this by pressing key from a keyfile. Next, specify the path to the keyfile in the input line below. Fortunately, this step also saves you from repeatedly entering the key for verification like in the manual create process.
In the lower part of the window where you create the container, you still need to define the filesystem and the encryption type. The default option in zuluCrypt is luks; this generates a 256-bit symmetric key in line with the Advanced Encryption Standard (AES). Pressing the Create button finishes creating the container (Figure 2).
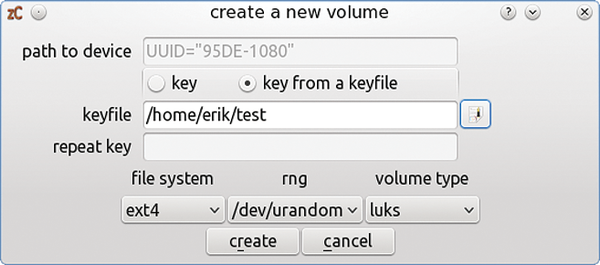 Figure 2: With zuluCrypt, you can create a new container for the encrypted data in next to no time.
ZuluCrypt then urgently prompts you to back up the LUKS header. The LUKS header stores various metadata such as information about the container as well as different keys, so a backup is very much recommended. ZuluCrypt opens the already familiar file dialog; by default, it offers to store the backup on the encrypted volume for safety reasons, but in your home directory. However, you can back up or – if the original header is destroyed – restore the LUKS header at any time in the zuluCrypt program window via the luks | backup header menu.
Reading Exercise
To work with the encrypted container, as with a conventional drive, you must mount it manually on the system. Although Linux recognizes the drive, without the appropriate key file, it gives you no access to the container. Thus, you must once again call zuluCrypt and use the open | encrypted container in a partition menu to select the desired partition. To allow this to happen, the software displays a list of all recognized drives on the system along with their filesystems; encrypted containers always have an entry of crypto_LUKS in the type column (Figure 3).
 Figure 3: ZuluCrypt shows in a list of all drives for mounting containers.
When you double-click a container, zuluCrypt mounts it as a new folder; the drive name is used as the folder name in your home directory. You can now work with the container like any conventional directory.
To correctly unmount the container after completing all your work, go to the zuluCrypt zC menu and select close all opened volumes. The tool now umounts the encrypted container, so you cannot see its contents without remounting via zuluCrypt.
Encrypting Files
If you do not want to create a whole container but want simply to protect individual files from prying eyes, then you can encrypt them individually in zuluCrypt using the zC | encrypt a file option. After you select this option, zuluCrypt will require the name of the file to be encrypted and a corresponding key. You can either re-enter a key manually or import it from a keyfile.
Then, zuluCrypt encrypts the file in question and stores it under the same file name, but with the suffix of .zc added, below your home directory. You can change both the filename and the target directory in the encryption dialog to suit your needs (Figure 4). Please make sure that the original file name does not contain any spaces, because zuluCrypt will refuse to encrypt in this case.
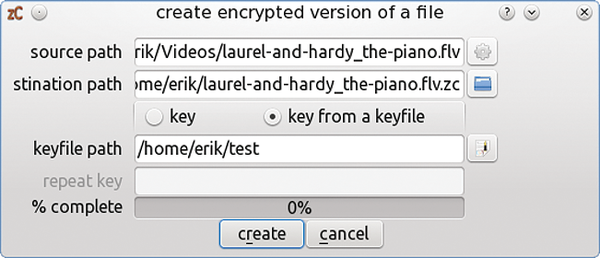 Figure 4: ZuluCrypt safeguards individual files from prying eyes.
To decrypt an encrypted file, select the program option zC | decrypt a file. Using the same clear-cut dialog that you saw when encrypting, you can now decrypt the desired file. This is quite a fast process: In the lab, zuluCrypt required only a few seconds to decrypt a file of around 100MB.
Container in a File
To protect smaller data sets, you can – as an alternative to encrypting a complete drive – use zuluCrypt to create container files that do not occupy the entire volume. Apart from this, these containers do not differ in terms of use from their larger siblings. You can create such a container by selecting create | encrypted container in a file; then enter the required data in a same dialog as for creating an encrypted partition. The only difference is that you must define the size of container file in addition to the filesystem to be used.
If you use multiple encrypted disks and containers simultaneously, zuluCrypt shows them all in its list window. This feature allows you to quickly switch between different content and close all open containers in one fell swoop when you shut down your system. The menu item zC | close all opened volumes (Figure 5) handles this process.
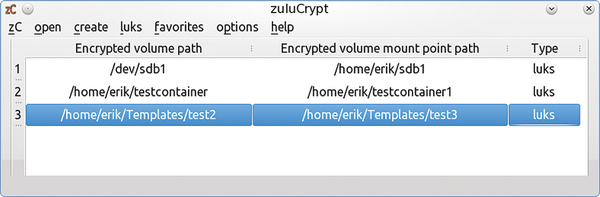 Figure 5: ZuluCrypt allows the simultaneous use of encrypted containers.
Tools
The menu item zC | erase data in a device gives particularly security-conscious zuluCrypt users the option of deleting existing data physically from a container. For this purpose, it overwrites the entire container contents with random characters, making a reconstruction of previously existing data impossible. The container itself is kept. To enable the secure delete function, you must first unmount the encrypted drives. You cannot purge unnecessary data files from mounted drives.
Conclusions
ZuluCrypt gives users a small but powerful encryption program that is suitable for every need due to its diversity of functions. In the lab, the software was very stable and ran without the slightest problem. The program impressed with its fast speed: creating encrypted drives with multiple-gigabyte sizes was achieved within a short time, and even deleting larger containers took just a few seconds.
The biggest shortcoming of zuluCrypt turned out to be the lack of distribution packages, which makes the installation process cumbersome and time-consuming. However, once you have overcome these hurdles, zuluCrypt gives you a highly useful tool that can significantly increase the security of your personal information.
Infos
- LUKS: http://code.google.com/p/cryptsetup/
- ZuluCrypt: http://code.google.com/p/zulucrypt/
- ZuluCrypt RPMs: http://rpm.pbone.net
- ZuluCrypt FAQ: http://code.google.com/p/zulucrypt/wiki/FAQ