Create a select menu with smenu
Not Spoiled for Choice

© Lead Image © acik, 123RF.com
The smenu tool reduces the effort of creating shell menus to one line, with numerous options for a wide range of design alternatives.
If you program for the shell frequently, sooner or later you will have to create a select menu, which usually requires several lines of code – unless you use smenu. Smenu reduces the menu's script to a single line. A number of parameters allow you to adapt the design and to simplify your work a little.
The source code for smenu is available on its project page [1], which contains installation instructions, as well as some useful tips. The smenu wiki [2] contains links to two YouTube videos that demonstrate the practical use of the program. The README file provides a structured overview of smenu's options [1].
Basic Function
In smenu's simplest form, a command's output is passed via pipe to the smenu command. For example, <command> | smenu displays a selection on a single line. To create a line-by-line menu, use <command> | smenu -c (Figure 1).
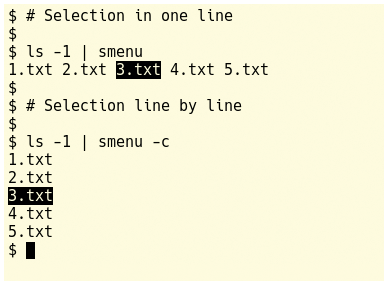 Figure 1: Pipe command output to smenu and leave it to the program to prepare the output in the form of a single-line menu.
For a freely defined menu, transfer the selection options using the echo command. However, the examples in Figure 2 only show the most rudimentary form: It doesn't make sense to use the tool without variables.
 Figure 2: If you want to enter the selection options with your own text, use the echo command.
1 lists the most important call options for smenu. Press Enter to select a menu option, and press Q to exit the menu without selecting. To search within the selection, use the forward slash (/) in the open menu and then enter the search term.
When the search completes, the cursor stops at the first hit, and the background appears blue instead of black. If you wait seven seconds, the software reverts back and waits for your next input. Typically, the selection results from the data obtained via the pipe.
Script Use
To use the result of the selection, apply command substitution, as shown in Listing 1, line 1 (current syntax) and line 2 (obsolete syntax). Listing 2 and Listing 3 show two functional examples, and Figure 3 shows their usage.
Listing 1
Command Substitution
VARIABLE=$([COMMAND] | smenu)
VARIABLE=`[COMMAND] | smenu`
Listing 2
A Selection with Explanations
#!/bin/sh
a=$(echo "1 first \n 2 second \n 3 third \n" | smenu -c)
echo "input value: $a"
Listing 3
Selecting a File
#!/bin/sh
b=$(ls *.txt | smenu -c)
echo "Selected file: $b"
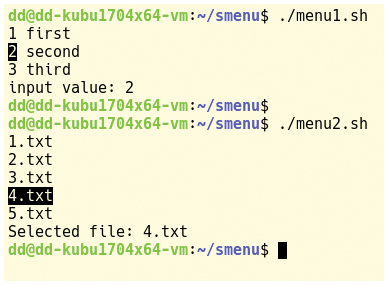 Figure 3: Listings 2 and 3 show simple scripts that demonstrate how you can easily create a menu for your software with smenu.
Table 1
smenu Options
| Option | Action | Tip/Example |
|---|---|---|
|
|
Column mode |
|
|
|
Heading |
|
|
|
Limit lines in selection |
|
|
|
Center menu |
|
|
|
Delete menu according to selection on the screen |
– |
|
|
Selection with several columns |
|
|
|
Selection with multiple columns at full terminal width |
Together with |
|
|
Allow multiple selections |
|
|
|
Exclude the transferred string from the selection |
|
|
|
Only allow designated strings to select |
Listing 4
Specifying the Heading
#!/bin/sh
clear
a=$(ls -1 *.txt | smenu -n3 -c -m "Select file:")
echo "Selected file: $a"
Listing 5
The -t Option
#!/bin/sh
clear
a=$(ls -1 *.txt | smenu -n3 -c -m "Select file:" -t2)
echo "Selected file: $a"
Listing 6
Using a Colon as a Field Separator
#!/bin/sh
clear
a=$(ls -1 *.txt | smenu -n5 -T: -c -m "Select file(s) (mark with [T]):")
echo "Selected file(s): $a"
Listing 7
The -e Option
#!/bin/sh
clear
a=$(ls -1 | smenu -n5 -c  -e [m][4] -m "Select file: ")
echo "Selected file: $a"
Listing 8
The -i Option
#!/bin/sh
clear
a=$(ls -1 | smenu -n5 -c  -i [t][x][t] -m "Select file: ")
echo "Selected file: $a"
Listing 2 demonstrates how to establish a selection with explanations. The end-of-line symbol (newline), which you represent with an escape sequence (\n), serves as a separator between the entries. Within an entry, the space serves as a separator between fields. The result adopted in the variable is the value from the first column. Smenu only inverts the current value of the variable on the screen, not the full line.
Listing 3 shows just how easily users can select a file interactively.
Improvements
Figure 4 shows a small menu, which already has some additional features. If the list of entries reaches a certain number of lines, a green scrollbar appears.
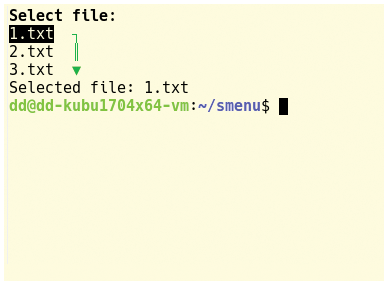 Figure 4: The green scrollbar shows that there are more items from which to choose.
If you limit the number of visible lines to three with -n3, the bar appears as soon as the length of the list exceeds this value. Use the -m "<text>" option to specify the heading. Listing 4 shows the corresponding code.
Look at the scrollbar in Figure 4 more closely: If you reach the start or the end of the selection, the arrow symbol appears. The arrows indicate more entries in the respective directions.
If you need a selection with multiple columns, type the number of columns using the -t option (Listing 5). Figure 5 shows the result on the terminal screen. If you want to expand the line content to the terminal's full width, use the -w option.
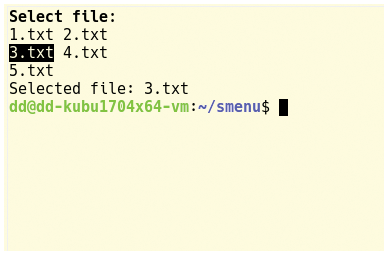 Figure 5: If necessary, distribute the data for the selection to multiple columns.
Multiple Choice
The -T option allows for the selection of multiple points by pressing the T or Insert keys in the running script for each relevant point. Complete the selection by pressing Enter. A marked entry appears underlined. Remove the marker by repeatedly pressing T or Delete.
The software uses the space as a field separator, unless you specify otherwise. However, the example shown in Listing 6 (Figure 6) uses a colon, which allows you to use tools (e.g., cut) during further processing of the variable's contents, to address a column.
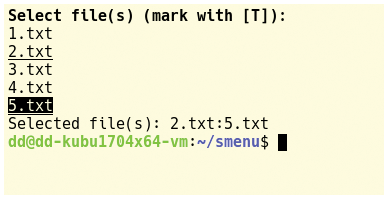 Figure 6: Some applications require the selection of multiple entries.
Menu Preselection
If you have no way to limit the list of menu options from the command in the pipe, filter the data when you call smenu. If necessary, use regular expressions (-e option, Listing 7). Alternatively, work with the positive hits (-i option, Listing 8).
The effect is generally the same: The unwanted entries appear in a color that offer less contrast and cannot be selected (Figure 7). When using both options simultaneously, keep in mind that exclusion has a higher priority. As a result, you might not get any items to select.
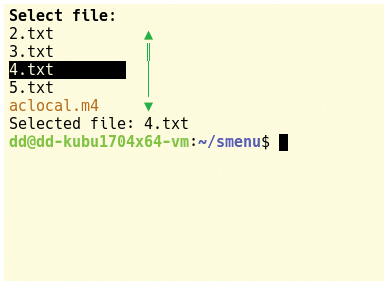 Figure 7: If the software supplying the data offers no way to filter it, use smenu functions to include or exclude points.
PDF Search
To browse a (quite large) portfolio of PDF files, use the pdfsearch.sh shell script (Listing 9). Using smenu, the small program displays the selection of hits and allows you to take further actions.
Listing 9
pdfsearch.sh
#!/bin/bash
# pdfsearch.sh
while true; do
  clear
  # Enter search term
  echo "browse PDF archive "
  echo "----------------------"
  read -p "enter search term (cancel: Enter or Ctrl+C): " sube
  if [ -z $sube ]; then
    exit
  fi
  # Evaluation list structure, case sensitivity is ignored.
  # only the number of hits is issued
  for i in $(pdfgrep -H -c -i "$sube" *.pdf); do
    number of hits = $(echo $i | cut-d\: -f2)
    if [ $number of hits-gt 0 ]; then
      hitlist=$(echo $hitlist $i)
    fi
  done
  # if hit is list empty, new loop run
  if [ -z "$hit list" ]; then
    echo "no hits"
    sleep 3
    continue
  fi
 # here comes smenu
  while true; do
    file=$(echo $hitlist | tr "\ " "\n" | smenu -d -n20 -c -m "select file for display (q to cancel):" | cut -d\: -f1)
    # If cancel with [q], delete hit list and
    # new loop run
    if [ -z $file ]; then
      unset hit list
      break
    fi
    # Evince and Qpdfview support the transfer
    # a search term when launching on Shell
    evince --find "$sube" $file
    # continue or finished?
    Continue= $(echo "select done" | smenu -d -m "continue with" -s /A)
    if [ "$continue" = "done" ]; then
      break
    fi
  done
done
The script only runs under Bash because it uses the read command. Either assign the appropriate rights to run it directly, or call it with:
bash pdfsearch.sh
(For PDFs, check out qpdfview or Evince: Both accept a search term at launch.)
When launching, enter the search term (Figure 8), which the script then transfers to pdfgrep. It shows only the number of hits, ignoring case sensitivity. Any hits are provided for selection via smenu.
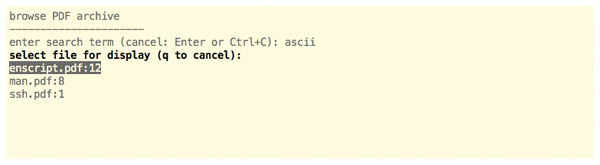 Figure 8: After entering a search term, the search launches and provides a selection of hits.
If you have selected a file to display, the script browses the search term in the PDF viewer. It then highlights it in the document (Figure 9). After closing the display program, either reuse the selection or enter a new search term (Figure 10).
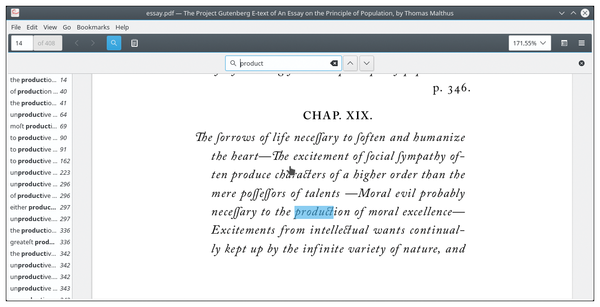 Figure 9: Certain programs allow you to transfer a term when launched, which the software then highlights in the document.
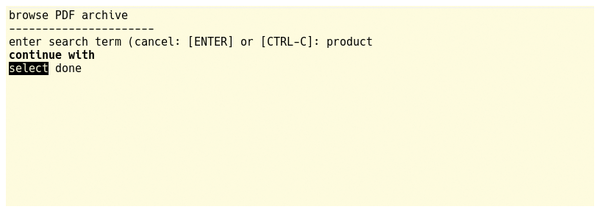 Figure 10: After viewing a PDF document, the script gives you the option of displaying another file or launching a new search.
Conclusions
Setting up a custom selection menu with shell functions is quite a lot of work. Smenu provides a practical alternative. Using the flexible tool, you can quickly and easily bring up a selection menu on the screen, with relatively simple syntax and with the use of very little code. Many options allow for a versatile design.
Infos
- smenu project page: https://github.com/p-gen/smenu
- smenu wiki: https://github.com/p-gen/smenu/wiki