Store data securely in the cloud with Cryptomator
Secure Cloud

© Lead Image © alexmillos, 123RF.com
Cloud services often place little value on data encryption. With Cryptomator, you can easily and transparently encrypt your data locally before uploading to the cloud.
Cloud services provide a convenient and cost-effective alternative to local storage, especially for users who want to access their data from anywhere. However, many cloud providers do not pay sufficient attention to data security. They often store unencrypted data in the cloud as well as transferring the data without encryption. This paves the way for hackers to sniff for authentication data to access a cloud account and then spy on the data.
State institutions, such as intelligence services or investigative authorities, can also view this unprotected data. In addition, this kind of sniffing is often legal, especially in countries where data protection is of little importance. Cryptomator [1], a program developed by the German company Skymatic, puts a stop to this data espionage by encrypting your data transparently. Since Cryptomator's source code is licensed under the GPLv3, built-in backdoors are eliminated.
Strategy
Cryptomator works as a local server that processes the data to be encrypted on a virtual drive integrated by the Filesystem in Use (FUSE) module on Linux. If FUSE is not available, the software uses WebDAV instead. Cryptomator always encrypts the data with a 256-bit AES key and a MAC master key, generating the keys using scrypt technology [2]. In contrast to many other cryptographic programs, Cryptomator not only encrypts the file contents, but also their metadata. In addition, it changes the file size, which makes it difficult to draw conclusions about a file's content.
The software has an easy-to-use graphical front end that works with vaults where you store the data. The vaults match the directories to be synchronized with the cloud service; in other words, the front end must be connected to some kind of cloud storage. The files can be edited at will in the respective vault; encryption and decryption takes place practically in real time. The cloud service client then transfers the locally encrypted data to the server without transferring the keys.
Installation
Cryptomator provides the software for Linux as an AppImage, which means that it can be used on all current distributions without needing to retrofit any dependencies. For Ubuntu and its derivatives as of version 18.04 and for Arch Linux, the project provides separate repositories. For all other distributions, you first need to download the AppImage [3], which weighs in at around 55MB. The manufacturer asks for a donation of up to EUR25, but even if you choose not to donate, you can still download the application.
Note that Cryptomator only runs on computer systems with a 64-bit architecture. After downloading, assign execute permissions to the image. Then run it with the
./cryptomator-1.4.15-x86_64.AppImage
or just by clicking if you are using a file browser like Dolphin.
Getting Started
After starting the software, a two-part window without a menubar or buttonbar appears. The application is controlled using the three buttons located bottom left. Use the plus button to create new vaults, the minus button to remove existing ones from the interface, and the gear button to open a simple settings dialog, where you can define whether the software automatically checks for updates at startup and which function it uses to mount drives (Figure 1).
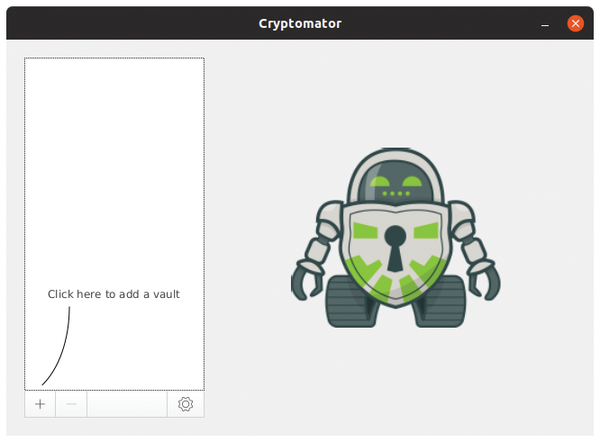 Figure 1: The Cryptomator front end is limited to the bare essentials and is easy to use.
A click on the plus button opens a context menu in which you select + Create vault. Cryptomator displays the dialog for creating a new vault in an overlapping window, where you first define the vault's name and the directory in which the data are stored. Its name needs to match that of a cloud file directory. After pressing Save, the window closes. You are then prompted for a password for the vault in the main window. The color bar below indicates the password's strength.
After confirming the password by clicking on Create Vault, you will see the vault name and path in the left column. There is a closed padlock icon to the left. On the right, enter the password for the vault again and click on Unlock Vault.
Pressing the More options button takes you to further settings. You can enter your own drive options for mounting the device in an input field or tell the software to mount as read-only.
Opening and Closing
After unlocking the vault, Cryptomator opens a window with a file manager containing the virtual drive. At the same time, the padlock symbol in front of the relevant vault opens. You can quickly see which vaults are open, even if there are several (Figure 2).
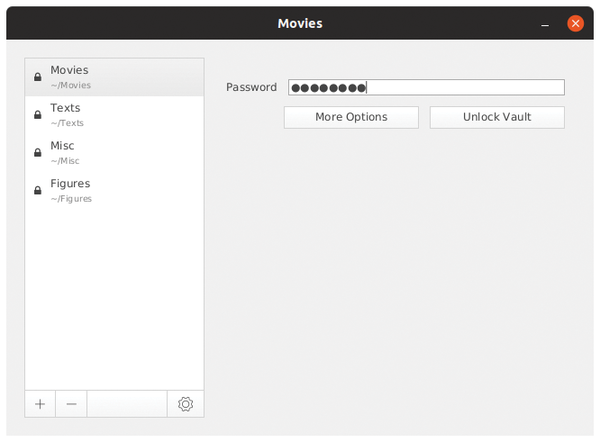 Figure 2: Cryptomator also manages multiple vaults simultaneously.
You can drag and drop to move, or simply copy, the files to be encrypted to the virtual drive. In the main window, you will also see a graph in the right window segment that shows the transfer rates for encryption and decryption in megabytes per second. The red line indicates the encryption throughput, while the green line depicts decryption throughput (Figure 3). The software also opens several vaults simultaneously if required. In our lab, Cryptomator showed no weaknesses, even when encrypting and decrypting files with a size of more than 15GB.
 Figure 3: Cryptomator visualizes the transfer rates during encryption and decryption.
As soon as changes (due to users storing and encrypting new files) occur on the virtual Cryptomator drive, the cloud client synchronizes the data with the server. This ensures that only encrypted data are sent to the cloud server. The files can be viewed and downloaded in the web interface. However, Linux identifies them as binary data; the content is not revealed either by name or file size. To stop working with Cryptomator, click Lock Vault on the right side of the main window. The software then closes the vault, which is indicated by the locked padlock icon.
When you open a vault again, you can immediately work with the decrypted files on the virtual drive. When loading and saving, the software then displays the data rates again in the graphical interface. If you close Cryptomator without closing the open vaults, the window is minimized to the taskbar, where you can access it at any time.
To remove a vault, click the minus icon in the lower left corner of the main window. If the vault is open, it is grayed, and the action cannot be performed. If the vault is closed, a window appears to inform you that the software is not removing the vault (the actual directory containing the data) from the system, but only the link from the graphical front end. You therefore need to manually delete the target directory from the system afterwards (Figure 4).
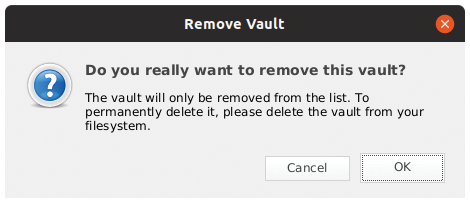 Figure 4: The software only removes the entries for vaults; the data contained in the vaults are retained.
Resource Hog
We noticed some unusual behavior when running Cryptomator in our lab. For inexplicable reasons, the processor load and memory consumption of the system increased until the computer almost came to a standstill.
On launching Cryptomator, the resource consumption was normal. The same was true of mounting a vault and for as long as the vault remained open. But after closing a vault, the load on a multicore CPU increased to over 50 percent on all cores. The memory consumption increased continuously until the system started to swap out and became virtually impossible to use. We noticed that Cryptomator was eating up about 2GB RAM per minute (Figure 5). This started as soon as the application prompted us for the password for a suspended vault. Closing the software released the resources immediately.
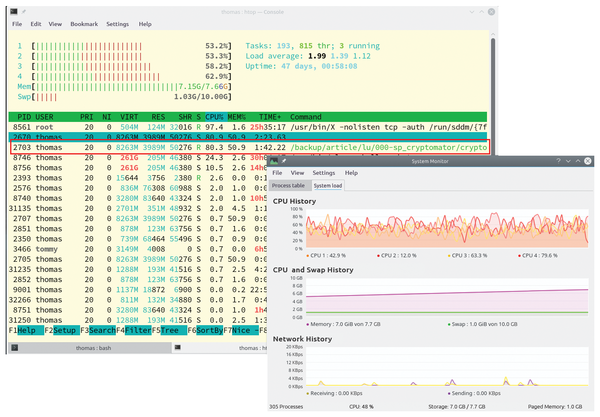 Figure 5: A possible bug in the software causes the system resources to go completely out of control after closing a vault.
Further research revealed the following: This peculiarity occurs if you use the cryptomator-1.4.15 AppImage offered by the project on openSUSE. On Ubuntu 19.04, the processor load increases permanently to 100 percent, but without depleting the RAM. This is primarily due to the gnome-shell process, which immediately returns to its original value of one to two percent CPU load after closing the AppImage.
We also observed this behavior in the Windows variant. Although it did not use all of the CPU capacity, the load on our test system still increased permanently to about 30 percent.
Conclusions
Cryptomator significantly increases your data security in the cloud. It relies on intelligent encryption to not only modify the content by cryptographic means, but also abstract the file details and metadata. The software is extremely stable and can also handle large files.
The very simple front end is noteworthy. It does not present any surprises even for inexperienced users, which makes transparent encryption easy to handle even for beginners.
Annoyingly, what appears to be a bug in the software causes the CPU to use up to 100 percent of its capacity when displaying the password prompt on Ubuntu. On openSUSE, the CPU consumption doesn't increase that much, but the RAM is depleted relatively quickly.
Infos
- Cryptomator: https://cryptomator.org
- Scrypt technology: https://en.wikipedia.org/wiki/Scrypt
- Download Cryptomator: https://cryptomator.org/downloads/#winDownload