Draw and paint in Linux
Sketch Artist
If you are looking for an open source drawing program, Krita and MyPaint both offer graphic tablet support and brushes. Deciding which one works best depends on your specific needs.
When it comes to an open source alternative to Photoshop, most people think of Gimp. However, Gimp isn't the only raster graphics (aka bitmap) editor for Linux. For drawing and painting, users quickly realize that they need more than Gimp, including brushes, Wacom-style graphic tablet support, and artistic effects. Krita and MyPaint are two open source alternatives that are specifically designed for digital artists.
Krita [1], once the black sheep of the KOffice bundle, has received a lot of attention as a standalone application. A prominent participant in the Google Summer of Code since 2008, it has grown into mature, production-ready software with paid developers.
MyPaint [2] is a simpler, more basic drawing application with fewer features. However, simplicity can be a great advantage, attracting many talented artists, including David Revoy, the prominent Blender animation specialist and the creator of many MyPaint brushes. Although the latest stable version, MyPaint 1.2, dates from 2017, solid work is being done on version 2.0.
Each application has its devoted users and areas where it performs best. If you haven't used either Krita or MyPaint recently, revisit both apps, in particular the MyPaint 2.0 beta. Both Krita and MyPaint have developed into mature, widely-adopted drawing suites.
MyPaint
With its strong focus on drawing, it makes little sense to use MyPaint for anything else. If you do choose to open a photo in MyPaint, your options are limited: You can use MyPaint's layer and blending options, superimpose text, or add a sketch to embellish the photo. It doesn't offer features found in Gimp, such as healing and cloning brushes, geometric transformation tools, filters, or color correction.
Instead, MyPaint gives you an infinite canvas for drawing and painting; you don't even need to predetermine your image size. With an understanding of how artists work, MyPaint's limited tool selection lets you focus on the content, not the interface.
You may want to customize the initial MyPaint layout so that all essential tools and features are at your fingertips. You can add dockable panels with the brush assortment, color wheel, and brush settings. No matter how many panels you add, the central drawing area remains large and spacious, with panels to the sides (Figure 1). There are several ways of choosing the color (from RGB sliders to various color wheel types), seven sets of artistic brushes from different artists, and the traditional brush settings panel. Brush settings include Size, Opaque, Sharp, Gain, Pigment, and more. Similar to Gimp, panels can be stacked to form tabs.
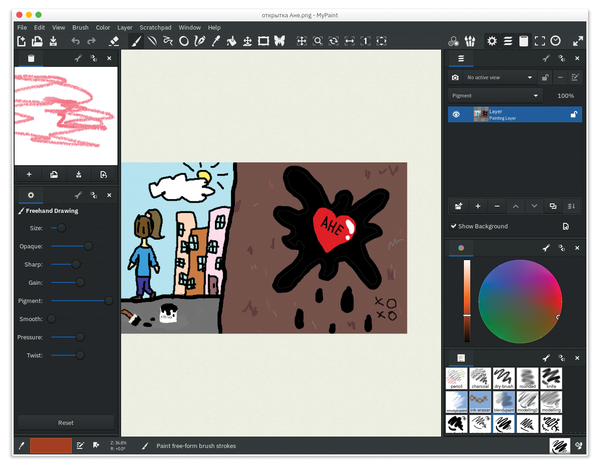 Figure 1: After arranging MyPaint's panels for brushes, layers, and settings, you're ready to draw or paint.
MyPaint supports many graphics tablets including Wacom. The pressure sensor works correctly for all supported models. You can also tweak advanced settings; the Edit | Edit Preferences dialog is largely dedicated to pressure handling and assigning custom actions to keys and buttons. Global Pressure Mapping (Figure 2) is a configurable curve that changes brush behavior. Adjusting the curve can subtly change how the digital brushes behave, mimicking real-life brushes.
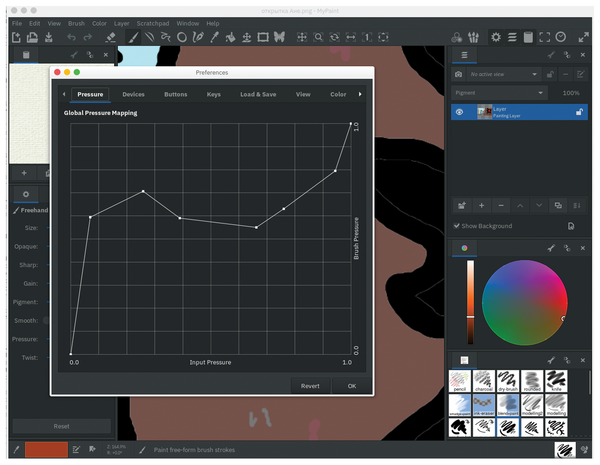 Figure 2: Global Pressure Mapping in MyPaint lets you experiment with brush behavior.
Drawing with MyPaint is quite comfortable. You use the F and D keys to change the current brush size, the mouse wheel controls zooming, and dragging with the left mouse button pressed while pressing the spacebar lets you move around the canvas. After 10 seconds of inactivity, unsaved work is backed up in the OpenRaster format (.ora) and placed in ~/MyPaint, minimizing the chance of losing your work.
Krita
With its main toolbar offering numerous features, Krita looks very professional. If you connect your tablet and start drawing, you'll notice that Krita is well-tailored for artists. A right mouse click (most likely implemented in your pen as the extra button) brings up the radial palette with a set of brushes, a color selector, scale control, and access to extra brushes.
Krita offers a breathtaking number of brushes: pens, pencils, inks, chalks, airbrushes, markers, scratchers, textured brushes, pastels, and much more. All brushes are divided into groups and powered by 17 brush engines. Select a brush by pressing the Choose brush preset button on Krita's top toolbar. Then press Edit brush settings and configure opacity, blending, size, ratio, pressure, and more. The number of settings depends on the brush engine, ranging from fewer options with the Quick Brush Engine to several options with the Pixel Brush Engine (Figure 3). The number of possible combinations of brush settings is close to infinite.
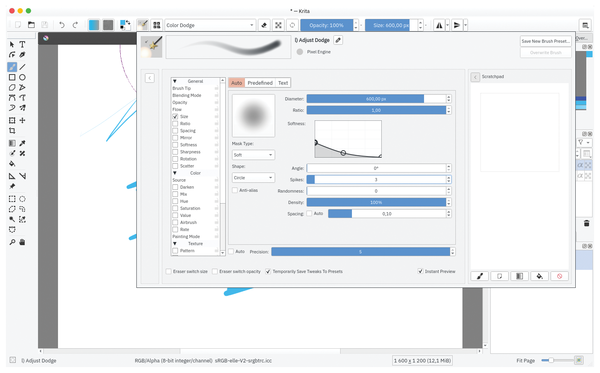 Figure 3: Krita sports several brush engines, some of which hide an impressive number of options.
Unlike MyPaint, Krita has cloning and healing brushes, as well as a variety of image transformation tools. It is possible to use Krita for general image manipulation instead of Gimp, but one should keep in mind the following limitations:
- Although the cloning brush works well, the Smart Patch tool (used for healing) is too automated and can deliver mixed results.
- Krita can lag and show poor performance when working with large images.
- Color correction tools are very limited.
- There is no printing support.
Early versions of Krita featured a limited set of built-in effects and filters, which prevented the application from competing with Gimp equally. Recent Krita versions support GREYC's Magic for Image Computing (G'MIC) – a rich set of artistic, geometric, abstract and enhancing filters (Figure 4). You will find these filters under the Tools menu.
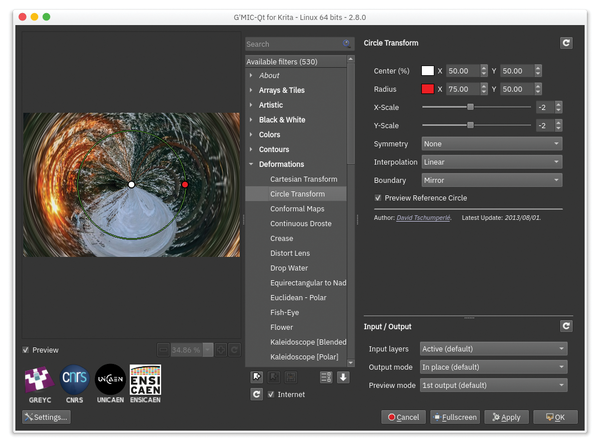 Figure 4: Krita isn't just for drawing: G'MIC support lets you play with artistic filters and effects.
Krita offers more than just drawing tools. Additional advanced features allow you to create animations and comic templates, as well as offer support for vector objects. Under Settings | Configure Krita…), you will find a noticeably larger set of options than found in MyPaint. You may want to adjust the RAM limit and swap file location, change the color space to 32-bit RGB, or apply a custom International Color Consortium (ICC) profile to your screen. Regardless of the menu, Krita has more available tools and options than you might expect. A good example is color blending for layers and brushes (Figure 5). Apart from multiply, screen, and a dozen other expected variants, Krita also allows blending things by lightening, darkening, and mixing based on different color models and extra algorithms. It's quite sophisticated; consequently, once you master Krita's options, you will have reached an unprecedented level of precision when it comes to graphics.
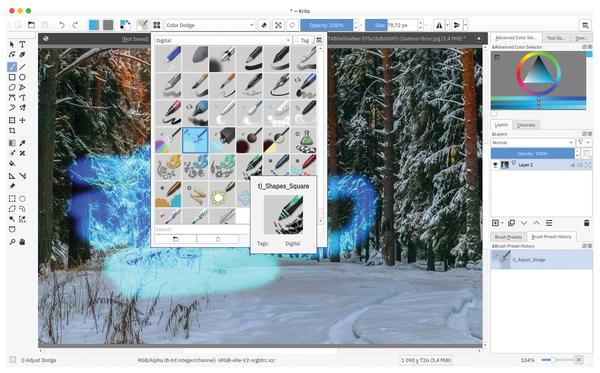 Figure 5: Krita offers a large selection of brushes, including cloner and healer brushes.
Interoperability
Both MyPaint and Krita can export and save files in OpenRaster (MyPaint's default), PNG, and JPEG. Krita offers additional options, including its default native format (.kra) as well as PSD, XCF, and a bunch of traditional raster formats (XPM, TIFF, etc.).
Although both MyPaint and Krita support OpenRaster, you should be aware of OpenRaster's limitations. For instance, Krita's support of selection masks for layers will be lost if you save the file as OpenRaster. To preserve this, you should use Krita's default .kra format, which supports all of Krita's features.
While MyPaint is not designed to import Photoshop PSD and Gimp XCF files, Krita can handle these types of files with some limitations. Krita's reverse-engineered PSD importer supports layer groups and masks, blending modes, and transparency. It does not support text layers and vector objects. Still, it's better than nothing.
Input Devices
Both applications are designed to work with pressure-sensitive graphics tablets. MyPaint in particular suffers without a dedicated input device. If you don't have one, you can try to draw with a mouse, but you will not get very far. This deficiency shows in many of its features, such as Scratchpad, which offers a separate canvas space where you can make sketches, mix colors, and do various auxiliary tasks without cluttering the main canvas.
Krita is far less hardware-dependent. Without a tablet, you can still master comics, animate your artwork, and manipulate images. If Krita had more developed color management tools (e.g., shadows and highlights), a better healing brush, and a decent print preview dialog, it could compete directly with Photoshop.
Making a Decision
Choosing between MyPaint and Krita depends on your individual needs. If you just need a robust mediator between your drawing tablet and Linux, then MyPaint is preferable. While it has fewer brushes than Krita, some artists think MyPaint brushes are better and more true-to-life. MyPaint's purpose is to provide the most authentic drawing experience. With this narrow focus, you can't criticize MyPaint for falling short on things it was not meant to do. Additionally, MyPaint settings are easier to navigate and use. For instance, changing the pen pressure in MyPaint is very intuitive.
Krita offers a complete, end-to-end solution for sketching, painting, and creating graphics from scratch. While MyPaint is superb in simple drawing, Krita also lets you draw comics, textures, animated scenes, retouch photographs, distort and transform any raster images, and apply artistic effects. However, Krita can't fix pale, underexposed, or blurred images, and it does not allow you to print. A decade ago, Krita did support printing, but it was so buggy that the developers decided to remove this feature.
In terms of performance, Krita has greatly evolved in recent years with improved OpenGL acceleration for the canvas, as well as the ability to calculate brush dabs on several CPU cores at one time. However, both contenders have important gaps. MyPaint's infinite canvas isn't that infinite if it consumes your available RAM without notification, and there is no dedicated setting to remedy this. Using large brush sizes in both MyPaint and Krita can slow down your computer. However, since Krita relies on hardware acceleration, your mileage can vary here depending on your hardware, drivers, and OS. Therefore, it is worth testing Krita on Windows, Linux, and macOS for comparison. MyPaint performance is somewhat less affected by your setup: It is fast with smaller sketches and slower with larger ones.
For beginners or artists who just want to draw and paint, I would recommend MyPaint. For more advanced users or anyone who wants to learn something new, Krita offers a versatile all-in-one bundle, which resembles Adobe Photoshop in terms of GUI without its paid subscription or other limitations.
Infos
- Krita: https://krita.org
- MyPaint: https://github.com/mypaint/mypaint/releases