Free FlightGear flight simulator
Above the Clouds
The free flight simulator FlightGear has improved in terms of stability and realism in recent years and offers joystick pilots massive potential for fun.
The FlightGear flight simulator [1] is one of the veterans of the Linux gaming world. More than 20 years after its initial release, the program has matured into complex simulation software that brings many aspects of flying to the screen in a realistic way. For this article, we used FlightGear v2018.3.
The images in this article were taken with the best possible graphic settings (see box, "Graphics Settings"). At a screen resolution of 2540x1440 pixels, this only utilized about half of an AMD RX 580 card's capacity (Figure 1). Even with slower cards, FlightGear remains playable, because after switching off rendering options like 3D clouds the simulator's resource requirements drop significantly.
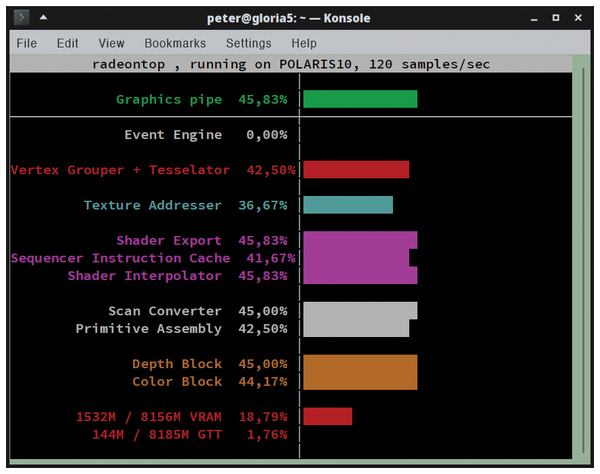 Figure 1: The RadeonTop graphics performance monitor shows that with an AMD RX 580 graphics card, even at maximum rendering quality in FlightGear, there is still plenty of capacity.
Graphics Settings
In the graphics settings below View | Rendering Options (Figure 2), you can adapt the graphics to suit your graphics adapter's performance. Use point sprites for runway lights is enabled in General, which means you have three-dimensional rendered runway lights. Throttle frame rate restricts the frame rate to a maximum of 50 frames per second, helping the game to run more evenly. Compensate field of view for wider screens is another helpful setting.
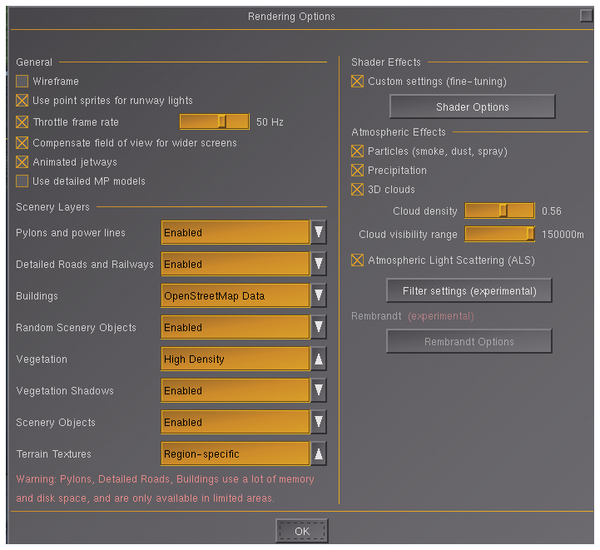 Figure 2: The Rendering Options allow you to adapt FlightGear's resource consumption to an acceptable frame rate on your system.
In the Scenery Layers section you can decide whether FlightGear shows you Pylons and Power lines and objects such as barns (Scenery Objects), based on a database, and also adds Random Scenery Objects to the landscape. The dialog warns you about the memory consumption, which can climb to 8GB. You can also choose the vegetation density, and decide whether or not trees and bushes should throw shadows. The Region-specific option for Terrain Textures colors the terrain and vegetation to match the region, for example, the Blue Ridge Mountains actually look blue instead of green.
The Shader Effects have a noticeable influence on the frame rate. You would normally see a simple slide control here, but if the Custom Settings option is enabled, then the Shader options button opens a dialog for detailed settings (Figure 3) that govern the rendering quality of scenery display. Experience shows that the 3D clouds option consumes the most graphics capacity. Without 3D clouds, the FlightGear world appears far less vivid, but it is often sufficient to just reduce the density of the clouds or the distance at which they become visible.
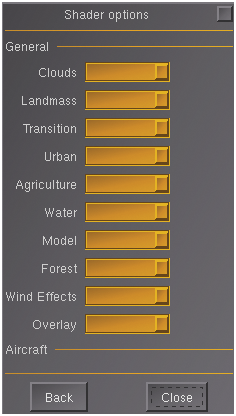 Figure 3: After selecting Custom Settings, all Shader options were set to the maximum for the best possible graphics here.
Atmospheric Light Scattering computes the light color on the basis of the light scatter in the atmosphere. Without it, the FlightGear world is far paler at typical altitudes.
Artificial World
FlightGear features numerous aircraft types whose cockpits and exterior views the program renders as 3D models. This means that the aircraft appear realistic from different angles and in different lighting conditions. A huge amount of work was also put into representing the landscape. It is based on a model of the entire Earth's surface that processes data from the space shuttle program, the global coastline database GSHHG [2], and data from the European Environment Agency and OpenStreetMap. In addition, around 180 contributors have designed local features, such as airports or cities.
FlightGear renders landscapes around the world with natural-looking vegetation, including impressive mountain scenes from the North American Blue Ridge Mountains to the Himalayas (Figure 4). Compared to the brilliant nature scenes, low overflights over cities are somewhat disappointing. For example, in Nuremberg, Germany, the castle looks a bit different in reality than on the screen (Figure 5), which is only to be expected. While landscapes automatically generated from elevation data look quite realistic, the scenery developers have to design recognizable buildings by hand. From a normal overflight altitude of about 6,000 to 7,000 feet, the city views generated from OpenStreetMap data look at least halfway realistic.
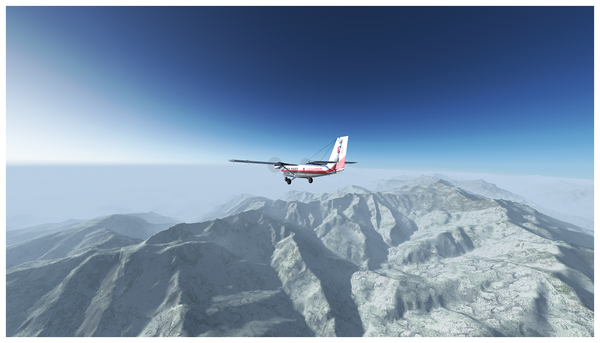 Figure 4: You can fly above the Himalayas in FlightGear, for example, on a flight through Nepal from the Tenzing-Hillary Airport in Lukla (VNLK) to Kathmandu (VNKT).
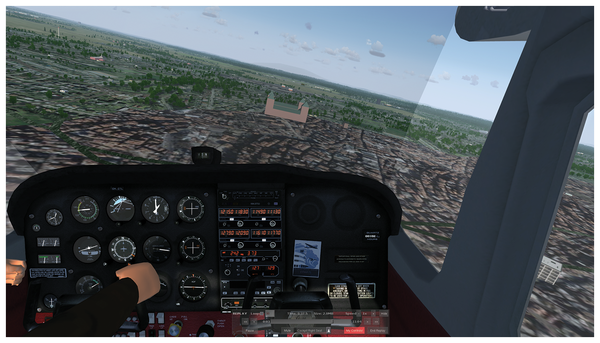 Figure 5: This is the degree of realism you can expect in a low-level flight (which would be prohibited in real life) over a major city in Germany. If you are familiar with Nuremberg, you will not recognize it in FlightGear.
There are also differences in the degree of realism in the interiors of the aircraft models: The cockpit surfaces of the Cessna 172P almost look as if you could touch them. The soft reflections in the instrument glasses may impair readability, but this is no different in reality. The cockpits of the Boeing 777-300 (Figure 6) and MDD F-15C do not look quite as fresh, although they are still above-average FlightGear models that make flying fun.
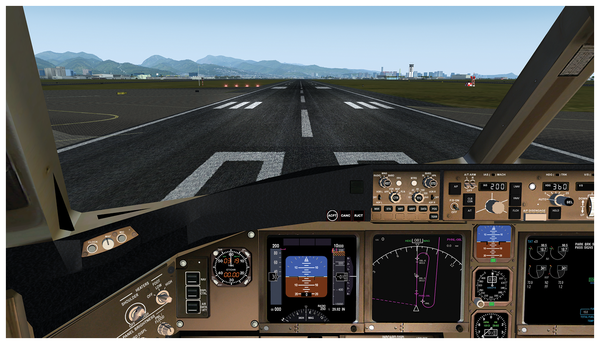 Figure 6: The cockpit of a Boeing 777 (first flight in 1995) is now based almost entirely on screens. The analog dials are only backup instruments.
Flight Machine
FlightGear not only simulates the landscape and the appearance of the aircraft, but also many technical conditions (Figure 7). Navigation instruments like the VHF Omnidirectional Range (VOR) actually work. (This is a rotary radio beacon that emits angle information. In combination with a radio-based rangefinder, the aircraft position can be precisely determined.)You are confronted with a dreaded stall scenario, where the aircraft stalls after dropping below the minimum speed with the resulting need to permanently monitor the airspeed, just like a real pilot.
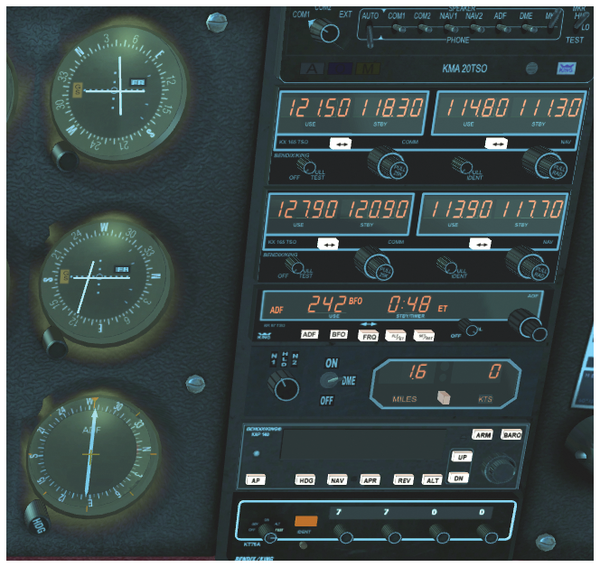 Figure 7: Navigation instruments in the Cessna model look and work just like the real thing.
Time to launch the flight simulator and a Cessna 172P: This veteran aircraft has been one of the best maintained models in FlightGear from the outset. In recent versions, the developers have once again polished its cockpit. The single-engine high wing aircraft is not only relatively easy to fly in reality, but also in FlightGear. It is a good model with which to learn flying skills.
If you run FlightGear with the --launcher parameter, a friendly dialog appears to let you select the aircraft, the starting airport, the weather, and other FlightGear settings (Figure 8). In the Aircraft section, click on the Cessna 172P Skyhawk (1982) that I mentioned earlier.
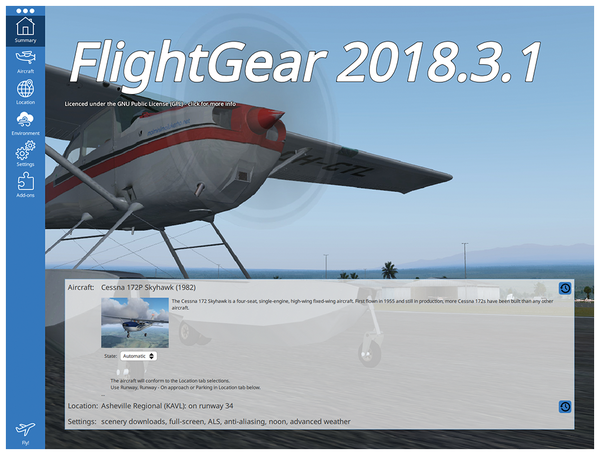 Figure 8: The --launcher start option opens a convenient wizard that lets you select the airport, aircraft, and many other FlightGear settings.
How about an afternoon flight over the beautiful scenery of the Blue Ridge Mountains in South Carolina? Enter ICAO Identifier 33A in the Location category and select the picturesque Fairview airfield. ICAO stands for The International Civil Aviation Organization, which – among other things – assigns globally unique codes to airports. In the next screen, select Runway 32. This runway points, as its name indicates, in the direction of 320 degrees (northwest) that is straight to the Blue Ridge Mountains.
You can choose the weather in FlightGear. We ordered a summer afternoon in the Environment section below Time & Date (Time of day: Afternoon, Season: Summer). In Weather, owners of newer computers can enable Advanced weather modeling. We disabled the Real-world weather option – it evaluates the weather data of a METAR report, a standardized weather report for airports. Instead we chose fair weather as the Weather scenario, to avoid cloud cover blocking our view of the landscape.
If you have an Internet connection with at least one megabit bandwidth, you can select the default Download scenery automatically [3] setting in the Settings section. In Multiplayer, you can also enable a connection to a FlightGear multiplayer server, which integrates other players' planes into your simulated world.
The simulator is normally launched in full screen mode (Start full screen). The Renderer I would recommend is Atmospheric Light Scattering. This method calculates the light scattering in the atmosphere, which makes the simulation look far more realistic for the large visibility ranges of high-altitude flights. Owners of more-or-less up-to-date graphics cards can treat themselves to Anti-Aliasing 4x, which completely irons out the ugly jagged diagonal lines that otherwise appear.
If you enter the --http=8080 option in Additional Settings, you can retrieve an OpenStreetMap-based moving map from the IP address of the FlightGear computer on port 8080 (http://<FlightGear-IP>:8080) via web browser (Figure 9). This lets you turn a tablet into a GPS device with a map display, like the one many amateur pilots take with them to facilitate navigation in their Cessnas.
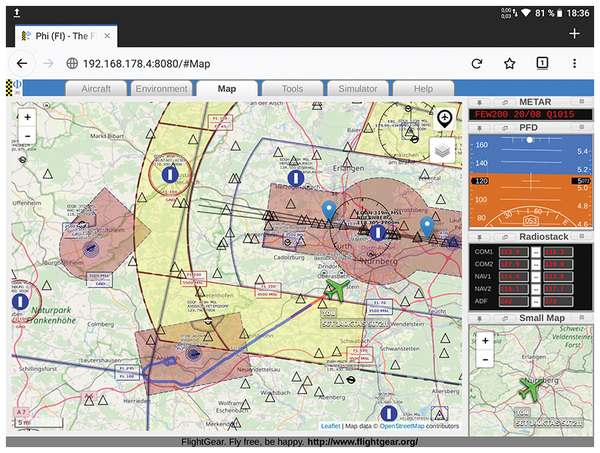 Figure 9: As a web server, FlightGear delivers an HTTP-based map view that you can open on a laptop or a tablet.
Getting Airborne
Now press Fly! This launches the simulation, which will take a number of seconds. The first task is to start the aircraft's engine. Fortunately, a Cessna 172 is easy to start. First zoom out (Shift+X) until you can see the whole of the Cessna cockpit. Ctrl+X switches back to the default zoom level later on. Pressing Ctrl+C highlights all the mouse-controllable cockpit elements in yellow and also shows you the names of the instruments (Figure 10). Pressing the same shortcut again disables this help feature. Press Y to hide the yoke, which is just annoying in this view. You can press the same key again later, if so desired, to display it again.
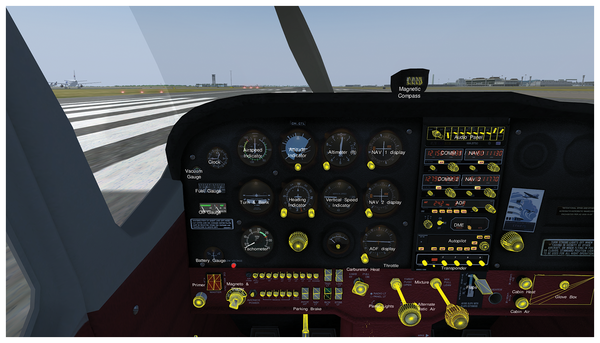 Figure 10: Pressing Ctrl+C highlights all the clickable points in the cockpit in yellow and (in the Cessna) additionally shows you the names of the elements.
Then click on the two red toggle switches bottom left (MASTER ) and additionally the shift lever right next to the ignition key (AVIONICS POWER). Then click six times on the Primer pull to the left below the red toggle switches to pump some fuel into the carburetor. Next, set the black throttle lever (THROT PUSH OPEN) bottom center to 25 percent. To do this, mouse over it and adjust the lever with the mouse wheel; a small pop-up shows you the percentage. Then push the adjacent red lever for MIX PULL LEAN all the way in (100 percent). Finally, press S for the starter for a few seconds to wake up the engine. In the menu with the aircraft name, there is usually an Autostart entry that handles all of these steps, but experienced pilots would never use it.
Theoretically, FlightGear can be controlled completely by keyboard, but serious flying is only possible with a joystick (see "Joystick" box). For control functions for which you cannot use the joystick buttons, there are also the FlightGear keyboard shortcuts, which you will find in the Help menu. An introduction to flying itself is given in the official FlightGear manual [4], chapter 8, A Basic Flight Simulator Tutorial.
All you have to do now is accelerate to take off. But will you find your way back to the airport of departure? Although our simple airfield does not have its own radio beacon for the approach to land, an antenna station nearby can be used to navigate to a position within sight of the runway. Equipment | Map lets you open the flight map, without which a pilot would never take off. But thanks to FlightGear's Map feature, you don't have to have it on paper. The shortcut for this is Ctrl+J, even if the Equipment menu tells you it is Ctrl+M.
If you check the Navaids (navigation aids) box on the left side of the map, then the SPA VOR in Spartanburg appears on the right side below the aircraft. If you also enable the Data option, then you will see its frequency 115.7 MHz on the map. F12 opens the radio settings, where you can enter this frequency in Selected for NAV1, the first navigation device. The SPA station will then turn light blue on the map. A light blue line also appears through the aircraft location, the line is known as the radial.
Now mouse over the dial of the NAV 1 display, and adjust it with the mouse wheel until the horizontal pointer moves to the center and the display TO appears to the right of it at the same time. The pointer may first move to the center in the case of an FR display ("from"). Then turn 180 degrees further, in our example up to 130 degrees.
A VOR always guides an aircraft along the set radial line, which now also runs through the current aircraft location on the map. To determine the position, combine the radial with the Distance Measuring Equipment (DME) display. This is a radio-based distance measuring device, often used in combination with a VOR (VOR/DME). In Fairview, the DME shows a distance of 12 miles to the Spartanburg station. VOR and DME together define a traceable position. If you center the needle of the VOR instrument at Radial 130 and move 12 miles away from SPA on Radial, you will fly over Fairview.
Now you can press Shift+B to release the parking brake, open up the throttle, and fly off to the northwest into the Blue Ridge Mountains.
Finding Your Way Home
Once you have had your fill of the scenery, or if the tank fill level (Equipment | Fuel and Payload) starts to drop towards the 50 percent mark, it's time to turn the plane southeast. What now follows is the procedure which is sometimes jokingly referred to as "Chasing the needle": If the vertical needle in the VOR instrument points to the right, then steer the plane past the 130 degree angle on the compass on the right. If it points to the left, then you steer to the left (Figure 11).
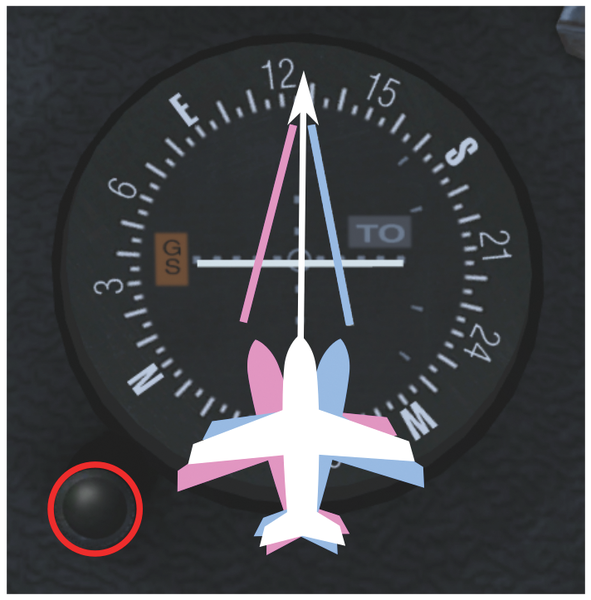 Figure 11: If the vertical VOR needle is to the left of the center, then you fly slightly to the left of the 130 degree course you actually planned (pink). If it deflects to the right, turn in the same direction (blue). If the needle is in the middle, simply follow the planned course (white).
You may want to watch the autopilot first to see how it does this. A Cessna 172P from 1982 only comes with a simple version that cannot be programmed with a route consisting of waypoints. But the KAP-140 autopilot by Bendix [5] can fly along the radial of the active VOR. In the Cessna model, the autopilot cannot be activated using the FlightGear autopilot menu, but only by clicking on its control buttons in the cockpit.
If you switch it on by selecting AP, then it first holds the course and pitch of the aircraft. Click on UP or DN until the number on the right in the autopilot reads 0000 – this stands for a climb rate of zero feet per minute. In other words, the aircraft will maintain its current altitude. Then, using the left-hand dial (marked red in Figure 11), turn the heading indicator to the 130 degree radial of the home course determined before takeoff, and click on the HDG (heading) autopilot button.
The Cessna now turns to 130 degrees, but does not yet compensate for the probable lateral shift in the course (vertical pointer in the VOR, also visible on the chart display). This only happens when you click NAV on the autopilot. Now the autopilot will take you back to the starting airport, but will stubbornly maintain altitude. You have to initiate the descent yourself, at the right time, by pressing the UP and DN buttons.
You also have to manually keep the speed at around 100 knots with the throttle stick. At a ground speed of 120 knots, the aircraft will travel two nautical miles per minute. You can read this off on the DME unit as long as you follow the radial. The mile is the unit commonly used in aviation, which is why the DME also measures in this unit.
If you are flying at 7,000 feet, it will take you 10 minutes to descend to roughly 1,000 feet at a sink rate of 600 feet per minute. This is equivalent to a flight distance of 20 miles. The distance to the VOR is shown by the DME. In our case, you still have to compensate for the 12 miles that the VOR is located behind our home airfield. In other words, you need to start descending 32 miles before the VOR by setting a sink rate of -600 feet on the autopilot with the UP and DN buttons.
As soon as you see the runway (on the map in the browser or on the map display in the FlightGear window), you need to approach manually at about 60 knots. As you will now see, a successful manual landing requires some practice.
Jet Power
Once you have mastered the art of manual flying, the good old Cessna may seem too boring for you. Why not fly a real airliner like the Boeing 777-300, another quality FlightGear model? Its wiki page [6] explains how to launch the triple-seven if you do not want to use the shortcut via the Autostart menu entry. Aircraft-specific operating details can also always be accessed in FlightGear using the Shift+? shortcut.
It is clear that such a large aircraft's response to the controls is a little slower than that of the small Cessna. On the whole though, it's not a massive difference when using a three-axis joystick. The fact that flying the 777 still feels completely different is more due to the screen-based instruments and the digital flight management computer that can automatically fly the aircraft along the entire route – if necessary, up to a few meters before touchdown.
You have already seen the cockpit of the Boeing 777 in Figure 6. The left screen combines airspeed indicator (left), altimeter (right), and compass (below). In the middle is the artificial horizon, which shows the horizontal and vertical position of the airplane even without a view to the outside. The navigation screen to the right with the flight management computer display (Autopilot | Route Manager) shows the planned course.
If the Boeing 777 with a top speed of 513 knots (950km/h) is not fast enough for you, try a Mach 2 fighter. The McDonnell Douglas F-15C "Eagle" (Figure 12) is recommended in FlightGear. The jet, designed as an air superiority fighter, will knock you clean out of your gaming chair even without G-force simulation.
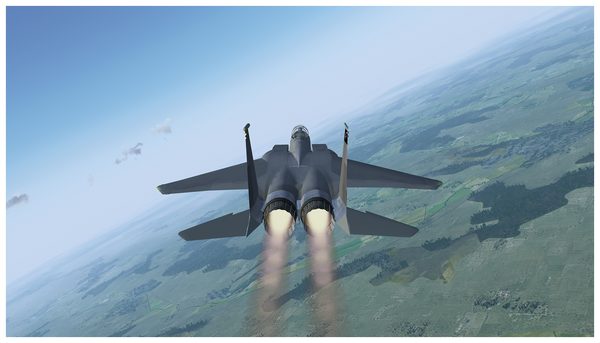 Figure 12: The F-15C "Eagle" – shown with full afterburner here – is an agile fighter that can make you dizzy even in the simulator.
Technical Problems
However, the first test with the F-15C was followed by disillusionment. This had nothing to do with the virtual aircraft, but with the technology of the PC on which the simulation was running: The game only managed disappointingly low frame rates of around 16 frames per second, and the rate also fluctuated strongly. This made it impossible to play FlightGear meaningfully.
Troubleshooting revealed that the load on the graphics card, like with other flight models, hardly exceeded 50 percent. However, one of the four CPU cores was running almost permanently at 100 percent load. Even switching off CPU-intensive simulation elements like the Advanced Weather system or AI Traffic hardly improved the situation. Was it really impossible to play FlightGear on a powerful AMD Ryzen 1800X CPU without any restrictions?
The solution was to add the sparsely documented and experimental startup option:
--prop:/sim/rendering/multithreading-mode=DrawThreadPerContext
It distributed the load over all four cores, keeping them well away from a full load scenario that would slow down the simulation. The simulation then ran smoothly at frame rates of around 50 fps. Only the head-up display of the F-15C did not move as fast as the aircraft itself.
Conclusions
FlightGear is an impressive simulation game that allows computer pilots to experience the feeling of flying over a beautiful landscape. Many technical features, such as VOR navigation or – in commercial aircraft – even an instrument-based approach, can captivate geeks for hours. But you should not expect models, especially jets, to feel exactly like they do in reality, since the flight dynamics model is obviously too simple for that. The commercial X-Plane [7] flight simulator, which is also available for Linux, offers an alternative for this purpose.
Joystick
For FlightGear, we recommend a three-axis stick, whose lever can not only be tilted, but also rotated around a third axis. In this way you can control the elevator, aileron, and rudder. In addition, the joystick should have a slider for thrust; push buttons for other aircraft functions are usually available anyway. A joystick like this is okay for convenient control, even if it does not realistically reproduce the aircraft yoke and rudder pedals. In the Joystick Configuration dialog, you will ideally want to assign axes 0 to 2 to the elevator, aileron, and rudder, and axis 3 to the thrust controller. In addition, you will want to have the Elevator Trim and Rudder Trim easily available; this is the zero position correction to compensate for air currents. For the Cessna, the remaining two pairs of keys are used to adjust the fuel mixture and flaps.
Infos
- FlightGear: http://flightgear.org
- GSHHG database: https://en.wikipedia.org/wiki/GSHHG
- Manual scenery download: http://ns334561.ip-5-196-65.eu/~fgscenery/WS2.0/scenery-2.0.1.html
- FlightGear manual: http://flightgear.sourceforge.net/getstart-en/getstart-en.html
- Bendix King autopilot: http://wiki.FlightGear.org/Bendix/King_KAP140_Autopilot
- Boeing 777 in the FlightGear wiki: http://wiki.flightgear.org/Boeing_777
- X-Plane: https://www.x-plane.com