Testing the Adafruit PyPortal touchscreen

Display Deluxe

© Lead Image © donatos1205, 123RF.com

© Lead Image © donatos1205, 123RF.com

Author(s):

Unlike other displays for the Raspberry Pi, Adafruit's PyPortal touchscreen provides an autonomous environment, including a microprocessor, sound output, and a WiFi connection.

The Raspberry Pi has a hard time with small displays because support from Raspbian is surprisingly poor. Creating and implementing suitable interfaces is difficult with a dearth of off-the-shelf programs for controlling small displays. I'm quietly confident that the PyPortal intelligent touchscreen by Adafruit is a better solution.

PyPortal (Figure 1) is a small 3.2-inch networkable resistive touch display with an integrated microprocessor [1]. At $55 (EUR59), it is not exactly cheap, but considering its components, the price seems reasonable. A correspondingly sized 3.2-inch display plus a Pi Zero W with an SD card, at about the same price, will serve as a comparison with the PyPortal configuration.

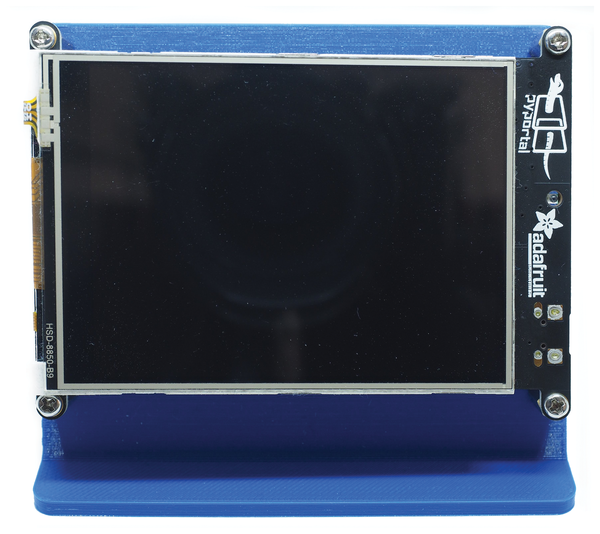
Figure 1: The front of the intelligent PyPortal display. The resistive touchscreen requires a certain amount of pressure before it reacts.

PyPortal in Detail

The screen takes up almost all of the real estate on the front, with a mounting frame and a brightness sensor on the right side. Adafruit has cut costs on the display itself. The resolution of 320x240 pixels is more suitable for 2.8-inch devices. Resistive touch technology is also a way of saving cash, but it does mean you need a stable mounting – just touching the screen is not enough, you actually have to press it.

The PyPortal is now available in two other sizes. The PyPortal Pynt for $45 reduces the screen diameter to 2.4 inches with the same number of pixels; the 3.5-inch PyPortal Titano offers a resolution of 320x480 pixels, plus a USB C power connection for $60.

The back of the display (Figure 2) accommodates, among other things, an ATSAMD51J20 CPU by Atmel. It is supported by the far larger ESP32 WiFi coprocessor by Espressif. These popular modules provide WiFi at a low cost. The ESP32 takes on the computationally intensive TLS/SSL encryption protocol, thus reducing the burden on the Atmel CPU. Its Cortex-M4 processor runs at 120MHz and has 1MB of flash memory for program code and 256KB of RAM. Additionally, 8MB of flash memory is available for other resources, such as images or sounds.

Figure 2: The back of the PyPortal features the Atmel CPU and the ESP32 chip, which handles WiFi and the computationally intensive TLS/SSL encryption protocol.

In addition to the previously mentioned light sensor, the PyPortal's features include a reset button, a temperature sensor, a miniature speaker with an amplifier, a microSD slot, a neopixel LED, an I2C port, and two ports for additional sensors. The last three ports also provide power and ground.

Mostly because of the extensive equipment, it's not surprising that the intelligent display has been very well received in the maker scene. Adafruit also designs the hardware, so you can adapt it to your own ideas. For example, if you need a better loudspeaker, just interrupt the defined conducting path and connect your own.

Besides the PyPortal, Adafruit also sells a matching minimalist display stand. However, both Adafruit and the community have already designed various cases that are available on popular 3D printing portals. You will find the stand from Figure 1, for example, on Thingiverse [2].

Getting Started

To put the display into operation, all you need to do is connect it to a 5V power supply with a micro-USB plug. CircuitPython runs on the Cortex-M4 processor; Adafruit has implemented a small example program, but it throws errors because the WiFi chip fails to connect to the home network without an SSID and password. Before you adapt the program, though, you will want to update the firmware.

Both firmware updates and program changes are handled over the USB cable, which you connect to a PC instead of a power supply for this purpose. Choose a cable that is not too long and of good quality; in particular, do not use a mere powercable. If you press the reset button once, the PyPortal reboots; if you press it twice, it switches to firmware update mode.

In both operating modes, the display provides its program memory as a drive. In normal operation, it goes by the name CIRCUITPY; in update mode the name is PORTALBOOT. On Linux, the device files known from USB storage media appear with a small difference: In operating mode, PyPortal announces itself as a partitioned mass storage device with the device name /dev/sd<X>1; in update mode it claims to be an unpartitioned stick named /dev/sd<X>.

On Linux, first check to see whether the drive has been mounted automatically. If this is the case, eject it and remount it with the command:

$ sudo mount -o sync /dev/sd<X> /mnt

The sync option ensures that all files are immediately written to the PyPortal. To install the firmware update, first download the current version, and then simply copy the file with the .uf2 suffix to the drive. The board then reboots, the PORTALBOOT drive disappears, and the CIRCUITPY drive appears.

Details of the update and, more specifically, links to the current firmware and how to work with CircuitPython can be found in the Adafruit [3] documentation. At the end of the day, working with the PyPortal is no different from working with other CircuitPython boards.

Figure 3 shows the layout of the files in operation mode. The root directory contains the code.py file, which contains the Python code of the main program that runs in an infinite loop, and the lib/ subdirectory contains libraries. Other files and directories depend on the application.

Figure 3: When connected to a Linux computer, PyPortal's memory appears to be a normal drive.

Weather Geek

Adafruit's sample program, as supplied with the product, retrieves a saying from a web server at regular intervals and shows it on the display. To log in to your WiFi network, the program needs the access credentials, which you enter in the secrets.py file. On closer inspection, the program turns out not to be very instructive, because it hides all the magic in the PyPortal class. This prompted me to develop a project of my own to illustrate how to display images and text.

The PyPortal is best suited for receiving and visualizing data. The program will query the weather from wttr.in. This slightly different kind of weather portal provides an ad-free weather report on the command line and is based on the Go program wego; fans of ASCII art will definitely get their money's worth. Figure 4 shows a deluxe version of its output. In a terminal window, you can call up this weather forecast for your location by typing curl wttr.in. Typing curl wttr.in/:help shows the syntax.

Figure 4: The wttr.in project outputs the required weather data in ASCII format on the terminal.

Wallpapering

The first thing to do is to set up some nice wallpaper on the screen. The PyPortal only supports bitmaps in 8-bit format at 320x240 pixels. For the project, I trimmed a picture of clouds in Gimp accordingly and exported it in BMP format. The code from Listing 1 displays the image.

Listing 1

Displaying an Image

01 import board
02 import displayio
03 from adafruit_bitmap_font import bitmap_font
04
05 # -------------------------------------------
06
07 def get_background(filename):
08   bg_file = open(filename, "rb")
09   background = displayio.OnDiskBitmap(bg_file)
10   return displayio.TileGrid(background, pixel_shader=displayio.ColorConverter())
11
12 # --- main-loop   ---------------------------
13
14 display = board.DISPLAY
15 group   = displayio.Group()
16
17 # set background
18 group.append(get_background("clouds.bmp"))
19
20 display.show(group)
21
22 while True:
23   time.sleep(60)

The displayio user interface library uses its own nomenclature. Other toolkits build and display trees of widgets, referred to as a group here. The program creates the top-level group in line 15. The get_background() subroutine (lines 7-10) creates a TileGrid (which itself is a group) from the BMP file.

The command in line 18 adds this group as the first subgroup and displays everything in line 20. The display determines the order of the subgroups: The earlier you add a subgroup, the further back it appears in the image, which is why the background needs to come first.

Text Output

The Label class is used for text output. Again, the terminology is confusing – a label is usually a short caption. In the displayio nomenclature, however, Label denotes a multiline text box. The library does all the work transparently in the constructor (Listing 2, line 10). The constructor creates a label from the text that is passed in, evaluates embedded line breaks, and takes care of suitable line spacing.

Listing 2

Creating a Text Box

01 import board
02 import time
03 import displayio
04 from adafruit_bitmap_font import bitmap_font
05 from adafruit_display_text import label
06
07 # -------------------------------------------
08
09 def get_label(text,font,color):
10   text_area = label.Label(font, text=text, color=color)
11   (x,y,w,h) = text_area.bounding_box
12   text_area.x = 0
13   text_area.y = -y
14   return text_area
15
16 # --- main-loop   ---------------------------
17
18 display = board.DISPLAY
19 group   = displayio.Group()
20 FONT    = bitmap_font.load_font("/DroidSansMono-16.bdf")
21 COLOR   = 0xFFFFFF
22
23 text="""Row1
24 Row2
25 Row3"""
26
27 group.append(get_label(text,FONT,COLOR))
28 display.show(group)
29
30 while True:
31   time.sleep(60)

However, the absolute alignment of the entire text box is not very intuitive. If you simply output the label, you will only see half of the content: The x and y coordinates of the text box refer to the center of its left edge, which would then end up in the upper left corner of the display. Lines 11-13 correct the offset of the label so that the text output ends up where you expect it to.

If you want to output several pieces of text in different colors or sizes, you cannot do this with just one label. The dimensions of the bounding box in line 11 help you achieve the right layout.

Fonts

The text output always uses bitmap fonts, with all their inherent advantages and disadvantages. Bitmap fonts contain mini-images of all characters, which avoids the time-consuming rendering of letters. Because the character size is fixed, you need a separate font for each size. More powerful systems, where the rendering overhead is not important, therefore use more space-saving character set formats. As a result, hardly any bitmap fonts are available for download on the Internet.

Fortunately, you can get the font conversion program FontForge through your system's package manager, or you can download it from the FontForge homepage. By following the instructions found online [4], in just a few mouse clicks you have created a bitmap font of your choice. To display the ASCII graphics of the weather output correctly, I chose a monospace font.

Data from the Web

The only thing missing after the wallpaper text is the Internet connection, so you acquire the weather data. The decisive commands are shown in line 11 of Listing 3, which imports the SSID and the WiFi password from the secrets.py file. The code in lines 14-21 then establishes the connection with the ESP32 chip.

Listing 3

Getting the Data

01 import board
02 import busio
03 from digitalio import DigitalInOut
04 import time
05 import neopixel
06 import displayio
07 from adafruit_esp32spi import adafruit_esp32spi, adafruit_esp32spi_wifimanager
08
09 # ---------------------------------------------
10
11 from secrets import secrets  # file secrets.py
12
13 def get_wifi(secrets):
14   esp32_ready = DigitalInOut(board.ESP_BUSY)
15   esp32_gpio0 = DigitalInOut(board.ESP_GPIO0)
16   esp32_reset = DigitalInOut(board.ESP_RESET)
17   esp32_cs    = DigitalInOut(board.ESP_CS)
18   spi         = busio.SPI(board.SCK, board.MOSI, board.MISO)
19   esp         = adafruit_esp32spi.ESP_SPIcontrol(spi, esp32_cs, esp32_ready, esp32_reset, esp32_gpio0)
20   status_rgb  = neopixel.NeoPixel(board.NEOPIXEL, 1, brightness=0.2)
21   return adafruit_esp32spi_wifimanager.ESPSPI_WiFiManager(esp, secrets, status_rgb)
22
23 # --- main-loop   ------------------------------
24
25 connection = get_wifi(secrets)
26 try:
27   response = connection.get("https://wttr.in/München?AT0&lang=en")
28   text = response.text
29 except:
30   text = "No data received"
31 group.append(get_label(text, FONT, COLOR))
32 display.show(group)
33
34 while True:
35   time.sleep(60)

Once the connection is up, you can send standard HTTP requests like GET and POST and evaluate the server response – typically by HTML, but with JSON to query data servers. In contrast, wttr.in returns plain text (Listing 3, lines 28 and 30), which the program outputs directly after converting it to a label (Figure 5). I adapted the URL in line 27 to suit the small PyPortal, so the output only shows the current weather data instead of a detailed multiple-day forecast. Change the city name before the question mark in the URL for your location, and use lang=en for English output.

Figure 5: The weather forecast for Munich, as requested from wttr.in, shows light fog. A picture of clouds was adapted for the background.

With fewer than 50 lines of code, the display shows the current weather data, but the program still lacks the ability to query the weather report regularly. To do this, you need to add a get() command to the infinite loop at the end of the program. Also, you might want to display the current time and the indoor temperature from the built-in sensor in the PyPortal.

Unfortunately, the temperature sensor in the PyPortal turns out to be a flop. The display backlighting heats it up, so it delivers useless values. As a consequence, Adafruit got rid of this sensor in the PyPortal Pynt and Titano variants. A better alternative would be to attach an alternative device (e.g., a BME280 or LM75) with a short cable to the I2C interface.

An extended version of this sample program is on GitHub [5].

Better than the Raspberry Pi?

The sample project has shown at least some of the PyPortal's capabilities. The question arises as to how the intelligent Adafruit display compares with a Pi Zero plus a miniature display.

The biggest benefit the PyPortal offers is its compact design. The processors, components, and connections on the rear are unlikely to wear out. Conversely, the Raspberry Pi is attached in a fairly precarious way to the socket array or HDMI port on a typical miniature screen. In the former case, the screen usually blocks pins that it doesn't need, so connecting additional sensors then means purchasing a multiplexer board.

Unlike the Raspberry Pi, the PyPortal comes with a tiny speaker for sound output. It is more suitable for warnings and signal tones than for listening to music, but the Pi Zero lacks this feature completely.

Regardless of the hardware, the intelligent display is far easier to set up than the Pi Zero and a small screen. Tinkering with the /boot/config.txt file with special overlays or HDMI parameters is not necessary. To switch it off, all you have to do is pull the plug, because there is no operating system that needs to be shut down cleanly first.

The PyPortal's current draw is about 200mA when the display is on and about 70mA otherwise. Therefore, the display is not suitable for battery operation. Even in continuous operation, though, it is unlikely to increase your electricity bill that much. A display of exactly the same size for the Raspberry Pi was not available for comparison measurements, but with a 4-inch screen from Waveshare, the combination clocked up to 260mA. The difference of 60mA between the PyPortal and Pi Zero including display can be measured, but in practice it hardly plays a role.

Of course, PyPortal does not always give you the better solution because many of its advantages turn into disadvantages in certain applications. If you need considerably more screen surface or better resolution, there is no escaping the Raspberry Pi, which also offers a faster CPU, more RAM, and multitasking. These more extensive resources also give you scope for more demanding and complex programs. When designing graphical user interfaces, especially, toolkits with layout management offer more possibilities for the developer than the PyPortal's displayio library.

Conclusions

As the lively community that has grown up around the PyPortal shows, Adafruit has its finger on the users' pulse with this display. Thanks to the fixed form factor, everyone programs the same hardware, and open source promotes the exchange of ideas and solutions. If you want to discover more details about the PyPortal or are looking for suggestions, you will find the guides [6] to be a comprehensive resource. In many projects, teaming the Raspberry Pi and the PyPortal also makes sense. The Pi handles the computationally intensive and memory-intensive work, and the PyPortal presents the results.

The Author

Bernhard Bablok works at Allianz Technology SE as an SAP HR developer. When he's not listening to music, cycling, or walking, he deals with topics related to Linux, programming, and small computers. He can be reached at mailto:mail@bablokb.de.