Cloning multiple computers with Clonezilla SE
Attack of the Clones

© Lead Image © Csaba Deli, 123RF.com
Managing a network of computers can be an involved process. Clonezilla SE lets you image and roll out multiple machines with ease.
Peace of mind is not measured in gigabytes, but it might as well be, because nothing causes a sys admin more turmoil, pain, and anguish than a dead disk. Clonezilla (see the "What Is Clonezilla?" box) has been coming to the aid of harried sys admins for almost two decades to help them duplicate entire disks, including all the data and partitions, with relative ease.
What Is Clonezilla?
Clonezilla [1] is an ncurses-based front end to a set of scripts that use several open source disk utilities such as Partimage, ntfsclone, Partclone, and dd. You can use Clonezilla to duplicate particular partitions and even entire disks. It will also restore partitions and help you mirror an old disk onto a bigger new disk.
Clonezilla supports a whole battalion of filesystems and then some. It can work its magic on partitions formatted as ext3, ext4, ReiserFS, XFS, JFS, FAT, NTFS, HFS+, and more. If Clonezilla encounters a partition type it doesn't understand, it will simply fire up the venerable dd utility and still get the job done.
You also get options to compress the cloned images using either the gzip, bzip2, or LZO compression algorithms. You can keep them on a locally attached device (such as a USB disk attached to the computer), on another computer via the network, or even on the cloud.
Clonezilla is a weapon of mass cloning. If your computer empire extends only to a couple of computers, you'll be happy using Clonezilla through its Live environment. On the other hand, if you manage a small school or an office, you should install Clonezilla Server Edition (SE) [2] to clone and restore machines over the network.
To use a cloning solution effectively, it's best if the computers on your network have similar hardware components. If your network is made up of computers with different components, you will need to manage lots of different images.
For smaller networks, you can create a master image, copy it on to a removable USB disk, and deploy from that. On bigger networks, where you have a large number of computers to deploy, it's more efficient to deploy the image over the network, which requires setting up a dedicated cloning server. With Clonezilla SE, this means setting up a Diskless Remote Boot in Linux (DRBL) server that you can install on top of Debian or CentOS servers [3]. If you don't want to earmark a computer as a permanent DRBL server, you can use the DRBL Live CD [4] to convert any machine into a server to broadcast images created by Clonezilla to any computer on the network.
The DRBL Live CD is available both as an ISO that you can burn to a CD and as a compressed IMG file that you can transfer on to a USB disk either using dd or via a graphical tool like UNetbootin.
In this tutorial, I'll use Clonezilla SE to create a master image from one machine on my network (see the "Test Lab" box), store it on the file server, and then automatically deploy it to multiple machines.
Test Lab
As shown in Figure 1, I have repurposed the computer that is usually used as a gateway server to act as the Live DRBL server. This machine has two network cards: eth0 and eth1. One of the network cards (eth0) is connected to the ISP router and is assigned an IP address by the router via DHCP. The other (eth1) is connected to a network switch. During the setup, I'll assign the DRBL server a static IP address (192.168.1.100).
All the other computers in the network are also connected to this network switch. My DRBL server will automatically assign them IP addresses. One of these computers on the internal network is a file server. Unlike the other machines, this file server has a static IP address (192.168.1.200). I've installed the openssh-server package on this computer, and all other computers in the network can SSH into this computer. I'll use it as the imaging repository that houses all the cloned images.
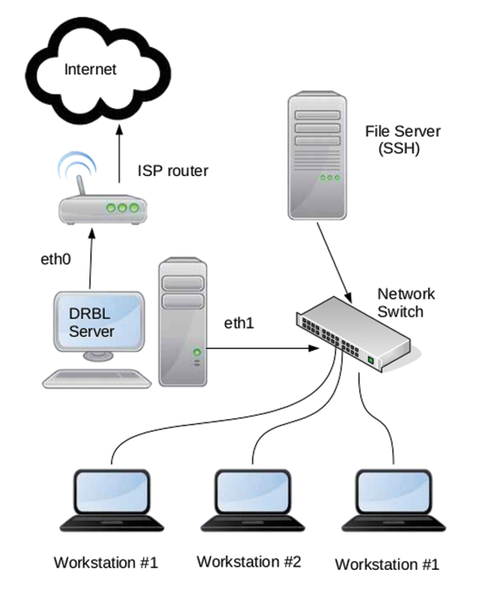 Figure 1: In the test lab, I repurposed my gateway server to function as the Live DRBL server.
Configuring the Server
The first step is to create an image of the computer. Head to the computer that will act as your Live DRBL server and boot into the Live environment. Once the graphical environment is up, double-click the Clonezilla server icon on the desktop to initiate the process of configuring the server.
You'll now be prompted for some information to help get the DRBL server up and running.
First, Clonezilla will ask you for the network adapters' network configuration. In my test lab, one of the adapters gets an IP address assigned by the DHCP server running on the Internet router, while the second adapter connects to the LAN switch. You should assign this a static IP address (192.168.1.100 in my test) when prompted.
The next important step is to point the server to the location where the cloned images will be housed (Figure 2). This could be anything from a local disk, to a network location, or even a cloud drive.
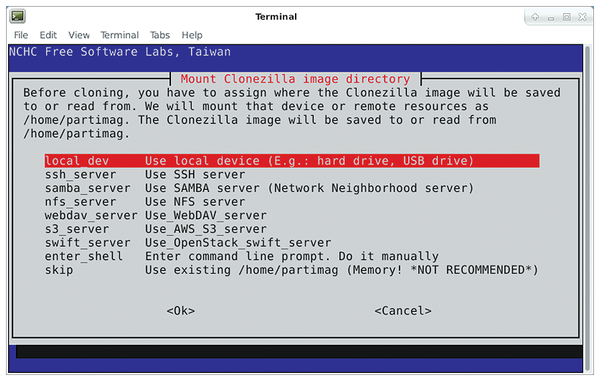 Figure 2: Besides the local network, you can also house the images on an Amazon Simple Storage Service (S3) or OpenStack Swift instance.
For the test lab, I will select the ssh_server option and provide the necessary credentials for the DRBL server to connect to the network share (192.168.1.200 in the test) via SSH. After establishing the connection, the DRBL server will display the remote machine's disk usage (Figure 3). Then the server will work its magic and set itself up.
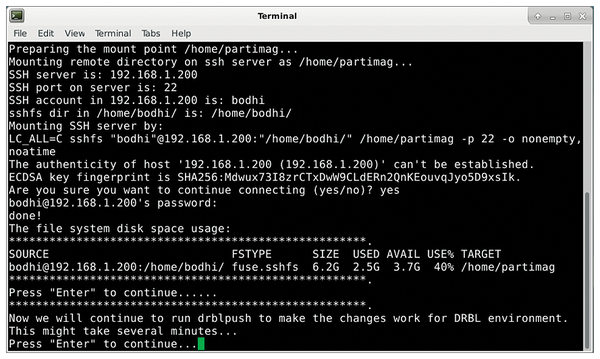 Figure 3: Setting up an SSH server is pretty straightforward and ensures your files are transferred securely. Clonezilla SE uses SSHFS to securely mount the remote repository.
Once the server is done, you'll be asked whether you want to exercise control over all the computers or particular ones. In testing Clonezilla SE, it's a good idea to select the All option. Once you've mastered the process, you can select the second option that allows you to mark specific computers on your network for the cloning process. There's no inherent harm with the first option; the second option just gives you more control over the process.
Similarly, in the next screen select the Beginner option to ask Clonezilla to select the default option for as many parameters as possible. Once you're more comfortable with the process, you can take charge by selecting the Expert option, which allows you to customize the settings for various parameters.
Cloning Mode
You'll next have to select the mode for the Clonezilla instance. Since I am creating a master image, I'll choose the save-disk option to image an entire disk. When asked to enter the name of the device and the image, I suggest using the Later_in_client option. Thanks to this option, you'll be prompted to select the disk you want to clone later on while you're on the client.
Clonezilla will then ask you whether you'd like to use fsck to check and repair the filesystem before initiating the cloning process. It's always a good idea to make sure the filesystem is in a consistent state before creating the image, so choose the -fsck option. If you're pressed for time and you know the filesystem is good, you can choose to skip the check.
Similarly, after creating the disk's image, Clonezilla can also check the disk to make sure it's restorable. Again, you can save some time by electing to skip this check, but I'd suggest you allow Clonezilla to make sure the image is restorable.
The penultimate step is to select the client action after it has been imaged. This is purely based on your preference; I usually select the poweroff option to shut down the client after its disk has been imaged.
Finally, you'll be asked if you'd like to break up the cloned image into smaller files for easier transportation. The figure is in megabytes, and it's usually a good idea to go with the default value (2000MB). If you don't want to split the image, Clonezilla suggests you replace the default value with a large number that's greater than the size of your disk, such as 1000000MB. However, remember that if the image repository has a FAT32 filesystem, this value cannot be larger than 4096MB since FAT32 can't read files that are larger than 4GB in size.
The server is now ready. You'll be returned to the prompt, but don't close the terminal window just yet. Now head over to the computer that you want to clone.
Preparing for Cloning
Make sure that the computer you want to clone is set to boot from the network. You'll need to head into the BIOS to change the default boot order; the exact process varies from one manufacturer to another.
Once you boot the computer after making the change, it'll pick up the DRBL server instance running over the network. You'll be shown a Clonezilla GRUB menu with a few entries. Select the default Clonezilla: save disk (choose later) as image (choose later) option (Figure 4). This entry is for the cloning task you've just set up in the previous step. The (choose later) is displayed because you deferred the decision to select the disk you wish to clone.
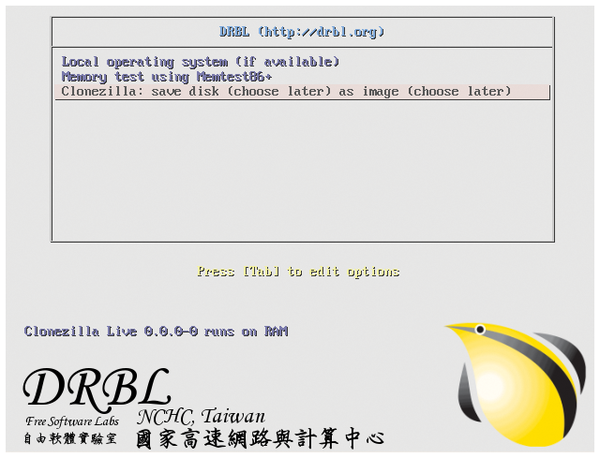 Figure 4: The limited Clonezilla environment broadcast over PXE runs entirely in RAM.
When the computer has booted, you'll be asked for the image's name. Go with the default option or customize it per your preference. Next select the hard disk you want to clone. If the computer has multiple disks, use the space bar to pick the one you want to image. It will then run fsck on the disk before initiating the cloning process.
The image will now be created and transferred to the file server via SSH (Figure 5). Once that's done, the DRBL server is notified and the client is powered off as instructed in the previous step. You now have an image that you can clone to all the other computers in your network.
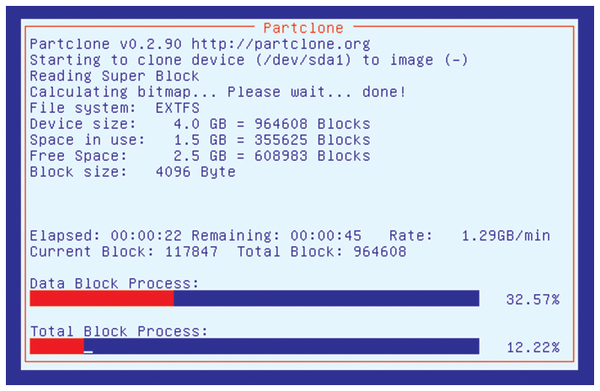 Figure 5: Depending on the size of the disk and the network bandwidth, the cloning (and deployment) process can take quite a while.
Deployment Process
To initiate the deployment process, head back to the machine running the Live DRBL environment. Notice that the terminal you had left open will now show the details of the cloning process (Figure 6). You can now safely close the terminal.
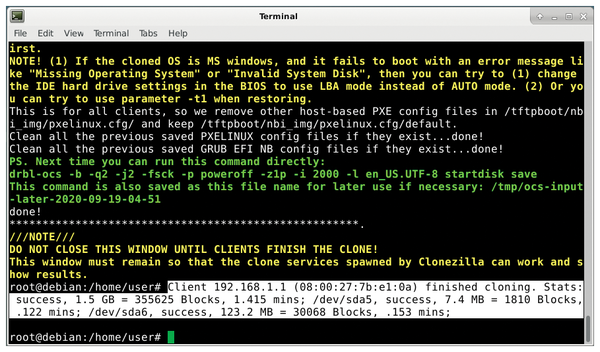 Figure 6: Just before it commences the requested operation, Clonezilla SE will display a rather long command that you can use next time to initiate the task without going through all the steps.
From the desktop, double-click the Clonezilla server icon again. You'll again go through the same process as covered in the initial step to first mount the image directory and then select the configuration to apply to all the computers in the network.
However, in the Clonezilla mode screen, you'll now have to select the restore-disk option since this time around you want to deploy the cloned image.
Clonezilla will scan the mounted file server and show you a list of images in the repository. If there are multiple images, scroll through the list and pick the image you want to restore. Next choose the target hard drive. Needless to say, the existing contents of this target will be wiped.
Clonezilla supports three restoration modes. There's Broadcast and Multicast for cloning multiple machines and Unicast for cloning a single machine. You should select the mode that best suits your network. However, multicast is a safe bet that will work for all types of deployments.
You'll then have to choose from three operating modes. If you select the first client+time-to-wait option, Clonezilla will ask you to specify the number of systems on which you want to deploy the image, as well as the time (in seconds) it should wait for the computers to be powered on. If you haven't powered on all your computers before the expiration of this time, Clonezilla will start deploying the image only on the systems that have been powered on.
I usually choose the clients-to-wait option, since I know the number of computers on which I want to deploy the image. Again, Clonezilla will work its magic and drop you back at the console. Leave it as is and head to the computers where you want to deploy the image.
Deploying the Images
Before you power on the computers, make sure they are configured to boot from the network. After you power on, select the highlighted option from the Clonezilla GRUB menu that begins with Clonezilla: multicast restore … (Figure 7).
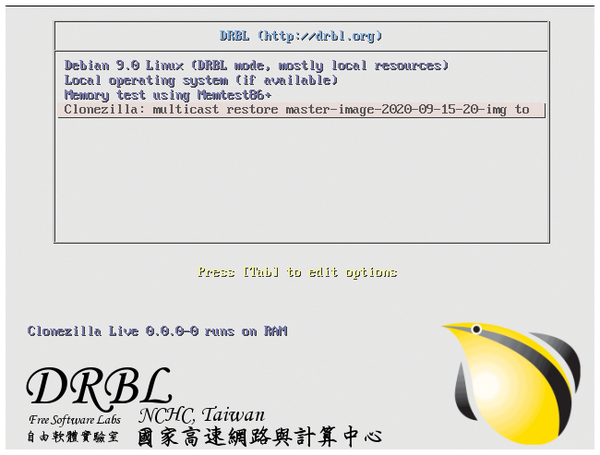 Figure 7: You can also boot into a Live Debian 9 environment in case you need to test or prepare the computer before deploying a cloned image.
The computer will boot and wait until the number of computers you specified in the previous step have all been powered on. Once they are all up, Clonezilla will initiate the process to deploy the image on the machines. When it's done, the machines will be rebooted into the cloned environment.
Conclusion
The process might seem involved if you haven't cloned multiple machines before. However once you get the hang of it, you'll be amazed at Clonezilla SE's power and dexterity. Remember however that Clonezilla uses some very unforgiving tools to do its magic. I suggest first experimenting with it on computers with blank disks. You can even create a virtual lab with a virtual network inside VirtualBox to familiarize yourself with the process of cloning and restoring multiple machines, before you use it on physical hardware.
Infos
- Clonezilla: https://clonezilla.org/
- Clonezilla SE: https://clonezilla.org/clonezilla-SE/
- DRBL manual installation: https://drbl.org/installation/
- DRBL Live CD download: http://drbl.org/download/
The Author

Mayank Sharma has been writing and reporting on open source software from all over the globe for almost two decades.