Stream processing made easy with Apache StreamPipes
Space Flyby

You don't need to be a stream processing expert to create useful custom solutions with Apache StreamPipes. We'll use StreamPipes to build a simple app that calculates when the International Space Station will fly overhead.
Our modern world is increasingly dependent on continuous data streams that generate large volumes of data in real time. These streams might come from science experiments, weather stations, business applications, or sensors on a factory shop floor. Many of the software systems that interact with these data streams follow an architecture in which events drive individual components. Continuous data sources (producers) such as sensors trigger events, and various components (consumers) process them. Producers and consumers are decoupled using a middleware layer that handles the distribution of the data, usually in the form of a message broker. This approach reduces complexity, because any number of services can receive and process incoming data streams virtually simultaneously. This flexible architecture gives rise to a new generation of tools that provide users with an easy way to create custom solutions that process data from incoming streams. One example is the open source framework Apache StreamPipes [1].
StreamPipes has been an incubator project at the Apache Software Foundation since November 2019 and is part of a growing number of solutions for the Internet of Things (IoT). The StreamPipes toolbox [2] is aimed at business users with limited technical knowledge. The main goal is to make stream-processing technologies accessible to nonexperts. Various modules are available to connect IoT data streams from a variety of sources, to generate analyses of these data streams, and to examine live or historical data.
StreamPipes offers a variety of connectors and algorithms for analyzing industrial data, with the focus on integrating data from the production and automation environment. But users without access to their own production line can also benefit from StreamPipes: For example, real-time data from publicly available APIs and widely used protocols such as MQTT can be used to connect existing data sources.
One important StreamPipes component is the Pipeline Editor. Users can rely on graphical, dataflow-oriented modeling to independently generate processing pipelines that the underlying stream processing infrastructure then automatically executes. On the application side, StreamPipes is useful for applications such as continuous monitoring (e.g., condition monitoring), detection of time-critical situations, live computation of key performance indicators, and integration of machine learning models. Figure 1 provides a rough overview of StreamPipes, from data connection, processing, and analysis through to deployment.
 Figure 1: An overview of StreamPipes.
Stream Processing Made Easy
Figure 2 shows the different layers of the StreamPipes architecture. Most users will want to connect existing data streams in the first step. For this purpose, StreamPipes provides a library with the StreamPipes Connect module to connect data based on standard protocols or certain special systems already supported by StreamPipes. Connect adapters, which can also be installed on lightweight edge devices such as Raspberry Pis, handle the task of collecting and forwarding data streams to the internal message broker – Apache Kafka is used under the hood. In the Connect adapters, users can define their own transformation rules (e.g., to convert value units).
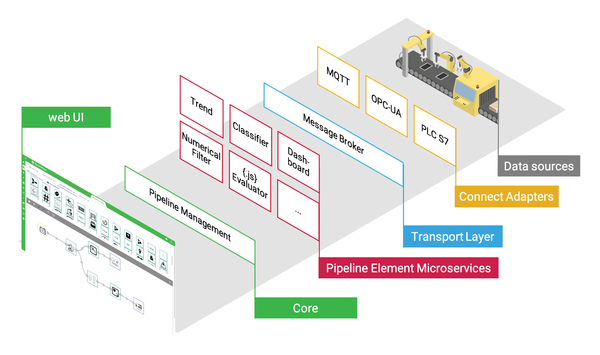 Figure 2: An overview of the StreamPipes architecture
One layer above the transport layer are reusable algorithms (e.g., for detecting statistical trends, preprocessing data, or image processing), each of which encapsulates a specific function and is available as an event-driven microservice. In addition to algorithms, StreamPipes also provides data sinks in this way, such as connectors for databases or dashboards.
Each individual microservice provides a machine-readable description of the algorithm's requirements and functionality. For example, certain required data types or measurement units can be specified that the data stream must provide to initialize the component. The algorithm kit can be extended at runtime with a software development kit, so that the user can install additional algorithms at any time, when new requirements arise, without restarting the application.
Users interact with the web-based front end, which makes it easy to build pipelines by linking data streams with algorithms and data sinks. In contrast to other graphical tools for modeling data flows, StreamPipes integrates a matching component directly into the core application. This component continuously checks the consistency of processing pipelines while the model is being built and relies on semantic checking to prevent modeling of faulty connections.
From Data to Application in a Few Clicks
For an example of a simple StreamPipes application, consider the International Space Station (ISS). Scientists rely on an open API to determine the current position of the ISS in its orbit around the Earth. The goal of the StreamPipes application will be to calculate other key figures based on incoming data and display the results on a live dashboard.
First you will need to install StreamPipes. The easiest way to set up StreamPipes is to use a Docker-based installation (Listing 1), which downloads and starts all the required components. Both Docker and Docker Compose must be present on the system; Docker needs a RAM allocation of 2 to 3GB.
Listing 1
Install and Launch StreamPipes
# download and unzip latest release from streampipes.apache.org/download.html
$ cd incubator-streampipes-installer/compose
$ docker-compose up -d
During the initial installation, the Docker images for StreamPipes and other images used in the background (for example, Apache Kafka) are loaded. Once the system is started, you can complete the setup in a web browser. By default, the interface is accessible on port 80. After you log in with your choice of user credentials (they are only saved locally), the StreamPipes welcome page appears (Figure 3).
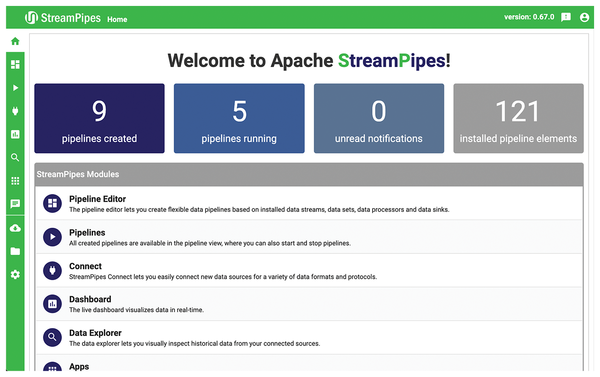 Figure 3: The StreamPipes welcome page.
Simple IoT Data Connection with Connect
The first step is for the application to receive the position data of the ISS as a continuous data stream. For this purpose, you need to change to the Connect module. The data marketplace, which is now visible, shows you the existing adapters, each of which can be configured individually (Figure 4). For example, you will find generic adapters for MQTT, PLC controls, Kafka, or databases, as well as some specific adapters for source systems such as Slack. For this ISS application, I will use the preconfigured ISS Location adapter.
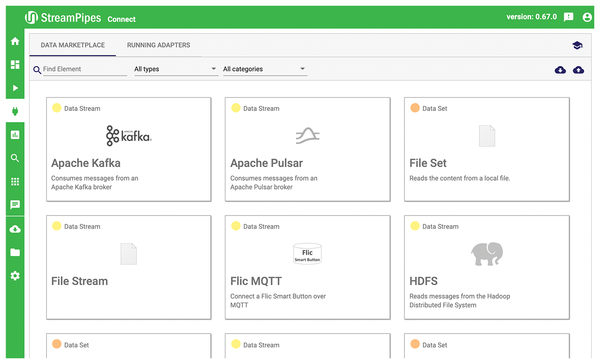 Figure 4: The data marketplace within the Connect module.
Each adapter has a wizard to configure the required parameters. In this case, the matching adapter generates an event with only three parameters: a timestamp and the coordinates of the current ISS location (latitude and longitude in WGS84 format).
At the end of the wizard, assign a name to the new adapter (here ISS-Location) and start the process. From now on, regular updates of the ISS position will reach the underlying Apache Kafka infrastructure. A quick look at the pipeline editor shows a new icon in the Data Streams tab.
Building Pipelines
After implementing the adapter, you can create a pipeline to compute some interesting data. The pipeline editor relies on the drag-and-drop principle: you can drag data streams, data processors, and data sinks into the editing area and link them together.
A schematic of the ISS application is shown in Figure 5. The program will transform the geographic coordinates using a reverse geocoding procedure to find the location nearest to the current coordinates. To do this, I will use an integrated component that covers a selection of around 5,000 cities worldwide. In addition, I'll use a Speed Calculator that calculates an average speed based on several successive locations. When I'm done, the processing pipeline should generate a notification as soon as the ISS enters a defined radius around a certain location.
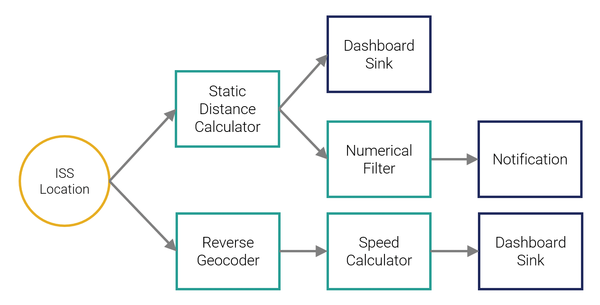 Figure 5: Schematic representation of the pipeline.
Start to assemble the pipeline by first dragging the ISS-Location data stream you just created into the editing area and selecting the Reverse Geocoding component from the Data Processors tab. The two components are now linked. The StreamPipes core now checks the compatibility – in this case, the geocoder needs an input event with a coordinate pair consisting of Latitude and Longitude, which the ISS data stream provides.
After the check, a configuration dialog opens. You can parameterize many algorithms here, for example, by specifying configurable threshold values. For the Geocoder, the only possible configurations are already preselected. After pressing Save, move on to add the next pipeline element – in this case, the Speed Calculator component – and configure it. To visualize the results, click on the Data Sinks tab and select the Dashboard Sink item. This allows you to set up a matching visualization in the live dashboard later.
Now you just need some notification that the space station is approaching. To do this, connect the Static Distance Calculator component to the ISS data stream through another output. Two inputs are required. The first one is a pair of coordinates for the location to which you want to calculate the current distance – in this case, I will use the coordinates for the city of Karlsruhe, Germany (Latitude 49.006889, Longitude 8.403653).
Then add a Numerical Filter to this component, with a value of distance for Field to Filter, < as the FilterOperation, and, say, 200 as the Threshold. The actual notification is generated by the Notification component, which you can now configure by adding a title and some additional text (Figure 6). Finally, add another dashboard sink to the Distance Calculator to visualize the distance.
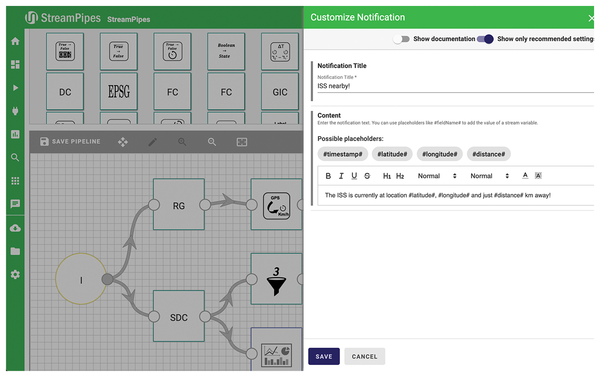 Figure 6: Configuring notifications.
A click on Save Pipeline starts the pipeline, after you enter a name, and takes the user to the overview. In the background, the existing microservices are instantiated with the selected configurations. The detailed view shows the configured distributed system; all components now exchange data via automatically created topics in Apache Kafka.
In addition to the standard wrapper used in this example, which runs directly on the Java Virtual Machine (JVM) and can also run on a Raspberry Pi, there are other wrappers for scalable applications based on Apache Flink or Kafka Streams.
Data Exploration
At this point, you still have to visualize the results. Two modules are available for this purpose: the Live Dashboard and the Data Explorer to display live or historical data. The live dashboard is the right choice to visualize the ISS. First of all, you need to set up a new dashboard; different widgets then handle the task of displaying the live data. I decided to display the speed, the closest city, and the distance to Karlsruhe by means of a single-value widget, and I added a map display of the current position (Figure 7). Dashboards like this can also be accessed separately from the actual StreamPipes web application via generated links.
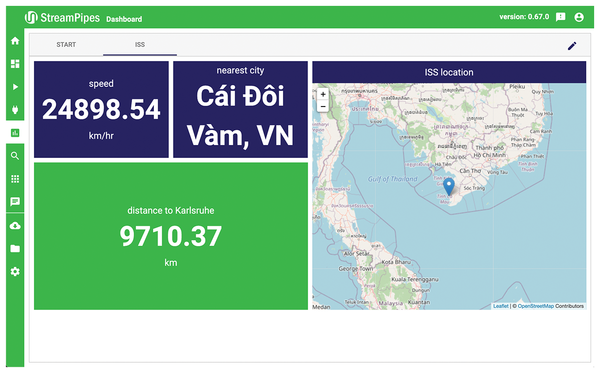 Figure 7: The dashboard visualizes the ISS data.
With just a few clicks, I have created an application that analyzes a continuously incoming data stream. The algorithms described in this article specialize in geographic operations, but the library contains many other modules, including modules for calculating statistics and identifying trends, as well as image processing and object recognition. There is also a JavaScript evaluator that offers great flexibility when it comes to transforming data streams.
Extension of the Toolbox
No-code solutions for data stream analysis initially include only a limited set of algorithms or data sinks. Extensions are therefore necessary for applications that are not covered by existing components.
To simplify the development of new algorithms for StreamPipes, a software development kit is available. Currently, an SDK exists for Java, and support for JavaScript and Python are in the works. The Java SDK lets you create new components using a Maven archetype. The command from Listing 2 generates a new project, including the required Java classes to create a new pipeline element.
Listing 2
Generate Project via Maven
mvn archetype:generate \
-DarchetypeGroupId=org.apache.streampipes \
-DarchetypeArtifactId=streampipes-archetype-pe-processors-jvm \
-DarchetypeVersion=0.67.0
The anatomy of a pipeline element follows the scheme shown in Figure 8. One (or more) data processors in StreamPipes are encapsulated in a standalone microservice that can be accessed via an API. The API provides StreamPipes' central pipeline management with a description of the available processors (or sinks) and is called whenever a pipeline starts or terminates.
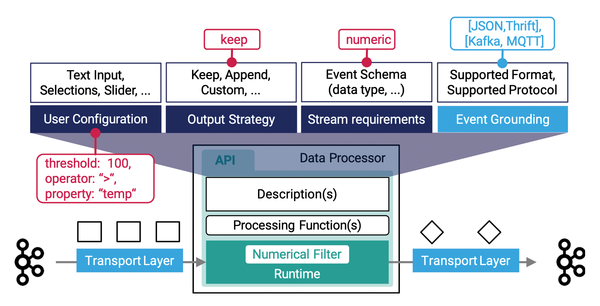 Figure 8: The anatomy of a new pipeline element.
The description contains information such as required user configurations (for example, input parameters or selection menus) that the web interface displays. It also defines stream requirements. In this way, the pipeline element developer can define requirements for the incoming data stream, such as the presence of a numerical value for a corresponding filter or, in the example described, geocoordinates (latitude and longitude in WGS84 format).
An output strategy defines the syntax of the outgoing events delivered by the component. It describes the transformation of incoming data streams into an outgoing data stream. For example, OutputStrategies.keep() can be used to specify that the output data stream corresponds to the input data stream in the structure. Finally, event grounding defines message formats supported by the component for transmission. This can be JSON or binary formats such as Apache Thrift, as well as various supported protocols. StreamPipes supports Kafka and Java Message Service (JMS) out the box.
If you now start the newly created component via the integrated init method, it automatically logs into StreamPipes' pipeline management and can be installed via the user interface. The Maven archetype generates a Dockerfile in addition to the required code classes, which ensures an easy transition to the production system. The online documentation contains several tutorials that explain how to create new components for StreamPipes.
As soon as the user starts a pipeline, the API calls the runtime and the implemented function. Messages are continuously received via the selected protocol (Apache Kafka in this case); the calculated results are then sent back to the broker.
Cluster Operation
StreamPipes' microservice approach includes the UI, the StreamPipes core for pipeline management, and all extensions, such as Connect adapters and pipeline elements. Flexible orchestration is available using Docker. In addition to the widely used AMD-based architectures, StreamPipes now also supports ARM-based systems.
The ARM support means that, for certain use cases, individual algorithm containers can be started on small edge devices, such as a Jetson Nano or Raspberry Pi, while the pipeline management core is hosted centrally. This is achieved by means of multi-architecture Docker images available on Docker Hub. These images are annotated via the Docker Manifest feature, so the user does not need to adjust the image tags in deployment descriptions. With a combination of architecture-specific image tags and an associated Docker manifest, you can create a one-size-fits-all image description that agnostically retrieves the right image of Docker Hub for the system architecture.
Experience has shown that containerizing services makes it possible to implement different operation options, from single server instances to full cluster operations. For single-server deployment, the StreamPipes environment can be quickly and easily launched using Docker Compose, a tool in the Docker ecosystem for defining and running multi-container Docker applications. The StreamPipes services defined in a YAML file are configured this way and then started locally with a single command.
Especially in use cases where high-powered computing resources are not available internally, or where the cloud is not an option, even a user without in-depth Docker skills can set up an executable StreamPipes instance in a few minutes. In addition to server operation, you can also provision small, portable mini PCs with StreamPipes.
It is also possible to use StreamPipes in distributed clusters. For this purpose, you can operate the individual microservices in a Kubernetes infrastructure, using Kubernetes' Helm package manger to reduce complexity. Helm lets you combine relatively complex Kubernetes YAML manifests into a single package. You can install StreamPipes' own Helm chart very easily in a Kubernetes cluster using a one-liner:
$ cd incubator-streampipes-installer/k8s
$ helm install streampipes ./
This also means that you can create Kubernetes clusters of edge nodes on the shop floor, as well as on centralized back-end servers. StreamPipes Connect can then connect the data at an early stage directly at the machine and, if necessary, set up processing algorithms for transformation, filtering, enrichment, and so on. This approach ensures that you don't necessarily have to transmit all the raw data, which is often not feasible due to restrictions such as latency, available bandwidth, or data sovereignty.
A blog post on the StreamPipes website contains detailed information about using the StreamPipes Helm chart in an example Raspberry Pi 4 Kubernetes cluster based on Rancher's lightweight K3s distribution.
Conclusions
The relatively young Apache StreamPipes incubator project by the Apache Software Foundation seeks to improve the accessibility of data stream-based applications for business users. With the underlying microservices approach, StreamPipes seeks to achieve the greatest possible reusability of the individual components. In the end, however, you'll need to decide whether the flexibility benefits of a modular solution exceed the benefits of a customized, programmed application.
In addition to StreamPipes and the popular Apache Flink and Apache Kafka tools, the Apache Software Foundation offers other projects that are useful in IoT deployment scenarios. The top-level Apache PLC4X project, for example, focuses especially on connecting machine data in an industrial context. Apache IoTDB is a relatively new database that specializes in persisting time series. The Apache Software Foundation maintains a strong community-driven approach to development. The developer community welcomes contributions of all kinds, enabling everyone to contribute to building a strong, open source IoT ecosystem.
Infos
- Apache StreamPipes: https://streampipes.apache.org
- StreamPipes on GitHub: https://github.com/apache/incubator-streampipes