Create panoramic images from single shots with Hugin
Expert Stitching
Hugin is a tool for creating panoramic images, with many additional functions that make it a powerful supplement to your image editing toolbox.
Hugin is a free and open source program that has been around for years. Up to now, it has mainly been used to create large panoramic images from a few – or even many – single images. If you use Hugin correctly, you can create good panoramic images very quickly.
However, Hugin also supports other uses that include generating HDR images and computing super resolution images – large, extremely high-resolution images created by interpolation. Hugin also includes many advanced tools, for example, letting users determine the correction data for lenses (calibrate_lens_gui). The align_image_stack command, which is used by many other programs to align images, is also part of the Hugin package.
Hugin [1] was originally developed as a user interface for Panorama Tools, also known as PanoTools [2]. Later, support was added for the combination programs Enblend and Enfuse [3]. Hugin, PanoTools, Enblend, and Enfuse are all mature tools – Hugin was already producing panoramic images worth viewing 10 years ago, the developers have been working on Enblend and Enfuse since 2004, and Panotools was originally released in 1998 and has been continuously improved. The longevity of these tools shows that they continue to be useful even though many cameras now have built-in tools for creating panoramas that generate more or less capable results.
Keeping It Simple
With images shot in the right way (more on this later), creating a panorama with Hugin is simple. The main focus of Hugin's development work in recent years has been to improve the Assistant for combining panoramic images, also known as stitching. You just need to load the raw material and run the Assistant to complete the next steps. If you accept the presets and the images meet the requirements, the software computes the results in less than five minutes (Figure 1). It's especially easy if the images you're merging into a panorama are a landscape with the main features at some distance from the camera (Figure 2).
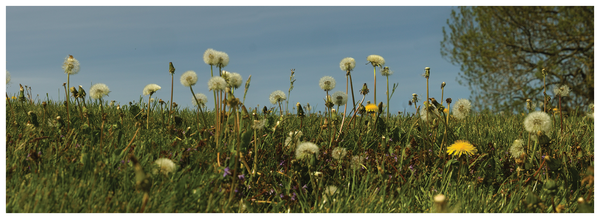 Figure 1: This near-panoramic image is composed of eight RAW images.
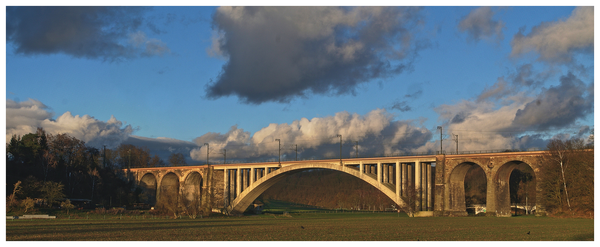 Figure 2: Hugin works almost perfectly for landscape panoramas with distant subjects. This example combines three individual images.
In the current version (2019.2.X at the time of writing), the Assistant comprises three steps (see Figure 3). Step one is loading the images. This is where you determine which image is used as the reference point for the white balance.
 Figure 3: Hugin's Assistant guides you in three steps (1-3) through the process of creating the panoramic images.
Step two is alignment, where you define the control points that allow the alignment of the images. Various algorithms are available for this purpose; if necessary, you can add or move control points manually.
Creating the panorama is the third step. To do this, the software distorts the images using the control points and then stitches them together by blending to conceal the transitions. This distortion is similar to a cage transformation in Gimp, where the control points serve as anchors.
Shooting Images the Right Way
The better the images fit together and the more they overlap, the more accurate the results will be and the less distorted they will appear. Many of these issues will need to be considered as you are taking the photos.
Parallax errors are one potential problem. These occur when you have captured the images to be combined from angles that are too different, and the relative position of elements within the photos appears to shift [4]. You can avoid or reduce parallax errors by rotating around the parallax-free fulcrum (NPP: "No-parallax point") [5], often incorrectly referred to as the nodal point. You can achieve this with a special adapter for the tripod. For landscape panoramas, however, this is often not necessary if you rotate the camera only by small angles and use large overlaps in the images.
Composite images created indoors or generally in confined spaces are far more difficult. Sometimes it is virtually impossible to take all the required images with low parallax from a single vantage point, although this would be preferable for automatic stitching. Sometimes only manual postprocessing of the single images or many attempts will achieve good results. The example in the "A Challenging Subject" box shows the overhead that can be required.
A Challenging Subject
The Norddeutsche Landesbank building in Hanover [6], Germany, (also called the Nord/LB) is considered an architectural highlight of the city. However, because it is nestled in the relatively narrow streets of the city center, it can be very difficult to find suitable locations to photograph the building well.
For nearly all sides of the building, you need to capture partial images and stitch them together. From any location on the ground, many parts of the building are difficult to see. In addition, there are problems with the lenses. It makes sense to use fixed focal lengths with short focal lengths and with the camera mounted on a tripod.
Stitching with Hugin quickly reaches its limits, and visible distortions begin to appear: the edges of the buildings, the skywalks and other structures then appear curved. While this is far from ideal, Gimp can help clean up the most serious errors (Figure 4).
 Figure 4: Sometimes quite rounded edges appear when stitching. In Gimp, you can clean this up with the Curved Bend filter.
With 360-degree panoramas, an additional problem arises from the exposure. This often differs so greatly when you combine shots taken against the light and those with the sun at your back that there may not be a consistent exposure setting for all the images. Exposure bracketing and several exposure cycles help in these cases. You then have a good chance of finding suitable images to create a harmonious panorama by manually selecting which single images to use.
Hugin's Assistant
The Hugin interface takes some getting used to, as it connects several elements and you sometimes need to switch between different dialogs on different levels while working.
By default, the program starts with a wizard called the Assistant, which has already been mentioned and that will be described in more detail. In the menu under User Interface, you will also find the options to activate an Advanced and an Expert mode. However, you may want to avoid these settings as you are getting used to the program.
Below the menu, in a kind of toolbar, you can access the various dialogs you might need from Assistant to Crop. Again, less is more at first: If the Assistant produces good results with the default setting, leave things be.
These three steps are all you need to create 360-degree panoramas, although you may want to adjust the exposure of the individual images to avoid distinct transitions. Then crop the result so that no empty areas are visible. Also, if you use RAW images, you first need to develop them digitally. Hugin can do this automatically, but it's usually better to do it manually (see the "Using RAW Files" box).
Using RAW Files
The current program version lets you use RAW files directly for processing. The required conversion into bitmap images is handled in a semi-automated way. For example, if you drag a group of RAW files from the file manager directly into the editing window, a dialog box appears (Figure 5).
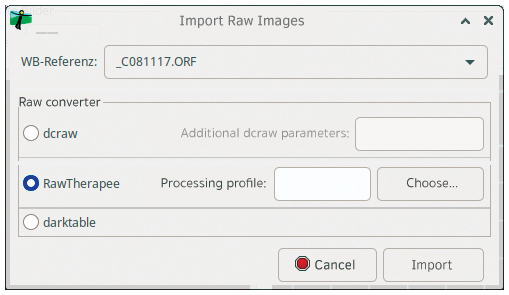 Figure 5: If required, Hugin will automatically convert RAW files.
Hugin tells the RAW converters to produce bitmap images in TIFF format with 16-bit color depth. This offers you pretty good possibilities for blending.
If there are already sidecar files for the imported RAW files from other programs, the software uses them to adopt the parameters for developing. However, it often makes sense to convert the images manually for the best quality. The results are usually better, especially if the light conditions were difficult when taking the pictures.
The Assistant will guide you through the steps automatically, and the result is a PTO file (a Hugin project file), which the program parses again later on, if needed, to load the settings. During a rerun, you can test additional settings, for example, by choosing alternative options or generating a HDR image as the output. You can add more images to the project at any time via drag and drop.
Hugin's Assistant will default to cropping the generated image so that no empty spaces remain at the edges. This sometimes reduces the size of the image unnecessarily. Missing information in the corners can be filled in with software such as Gimp by cloning or using the resynthesizer plugin. If you take this approach, you are free to manually resize the panorama image by setting up another frame under Crop or by using the handles to enlarge the area for the output.
Setting Control Points
The control points play a key role in stitching. These points, which you or the software set in two adjacent images, help the algorithm to determine the parameters for defuzzing and fuzzing.
Hugin uses the method selected in Preferences to determine the points. This has a considerable influence on the quality of the panorama. A status field of the main window displays the results of the alignment (marked with an X in Figure 3). If the error values are high, test whether another method provides better results or select other images if necessary.
Which images Hugin is currently previewing and using for combination is managed by the settings in Displayed Images. The software only includes images marked as active in this folder. You can see their positions in the panoramic image by mousing over the preview while holding down Ctrl (Figure 6). The software automatically highlights the thumbnails so that you can immediately see which images are incorrectly positioned.
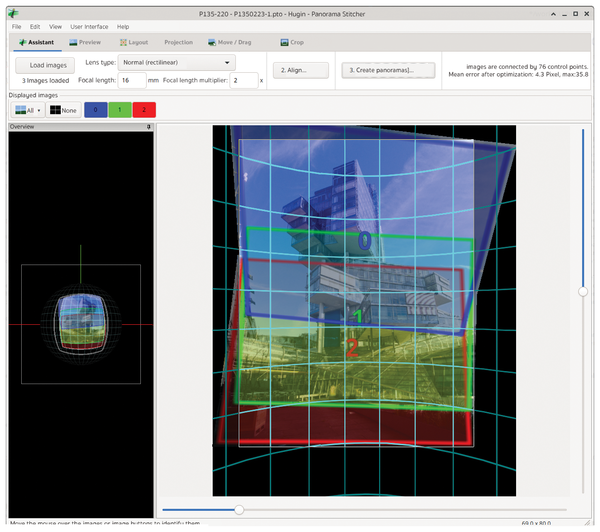 Figure 6: Which part of the panorama is from which image? If you hold down Ctrl while mousing over the preview, Hugin will display the source.
Hugin shows you the control points in the Panorama Editor preview. If this is not the case, you can enable this view by pressing Shift+F3 or selecting View | Control Points | Show Control Points (Figure 7).
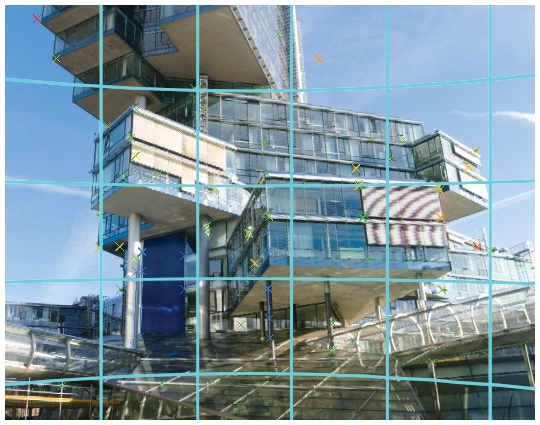 Figure 7: Hugin marks the determined control points in the preview with a colored X.
Control points located in clouds or other moving structures (such as waves or vehicles) are a bad choice for stitching. You will want to remove them. The Control Points dialog in the Panorama Editor is used for manual fine adjustment and for creating or removing control points. Figure 8 shows the window, and the "Alternative Algorithms" box explains the details.
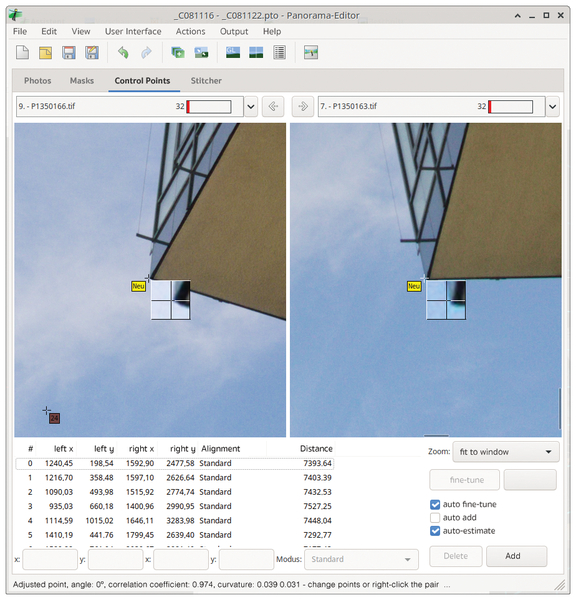 Figure 8: For perfect results, Hugin lets you define control points manually.
Alternative Algorithms
Hugin comes with its own control point generator (CPFind). In many cases, this delivers good results, but it quickly reaches its limits with more complex images, such as those of the Nord/LB. Then it is worth taking a look at the alternatives: Autopano-SIFT is one of the best-known algorithms, but until recently it was protected by a patent. With the patent expired, it is now possible to use the algorithm freely. The original implementation requires Mono, which makes it a less than attractive option. A variant implemented in C (Autopano-sift-C) is now available for many systems. In the Nord/LB example, Autopano-sift-C finds about twice as many control points as CPFind.
You can enable the alternative control point generator either by default in Hugin's configuration or directly for the current project in the Panorama Editor (Figure 9). This very simple dialog is interesting for advanced users. It offers a good way of quickly trying out different parameters for a panorama, whereas the Assistant guides you through the options at a fairly leisurely pace. In the settings for Feature Matching, you can select alternative generators, while Optimize takes you to the additional parameters. You can also adjust the lens type here if necessary.
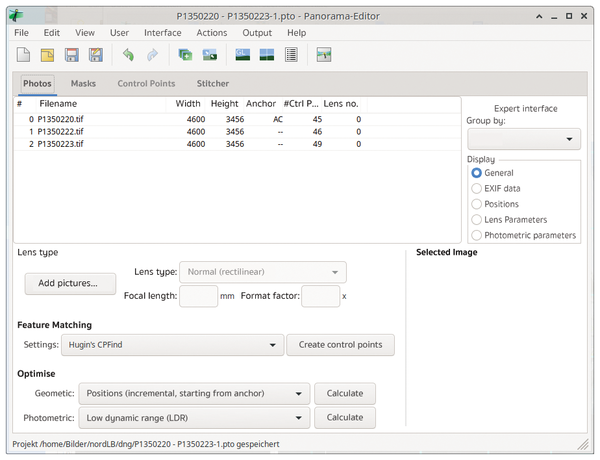 Figure 9: The most important options for panoramic images can be quickly adjusted in the Panorama Editor to try out alternatives.
In Figure 8, two adjacent images have been selected and are shown in the preview windows. If you click on one of the preview windows, the program displays a crosshair in both of them. You can now move the control point with the mouse pointer to achieve identical positioning in the two images. To move control points in both previews at the same time, hold down Shift while dragging the mouse. Holding down Ctrl moves the image in the preview.
This new item is now available in the list below the preview and activated there, assuming that the auto add button to the right of the list is activated. You can delete faulty control points in this list using Del.
The Zoom field to the right of this list lets you define how Hugin displays the images in the preview. The 0 key fits the preview images into the window, while 1 displays the preview at the original size.
The default is fit to window, which makes it difficult to place the control points in large images. It is therefore better to switch to a fixed zoom level. With auto fine-tune, you set the general location of new points manually and then determine their exact positions automatically. This procedure usually gives you good results.
From the Panorama Editor, after changing some settings, you can return to the Assistant by selecting OpenGL Preview. After determining the control points, this shows you a rough preview of the results. If things look crooked, the Move/Drag menu item lets you move and bend parts of the image to minimize distortion (Figure 10).
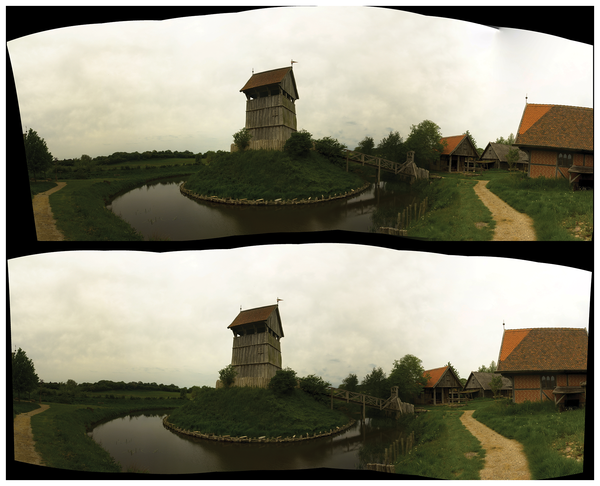 Figure 10: Moving parts of the image helps you compensate for collapsing lines or curved ridges.
Use the mouse to grab the panorama approximately in the middle and drag it down until horizontal lines (say on the ridge of the roof) actually look straight. However, this correction is often not necessary, as the software has probably incorrectly identified the control points in these cases. Sometimes it helps to select a projection other than the default (in Lens type in the Assistant) and use Crop to correct the area for the finished panoramic image.
Align and Crop
In the Assistant, use Align in the toolbar to launch the algorithm for arranging the images. The order in which they are loaded is irrelevant, since the algorithm follows the control points when positioning the images. This makes it all the more important to make sure the control points are set correctly.
The error message enblend: excessive image overlap detected; too high risk of defective seam line in the log window indicates that you tried to combine too many images with too large an overlap. Positioning errors usually do not cause the process to abort, but will result in faulty images. Figure 11 shows two typical examples.
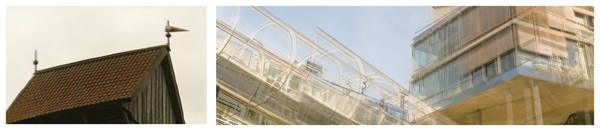 Figure 11: One possible cause of error when stitching images is trying to combine too few or too many images.
In both cases, it is best to remove virtually identical images from the list until the error message disappears. Figure 12 shows an example: After the number of images was reduced from 26 to 16, Hugin computed an attractive panorama.
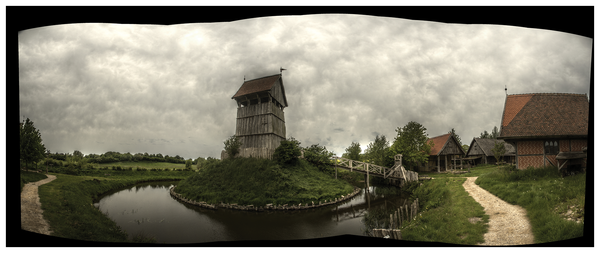 Figure 12: To create this panorama, the number of images was reduced in the test from the original 26 to 16.
Create
In the last step, Create, you define how the software combines the individual images (Figure 13). This is specifically about creating High Dynamic Range (HDR) and Low Dynamic Range (LDR) images.
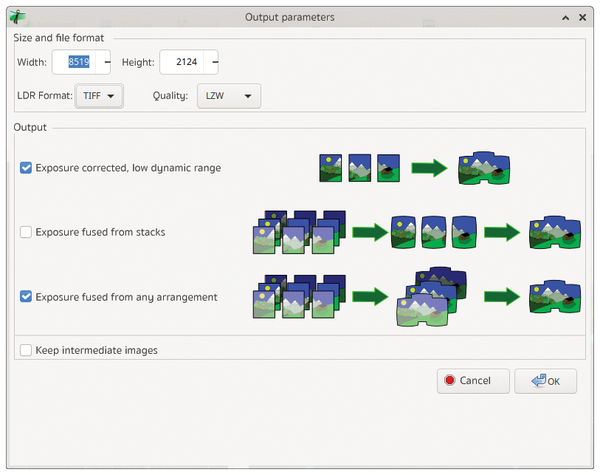 Figure 13: Another dialog lets you define how the program combines the single images.
Hugin offers different variants: Exposure fused from stacks lets you combine LDR images to create an HDR image. Exposure fused from any arrangement lets you combine LDR images to create an HDR panorama.
In the upper field of the Size and File Format dialog, you can define the format for the output, among other things. JPEG means that the software only allows the use of LDR images, while PNG and TIFF support the use of HDR images with up to 16-bit color depth.
Sometimes it makes sense to use the images converted by Hugin for manual post-processing. By default, the program automatically deletes the used copies, but Keep Intermediate Images prevents this from happening.
Next, Hugin automatically enables an additional program, the Batch Processor. This controls the process of editing the PTO files generated by Hugin. In the best case, Hugin will automatically start the current project and finish it without errors. If errors occur, a window opens with related messages. Edit with Hugin lets you reread and edit the PTO files.
Hugin needs a generous helping of disk space to create the panorama. If you work with RAW files, for example, it first converts them into large TIFF files, which it then saves again – keeping the same size – when distorting and blending. Finally, an additional output file of several hundred megabytes ends up on your hard disk. The last step – but only this one – can be avoided by creating JPEG files first. For printing or further processing, however, TIFF files are by far the better choice.
In order to keep tabs on the volume of data, it is therefore recommended to create only LDR variants with JPEG as input and output format at first and use HDR-relevant options (exposure bracketing, 16-bit input images, TIFF as output format) in the second step only, once you have determined the matching images. Large panoramas should ideally be created step by step to find out whether the individual images are correct.
If you save the source images for several panoramas in one directory, another special feature of Hugin simplifies the workflow. The program offers the possibility to quickly group images that belong together – based only on the time of creation in the Exif tags – and convert them into panoramas. The Batch Processor, which was automatically activated in the last step, offers a Browse for images feature in the File menu. This takes you via a small dialog to a list of related images (Figure 14).
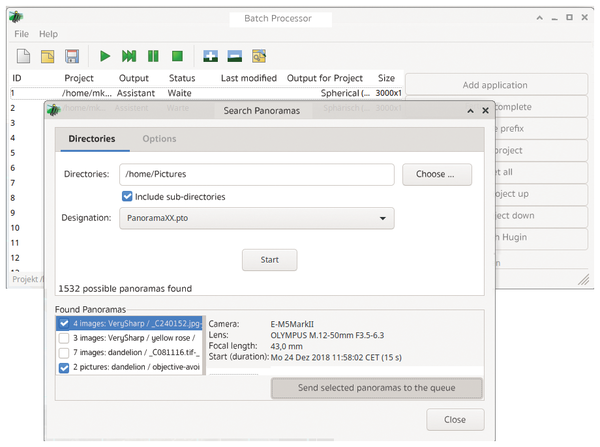 Figure 14: The Batch Processor automatically determines related images by reference to the Exif data.
Since the evaluation here is done only on the basis of the Exif tags, the software also classifies exposure series and other continuous shooting as belonging together, which then often leads to unwanted results. Nevertheless, this function proves to be a fast method for assigning images to a panorama.
Preferences
Hugin's preferences dialog looks quite complex. However, most distributions set up the software with reasonable defaults during installation. Of particular interest is the tab for selecting the control point algorithms (Figure 15).
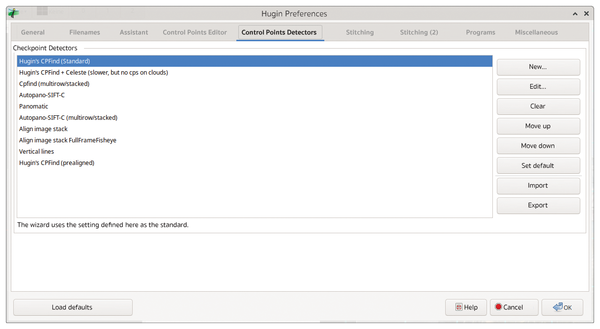 Figure 15: The way the software determines the control points is defined in the preferences.
Try other algorithms if the default setting does not produce sufficiently good results. For example, you have the option to select algorithms marked by Celeste that do not create control points in complex structures in the image. In Stitching and Stitching (2),you can set up how Hugin creates the panoramas and provides them with metadata.
Conclusions
Although modern cameras often have built-in tools for creating panoramic images, Hugin offers many advantages. Sometimes the built-in camera tools do not write RAW files for panoramas, or sometimes the results are technically not convincing. Hugin, on the other hand, is universal and, besides panoramas, generates HDR images and super resolution images as needed. Whenever things get difficult, the program shows its full potential.
Additional programs such as the calibrate_lens_gui tool supplement the range of functions to determine correction data for older lenses – for example, from analog timing. The Batch Processor manages the process of computing many panoramas, which you can then run automatically overnight.
Infos
- Hugin: http://hugin.sourceforge.net
- Panorama Tools: https://sourceforge.net/projects/panotools/
- Enblend and Enfuse: https://sourceforge.net/projects/enblend/
- Parallax error: https://wiki.panotools.org/Parallax
- NPP: https://wiki.panotools.org/NPP
- Nord/LB: https://en.wikipedia.org/wiki/Norddeutsche_Landesbank