Home automation with a Raspberry Pi
Home Director

© Lead Image ©donatas1205, 123RF.com
Control devices from different manufacturers of home automation devices from a single interface by combining free software and a Raspberry Pi.
Smart homes with many computer-controlled devices are in vogue, with increasing numbers of manufacturers jumping on the bandwagon. Smart light bulbs and individually controllable sockets are no longer the only items available: Air conditioners, washing machines, ovens, and multimedia and alarm systems can also be integrated through smart home apps.
Not all smart homes are created equal: Different specifications (e.g., the Zigbee and Z-Wave standards) render many components from different manufacturers incompatible. Ultimately, you can end up juggling several corresponding matching control devices and apps for the individual end devices.
However, armed with just a Raspberry Pi and ioBroker home automation software [1], you can use components from different manufacturers intelligently, while bundling a wide variety of standards – including legacy WiFi – in a single device. You no longer need several different apps on your smartphone to control each component, and you don't need a high-powered, permanently running, conventional PC to control the devices.
ioBroker for the Smart Home
ioBroker is written in JavaScript and is considered the bedrock among free software solutions for home automation, having been under continuous development for more than six years and available back when the Internet of Things (IoT) was still making strangely hesitant steps into private households.
The cross-platform software is modular, with each virtual adapter (now available for more than 300 components and services) communicating with its complementary device. ioBroker supports the integration of new adapters on the fly. Additionally, you can combine several ioBroker servers to create a multihost, an option that is likely to be of particular interest in large environments such as enterprise infrastructures.
Several ZIP archives for the Raspberry Pi cover the spectrum from the Raspberry Pi 2 to the current fourth generation device, although some of the archives are based on older versions of Raspbian. In addition to the images, the developers also provide a repository that supports integrating the software into an existing Raspberry Pi OS. The install is documented on the project's website [2].
The ZIP archives usually contain a minimal installation of Raspbian, without a graphical user interface and a login of username pi and password raspberry. The US keyboard layout is the default after installation.
Configuring the Software
ioBroker is managed entirely in a web browser, for which the client-server application integrates a web server. You can reach the management interface at http://<Pi IP>:8081 from a workstation on your home network. A license agreement appears, and you must agree to anonymous statistical data being collected before you can access the dashboard. This setting can be changed later.
The system then guides you to the basic settings menu, where you can modify some system options (Figure 1). By default, only the Admin, Discovery, and Info adapters are active in ioBroker. For a list of installed adapters with some adapter-specific status and management information, click Instances in the vertical options bar on the left side of the browser window.
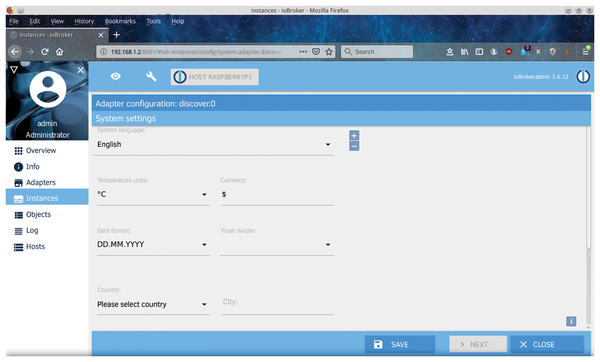 Figure 1: ioBroker's interface requires no training.
To discover your existing smart home devices – and have the corresponding adapters installed – select the discovery.0 entry in the Instances view (Figure 2), which opens an area with a list of methods for adapter detection (e.g., Ping, UPnP, mDNS). You can enable/disable the individual options by checking or unchecking the boxes.
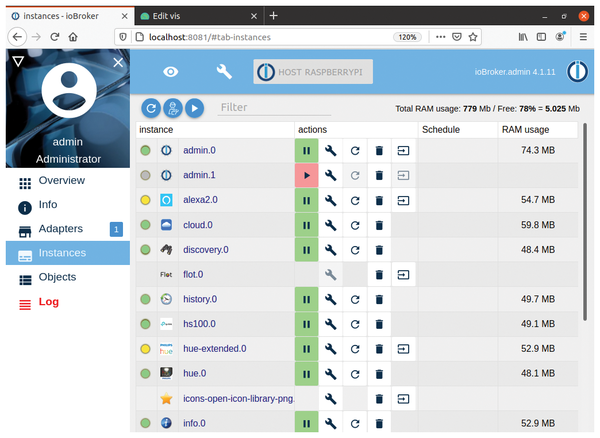 Figure 2: The preinstalled Discovery adapter searches for existing smart home devices.
After clicking the Discover button, ioBroker finds responsive devices and services. Please note that it only detects components and control devices (so-called gateways) on the local and WiFi networks, but not end devices, such as smart switches or lamps with intelligent controls, addressed over other protocols.
The system lists the gateways and components it finds in a new window after the search, where you can enable the desired components by checking the boxes for the individual entries and then pressing the Create Instances button at the bottom of the window. The software then downloads the required packages and integrates them into the system.
Updating Adapters
After the initial installation of the main adapters, it makes sense to look at the Updates box in the Info group in the sidebar. If updates are available for installed adapters or components, you can install them by clicking on the update (circular arrows) icon in front of the adapter name. ioBroker then updates the software in question.
On the right side of the window, the New Adapters list shows adapters newly implemented in the software. If you have what were previously unsupported smart home components, it makes sense to check here to see if an adapter is now available for this device (Figure 3).
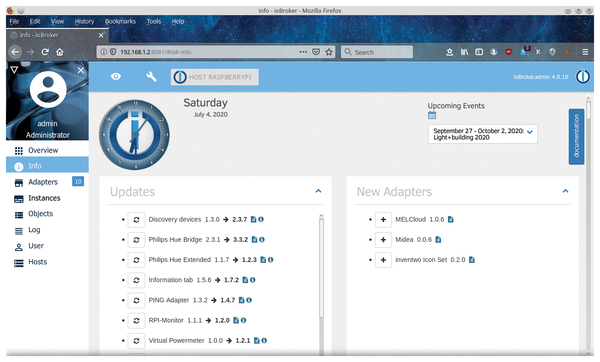 Figure 3: ioBroker is actively maintained and developed.
To insert adapters retroactively, use the Adapters entry in the sidebar (Figure 4). ioBroker lists all the available adapters on the right side of the window, with the previously installed adapters at the top of the list. Once you have found the right module for your smart home component, click on the small menu in a blue circle on the right above the name of the adapter to see a short description of the respective adapter. Pressing the plus button at bottom left in the description block installs the adapter. The module fires up automatically and appears in the list of available instances.
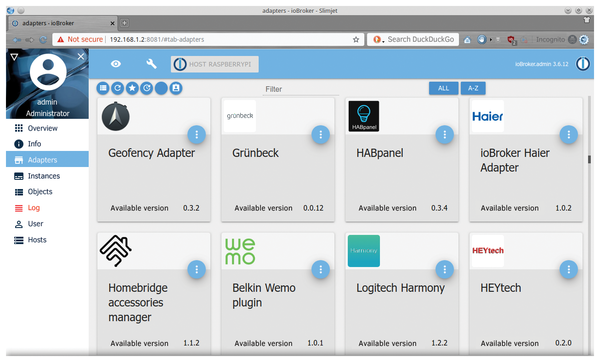 Figure 4: ioBroker supports more than 300 adapters from all areas.
For most adapters, a configuration window opens where you can adapt the module to suit the hardware. Above all, the individual manufacturers' control devices first need to be connected to the Raspberry Pi in the corresponding dialogs after installing the adapter, so you can access the connected devices. To do this, you usually have to specify at least the IP address of the adapter and the port number on which it can be accessed.
You can discover the device's IP address either in your router's settings menu or with tools that show active devices on the local network, like Angry IP Scanner [3] for Linux or Fing [4] for your smartphone. For some adapters, you also need to make settings on the gateway during configuration in ioBroker. If this is the case, a corresponding message box usually appears (Figure 5).
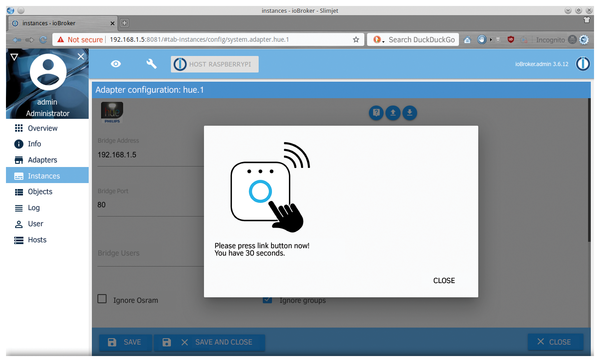 Figure 5: ioBroker guides the configuration with device-specific dialogs.
In this case, the settings that appear are context-sensitive; the options displayed are specific to the device in question. After finishing the configuration, close the dialog and switch to the Objects category.
Objects and Custom Scripts
The Objects dialog lists all the existing adapters with their respective configuration options. They are summarized in a tree below the respective instance (Figure 6). You can typically modify the configuration of the end devices in the individual folders by adjusting the predefined values. Because the individual attributes of the devices are also required for creating corresponding controls in the Vis editor visualization dialogs (discussed in the next section), you will want to assign meaningful names to the object attributes and enter them in the corresponding lines of the attribute view to ensure a better overview of the features in the Vis editor interface.
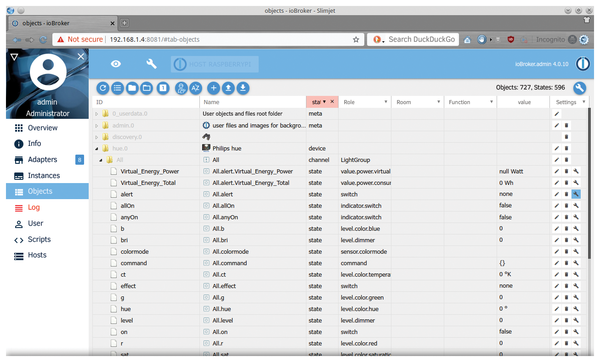 Figure 6: The Objects view shows the bundled device-specific attributes.
Because the current configuration of a component does not yet allow automated control, ioBroker offers a scripting option for installing a convenient interface: the JS Script Engine adapter. In the interface, you can choose whether you want to create the script in JavaScript, Blockly, or TypeScript. If you choose Blockly, ioBroker integrates a modular system that allows programming of components through the underlying JavaScript back end with graphical puzzle pieces.
Once you have integrated the script engine into the system, a new Scripts entry appears in the sidebar, where you can call the engine. Script programming requires some prior knowledge, but the ioBroker developers do offer detailed documentation to help you out [5].
Uniform Interface
With the help of the Vis interface, you can combine your entire private IoT into a unified control center. Vis is also implemented as an adapter and installed when the control software in ioBroker is installed. The visualization module combines all common control elements such as switches, scripts, and scenes of the smart home infrastructure in a uniform, web-based interface that you can access with any end device (Figure 7). To access the interface, either call the corresponding adapter in the Instances group from the adapter web page icon, or enter the IP address of the Raspberry Pi followed by port number 8082 in the address bar of a browser.
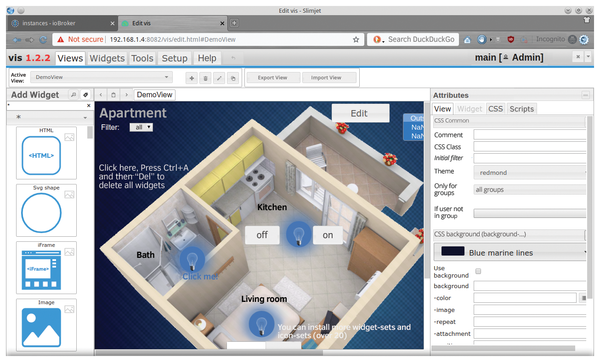 Figure 7: Build your own smart home control interface in the Vis editor.
If you call the Vis adapter from the Instances view, the Vis editor appears, where you can define the individual attributes for the end devices to be controlled. The editor has complex optional settings for the respective actuators, switches, sensors, and terminal devices; it is a good idea to read the manual up front to avoid creating faulty controls. The individual device attributes can be found by choosing the Objects item in the ioBroker sidebar (Figure 6).
If you call the Vis adapter manually from the web browser, you are taken to a dialog that presents an editor; clicking the VIS RUNTIME button opens the preconfigured control interface, which you can use to switch the individual devices on and off or to display information. A tablet that displays this interface in the browser is ideal for this task, letting you monitor and control your infrastructure conveniently, simply by tapping.
In the Vis interface, you can also include widgets in the editor that provide you with information such as the weather situation or a time display. Widgets are enabled in the same way as traditional device controls [6]. The system lets you freely design the widgets in terms of appearance; the same applies to the Vis interface background. The developers provide basic layout templates that can be freely customized.
Developing Scenarios
ioBroker lets you program and use scenes to control your device groups individually. To do so, use the Adapters selection to integrate the scenes adapter into the system. After doing so, the new Scenes option appears in the vertical bar on the left side of the program window. On opening, you are taken to the scene editor, which lets you define individual, changing settings profiles for individual components or component groups.
ioBroker stores the settings profiles in a tree structure. Once you have captured one or more of these scenes, incorporate them into your control interface in the Vis editor; then, you can manage multiple devices together by predefined scene profiles (e.g., automatically dimming the lights and lowering the blinds for a home theater setting).
Conclusions
ioBroker and the Raspberry Pi bring order to the jungle of smart home components from a wide variety of manufacturers. The very compactly programmed and at the same time well-thought-out software requires hardly any resources. Thanks to the many available adapters, it nevertheless unites numerous vendor-specific home automation devices under a unified interface. The only downer is the huge technical complexity of the program because of its feature set, which means a correspondingly steep learning curve for users, for which careful reading of the documentation is necessary.
Infos
- ioBroker: https://www.iobroker.net/
- Installation: https://www.iobroker.net/#en/download
- Angry IP Scanner: https://angryip.org
- Fing: https://www.fing.com/products/fing-app
- Blockly documentation: https://github.com/ioBroker/ioBroker.javascript/blob/master/docs/en/blockly.md
- Widgets: https://github.com/ioBroker/ioBroker.docs/blob/master/docs/en/viz/widgets.md