A new fork of RawTherapee offers tools for photo editing
Putting It Together
RAW converters are the first tool to use in editing photos, and new solutions and programs have the potential to make users' lives easier. How does ART stack up?
ART, which stands for Another RawTherapee, is a RAW converter for photo editing. This young project combines some tools and concepts found in two well-established programs, RawTherapee and darktable, and attempts to offer additional functions, while also providing a user friendly, streamlined program. This article takes a look at the current state of this project and how it's progressing toward those goals.
A Surprising Fork
Three major RAW converters are available for Linux so far. Darktable is the most comprehensive and complex of these programs. RawTherapee is a bit smaller, but scores points with users for its "good-natured" behavior and ease of handling. A third option that appeals to many users is LightZone, a Java application that was formerly proprietary but is now open source.
Darktable offers new releases at short, regular intervals that often extend or completely replace its current collection of 60 or more tools, but RawTherapee's development is proceeding at a slower pace. To date, it includes a number of excellent exposure tools, but it still may not have all the features you're looking for. For example, RawTherapee has nothing like a cloning or stamping tool, which even the far older LightZone has. Similarly, darktable has offered masks for years, but RawTherapee has not. They are, however, under development.
With that in mind, it may be surprising at first that RawTherapee is the basis for a fork, ART. However, if you look at what the ART developer, Alberto Griggio, is doing, the reason for choosing RawTherapee as a foundation quickly becomes apparent: The developer is rebuilding or extending the existing tools (Figure 1).
 Figure 1: At first glance, ART looks like RawTherapee.
For example, additional controls for the exposure tool settings allow for more fine-tuning. In addition, ART adopts some other helpful tools, such as automatic perspective correction from darktable, and also adds some brand new tools, such as Texture Boost. Although ART v1.5.4 (the latest version at the time of writing) so far only offers a relatively small collection of functional tools, the toolbox already seems to be abundantly filled (see Table 1).
Table 1
Tools in ART 1.5.4
| Tool | Function |
|---|---|
| Exposure |
|
| Exposure |
Preliminary exposure settings |
| Tone Equalizer |
Fine exposure settings |
| Tone Curves |
Gradation curves |
| Dynamic Range Compression |
Dynamic compression |
| Log Tone Mapping |
Filmic-style exposure |
| Details |
|
| Spot Removal |
Cloning/healing tool |
| Sharpening |
Image sharpening methods |
| Noise Reduction |
Noise reduction |
| Impulse Noise Reduction |
Noise reduction |
| Defringe |
Remove color fringes |
| Color |
|
| White Balance |
White balance |
| Saturation & Vibrance |
Saturation |
| Channel Mixer |
Channel mixer |
| Color Equalizer |
Color adjustments |
| RGB Curves |
RGB curves |
| L*a*b* Adjustment |
L*A*B* adjustments |
| Color Management |
Color profiles |
| Local Editing (new group) |
|
| Color Correction |
Local color adjustments |
| Smoothing |
Local blur |
| Local Contrast |
Local contrast |
| Texture Boost |
Boost textures |
| Special Effects (new group) |
|
| Black-and-White |
Monochrome effects |
| Film Simulation |
Simulate film exposure |
| Soft Light |
"Soft light" (layer mode) |
| Vignette Filter |
Edge shading |
| Graduated Filter |
Gray graduated filter |
| Haze Removal |
Remove haze |
| Film Grain |
Simulate film grain |
| Simulate Film Negative |
Simulate film negative |
| Transform |
|
| Crop |
Crop |
| Resize |
Scale |
| Post-Resize Sharpening |
Sharpen after scaling |
| Lens/Geometry |
Lens and perspective correction |
| @TZTH:RAW |
|
| Sensor with Bayer Matrix |
De-mosaicing tool |
| Raw Gain/White Point |
Set black and white point (RAW) |
| Preprocessing |
Filter hot/dead pixels |
| Dark Frame |
Use dark-frame subtraction |
| Apply Flat Field |
Correct effects caused by the lens-camera combination |
| Metadata |
|
| Exif |
View and edit Exif data and maker notes |
| IPTC |
View and edit IPTC data |
Documentation and Interface
Unfortunately, the ART documentation [1] can be confusing. In some cases, there are references to other sources – tools inherited from RawTherapee are documented by RawPedia [2]. Pixls.us [3] is currently the best place to find more information. In some places you will find detailed tooltips within the program (Figure 2).
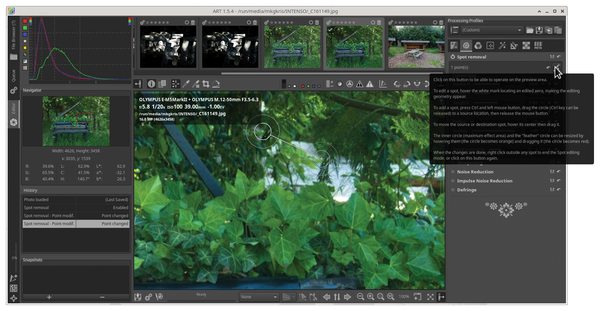 Figure 2: Detailed help texts are available for some (but not all) tools within the program.
The file manager mode behaves almost identically to RawTherapee when selecting images. On the left, you select the directories; on the right, you filter their content via Filter or load single images via Inspect.
ART supports several very practical approaches to displaying thumbnails (Figure 3). In addition to the embedded image, which sometimes turns out far too dark, you can quickly create preview images with a linear, film-like exposure. This goes well beyond what RawTherapee 5.8 provides and is a massive help when searching for images. Two other variants of the preview (with and without focus points) are only found in the editor mode in typical RawTherapee style and not also in the file manager, as is the case in darktable.
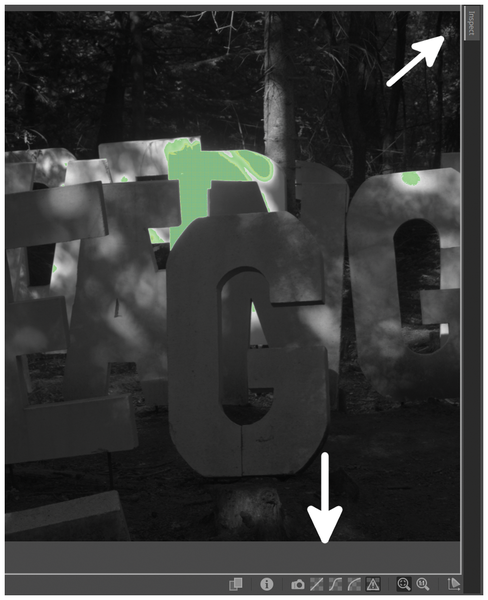 Figure 3: ART offers extensive options for previewing problematic images. In this example, Inspect highlights pixels where clipping occurs.
The compatibility between ART and RawTherapee is good so far. Although ART uses its own sidecar files with the .arp extension, instead of RawTherapee's .pp3, they can be imported reciprocally. The respective program then ignores the tags for which it does not provide tools but takes all others into account.
Exposure Tools
RawTherapee's basic exposure tool is named Exposure and is rightly considered to be a good tool that is easy to use. Its extensive functions come with a correspondingly large number of controls, but these become intuitive quite quickly. Despite this, the ART developer decided to split the tool into three components, which then appear as independent tools in the Exposure section (Figure 4).
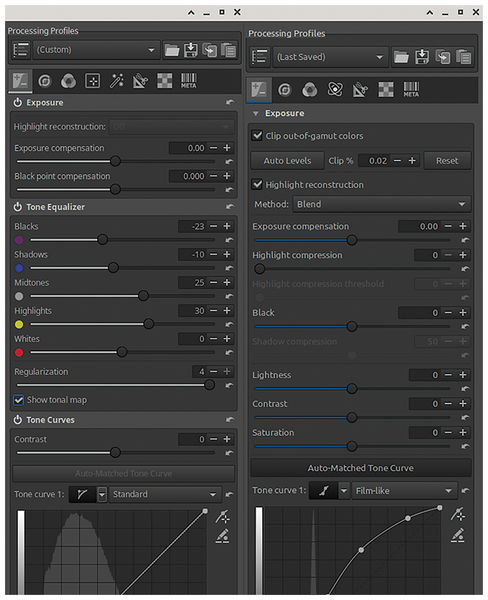 Figure 4: The ART Exposure tool (left) and RawTherapee counterpart (right).
For many users, splitting the tool up probably does offer some advantages, since three steps can now be performed separately. However, some features were lost in the process. For example, ART lacks Highlight compression, which can give you good results when the sky is burned out. ART adopted the other settings, Highlight reconstruction and Exposure compensation (equivalent to white point), and they work like they do in RawTherapee. The fact that the controls for brightness, contrast, and saturation are missing will probably only bother a small number of users.
In the Tone Equalizer section, ART even provides more settings than RawTherapee. With five sliders, different tonal values can be adjusted to the photographer's liking fairly quickly. The five tonal ranges mark different colors that are reflected in the tonal map (Figure 5). The tool displays them if you check the box next to Show tonal map.
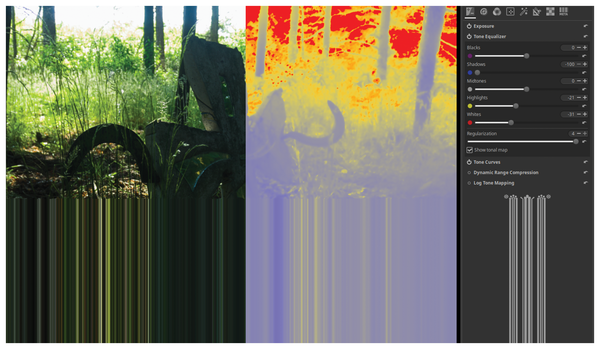 Figure 5: The tonal map shows the tonal range to which individual image sections or their pixels belong. On the left is the original image; on the right, the tonal map has been activated.
The third section, Tone Curves, now contains a dedicated saturation control in addition to the two tone curves. This is important because the saturation subjectively increases as the brightness decreases.
RawTherapee's dual tone curves also exist in ART: the first is often used to adjust luminance via the Luminance, Weighted Standard, or Saturation and Overlay modes. The second is used to control the saturation (mode Filmic, Perceptive, or Colorful) as well as for fine control of the contrasts. Another option is to roughly set the exposure compensation with Tone curve 1 and fine-tune it with Tone curve 2.
Be that as it may, exposure is always implicitly linked to saturation – dark colors appear to be more saturated. To influence this, the developer added a darktable-style saturation equalizer to the software. Like in a histogram, the dark tonal values are on the left and the light ones on the right. You can use the curve to reduce or increase the saturation of the colors (Figure 6).
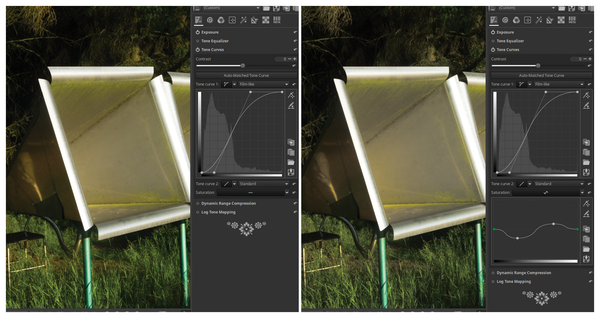 Figure 6: A highlight: brightness-independent saturation control. The left image shows normal saturation; desaturated shadows and saturated highlights are visible on the right.
In many places, ART's practice-oriented development is evident. For example, the Tone Curves tool starts with the special Auto-Matched Tone Curve option, which presets tonal values based on the embedded preview images (i.e., it takes into account the camera manufacturer's specifications).
In RawTherapee, you have to manually load the profile of the latest image you processed each time. This step is eliminated with ART, which makes editing many images taken under similar conditions immensely faster and easier. The tools keep the settings, once made; you may have to deactivate them manually. All ART tools share this behavior.
ART lacks the practical Shadows/Highlights tool from RawTherapee. It supports fast and effective correction at the histogram edges, which can also be done with the other tools, just often not as easily. More of an issue is the fact that the Tone value correction tool is missing; it handles local tone mapping and is practically irreplaceable by other tools.
To make up for this, there is an additional tool named Log Tone Mapping. It is a stripped-down variant of darktable's Filmic module, but without its S-shaped tone curve and limited to luminance corrections [4].
Other Useful Features
The perspective correction tool, adopted from darktable, is another practical feature. While RawTherapee only allows for simple, manually operated corrections, darktable offers a largely automatic tool. This also performs well in ART (Figure 7). In addition to the manual settings already familiar from RawTherapee, it has automatic modes that capably perform corrections that are horizontal, vertical, or both.
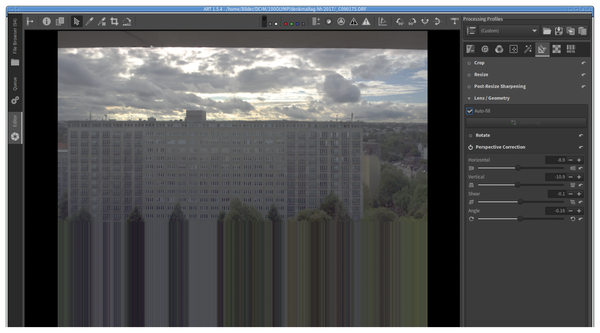 Figure 7: ART adopts automatic perspective corrections from darktable. Automatic corrections are made possible by the three buttons below the sliders.
Another tool worthy of special attention is Flat Field. It allows very extensive automatic corrections related to the camera and lens. RawPedia [2] explains the tool in detail.
Some new tools that are not yet available in RawTherapee or darktable have also found their way into ART. Two new tool groups have been added: The Local Editing group (functions with local effect) includes the Color Correction, Smoothing, Local Contrast, and Texture Boost tools. The Special Effects group provides monochrome effects, film simulations, gray gradient filters, and more (Figure 8).
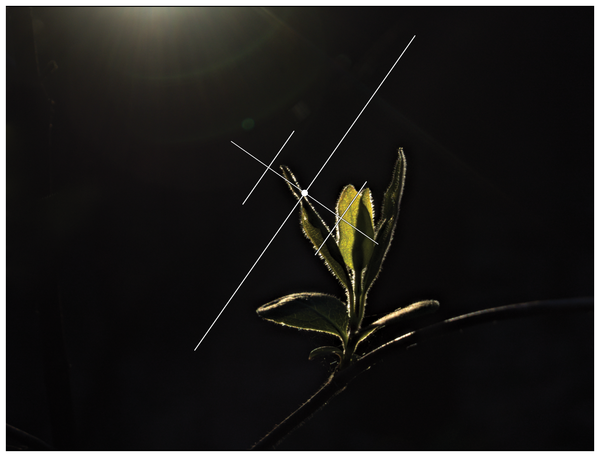 Figure 8: ART supports a number of effects, for example, a gray gradient filter that allows targeted darkening.
In particular, the Texture Boost tool, which is a variant of the Increase Local Contrast tool and boosts small contours [5], works very well. Both tools work well in combination in ART.
In the Details tool group, Spot Removal is the outstanding feature. It is used to remove small parts of the image up to a maximum diameter of 200 pixels. In terms of the effect, it is like to Gimp's Heal (i.e., cloning with simultaneous brightness correction). To create a correction point, you just click on the image while holding down Ctrl. Initially, two circles appear (Figure 9) with a small cross marking their centers. Move them with the mouse to specify the source for the material to be inserted. You can then define the size of the insertion via the smaller, inner circle. The outer circle determines how soft the transition to the unchanged material is.
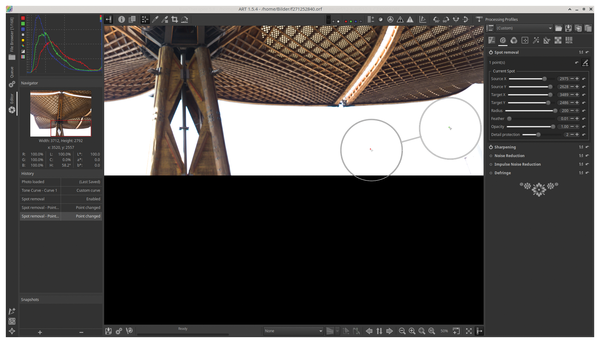 Figure 9: Quick, easy, and often quite effective: the Spot Removal tool.
On the right side of the panel, you can see the parameters used in the process. You will not normally need to pay any attention to them, because all the actions can be performed directly with the mouse in the image window. You can set some parameters in the panel, for example, the size of the insert, its Opacity, and the Detail protection.
However, this tool has two disadvantages compared to darktable's variant. Darktable has even replaced it with a wavelet-based version that allows far more granular corrections at different scales of detail. However, the tool is less suitable for beginners due to its extreme complexity. What is more of an issue is the fact that ART only provides circles for the tool instead of freely definable shapes for the inserts. This often makes complicated structures necessary, which then cause quite a bit of additional work.
ART has seen another exciting development in the form of User Commands. These are plugins in the form of plain text files that can be developed from a shell script [6].
Masks
ART touts the ability to make local adjustments via masks as one of its highlights. However for now this ability is pretty limited. In the 1.5.4 version, masks can only be used with the tools from the Local Editing group – not very helpful, since masks often prove to be extremely useful, especially for exposure. Also, using the masks can be very awkward, because they are obviously based on the RawTherapee mask code. The latter always links masks to layers, or to be more precise to special filter layers.
The developer needs to think outside the box here. In darktable, and in LightZone, masks are extremely powerful and easy to use. The mask creation model that exists in LightZone also extends to all tools except the RAW tool.
What happens in detail in ART? All layers act independently there and each can be used with a different mask type. However, several levels act cumulatively for combined effects. ART distinguishes between four mask types. Parametric masks are defined on the basis of image properties (the parameters). The user can draw manual masks with a brush. Geometric masks, a variant of manual masks, let you define the mask using a few support points. Finally, DeltaE masks are a specialty in ART: They use similar colors to define the mask (Figure 10).
 Figure 10: You can see masks, which are normally invisible, after enabling Show Mask.
Right now, using masks is not fun with either RawTherapee or ART. However, this will probably change in the near future. If you are currently managing without masks, you would do well to keep that up for the time being. A wiki page summarizes the information available for masks [7].
Conclusions
The idea of adding tools from darktable to RawTherapee and decluttering the major RAW converters has been discussed many times. In the past, the idea mostly fell through because it seems very difficult to align the different program structures. Trying to do this with a practice-based approach is definitely a good idea and has real potential. However, the results show that the process is not easy and involves a massive amount of work.
As of this version, ART is usable, but still has a long way to go to reach its desired goals. If you are familiar with darktable or RawTherapee and are looking for perfection, you will certainly achieve your targets faster with the established programs. Having said this, the version of ART is already suitable for experimentation and for simpler tasks, and the latest available version at press time, 1.8.2, was both faster and more useful. Whether or not it will establish itself and continue to build on its strengths is something only the future will tell.
Infos
- ART: https://bitbucket.org/agriggio/art/wiki/Home
- RawPedia: https://rawpedia.rawtherapee.com/
- Pixls.us: https://discuss.pixls.us/
- Log Tone Mapping: https://discuss.pixls.us/t/ive-finally-tried-art-and-it-is-amazing/20482/14?u=agriggio
- How local contrast works: https://www.cambridgeincolour.com/tutorials/local-contrast-enhancement.htm
- ART user commands: https://bitbucket.org/agriggio/art/wiki/Usercommands
- ART masks: https://bitbucket.org/agriggio/art/wiki/Localediting