Create screencasts with menyoki
Moving Pictures
Short snippets using animated GIFs are often sufficient to show what's happening on your desktop. With menyoki, you can create these animations from the command line.
If you need to demonstrate complex desktop processes, a video can be worth a thousand words. Conveniently, numerous screencast tools let you record what is happening on the screen and generate a video from your actions in MP4 format. However, GIF animations are far better suited for short events. They do not display annoying blocky artifacts, can be easily sent via a messaging app, and can be quickly integrated into websites.
The menyoki [1] screencast tool lets you create animations and save the captured processes in GIF or APNG format. If so desired, menyoki can also break down videos into individual frames, which proves useful when fishing a screenshot out of a rapidly moving process or monitoring such a process in peace afterwards. Conversely, menyoki can also create an animation from individual images, making it possible, for example, to integrate photos from a wildlife camera into a short movie. In addition, menyoki lets you create screenshots and – within narrow limits – edit the individual images.
Currently, menyoki only works in an X11 session; capturing images on Wayland is not supported yet.
Installation
To get menyoki up and running, Arch Linux users can retrieve the program from the community repository by typing:
pacman -S menyoki
For other distributions, you can download the current menyoki version as a tarball from GitHub [2] and proceed to unpack the archive.
You only need the menyoki program in the current directory; call it by typing ./menyoki. If you want to make menyoki available to all users, copy it to a suitable directory, such as /usr/local/bin/, which allows you to run menyoki directly from anywhere by typing menyoki. Either way, you will be responsible for updates in the future. For other installation options, see the "Alternatives" box.
Alternatives
You also can install menyoki with Docker or Cargo. Both are a bit more complicated than downloading the menyoki archive, but they make it a little easier to update the tool in the future.
If you are familiar with Docker, just call:
docker pull orhunp/menyoki
to set up the appropriate container. You can then call menyoki by typing:
docker run orhunp/menyoki menyoki
Depending on your system, you may also need to prefix the commands with sudo (e.g., on Ubuntu).
Menyoki also can be integrated via the Cargo package manager for the Rust programming language. All major distributions have Cargo and Rust in their repositories, but these are mostly outdated versions that are not suitable for installing menyoki. You should therefore always install the latest version of Rust manually in your home directory. To do this, first use the package manager to install the curl tool, a C compiler, and the developer packages for the libX11 and libXrandr libraries.
On Ubuntu, line 1 of Listing 1 provides everything you need. You can download an installation script for Rust with the command in line 2. Run it, and enter 1 at the prompt. After installation, open a new terminal and install menyoki (line 3). Don't forget to regularly update Rust (line 5) and menyoki (line 6) later.
Listing 1
Setting up menyoki via Cargo
01 $ sudo apt install curl build-essential librust-x11-dev libxrandr-dev
02 $ curl --proto '=https' --tlsv1.2 -sSf https://sh.rustup.rs | sh
03 $ cargo install menyoki
04 [...]
05 $ rustup update
06 $ cargo install menyoki --force
And, Action!
To capture what's happening in a desktop window as a GIF animation and save it in film.gif, just call menyoki with the command shown in line 1 of Listing 2. This long line of instructions may initially look cryptic, but upon closer inspection it nicely demonstrates the menyoki command structure. Immediately following the menyoki command, you need to type the action that you want menyoki to complete. In Listing 2, that action, the record switch, records an animation.
Listing 2
Recording with menyoki
01 $ menyoki record --countdown 5 gif save "film.gif"
02 $ menyoki record --with-alpha --countdown 5 apng save "film.apng"
You then use parameters to influence record's behavior. In Listing 2, following record, the --countdown 5 parameter tells menyoki to start recording after five seconds. This not only allows time for preparation, but – very usefully – it also lets you hide the terminal window with the menyoki call. Without this parameter, menyoki waits for three seconds by default. The action and its parameters are followed by the file format for storing the animation. Listing 2 uses the GIF format in line 1, but APNG is also possible (line 2).
Finally, save tells the software to save the video in the film.gif file after recording. If you omit this specification, menyoki independently chooses a storage location along with the file name, which it outputs on exiting – typically ~/pictures/rec.gif.
Framed
After calling the command from line 1 of Listing 2, a delicate frame appears (Figure 1). Menyoki will record whatever is inside the frame. You can record a different window by clicking on the desired window. In its own terminal window, menyoki informs you of the associated Window title and Window size. Armed with this information, you can determine whether menyoki has chosen the right window content. You have 60 seconds to select the desired window. If you need more time, specify the required number of seconds with the --timeout parameter.
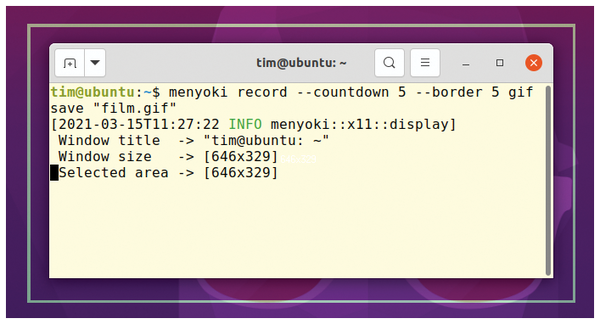 Figure 1: If menyoki's selection frame seems too thin, you can expand it to five pixels, for example, using the --border 5 parameter.
Gnome and KDE draw a shadow around their windows. Since the shadow belongs to the window, menyoki also draws it. The selection frame therefore appears to be far larger than the actual window (Figure 1). In the final animation, however, the shadow is shown as a black area.
To get around this, you have a couple of options. First, using the --with-alpha parameter tells menyoki also to record transparent pixels. However, this only works smoothly with the APNG format (Listing 2, line 2). Alternatively, you can hold down the Alt key and then use the arrow keys to reduce the size of the selection rectangle. You can enlarge the recording area again by holding down the left Ctrl+Alt keys. Pressing the left Shift+Alt keys along with the arrow keys lets you move the entire frame. However, exact frame placement around the window can be a fiddly process (Figure 2).
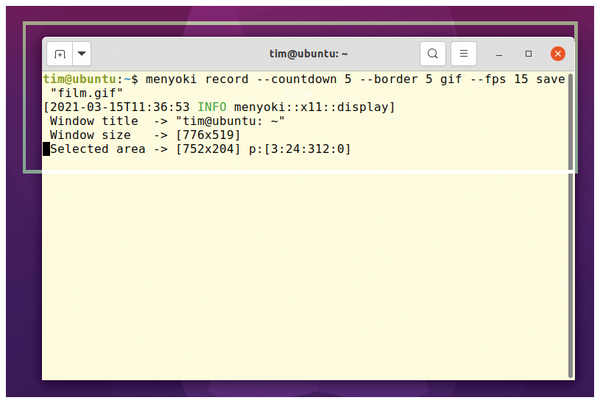 Figure 2: By reducing the size of the selection frame, you can restrict the recording area to the areas that you want to show.
Alternatively, turn off the shadows completely in the system settings (not all desktop environments let you do this). As a final measure, you can post-process the recording with a video editing program.
Recording!
After selecting the appropriate window, start recording by pressing Alt+Enter (Figure 3). The same key combination will stop the recording later. Menyoki records the video in RAM and writes it to your hard disk when you stop recording. This approach causes the main memory to quickly fill (depending on your memory size) and the system to freeze, making menyoki only suitable for short recordings.
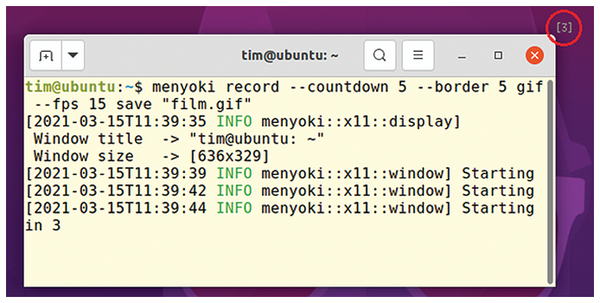 Figure 3: Before recording starts, menyoki displays a countdown in the terminal, as well as in the upper right corner next to the area to be recorded.
In the default setting, the software records at 20 frames per second; however, for many tutorials, something as low as 15 could be fine. Although the results are more jerky, the finished animation also takes up less storage space. In addition, a lower frame rate gives you a longer recording time. Use the --fps parameter to define menyoki's recording frame rate. Unusually, this value follows the file format specification (Listing 3, line 1).
Listing 3
Menyoki Options
01 $ menyoki record gif --fps 15 save "film.gif"
02 $ menyoki record --root --size 320x200 --padding 100:0:0:50 gif save "film.gif"
03 $ menyoki -q record --duration 1 save "-" | convert - "film.miff"
With the --root parameter, menyoki can capture the entire desktop. If you use multiple monitors, use --monitor <NUM> instead, where NUM corresponds to the monitor number to be recorded. Another parameter, --focus, lets you immediately record the currently focused window. The --select parameter lets you choose the window to be recorded.
If you only want to capture a section of the desktop, move the green highlight rectangle to the appropriate position using Shift+Alt and the arrow keys. Alternatively, specify the size of the area directly. For example, line 2 of Listing 3 captures a 320x200 pixel area of the desktop (Figure 4). The --padding switch moves the recording area 100 pixels down and 50 pixels to the right from the upper left corner of the screen.
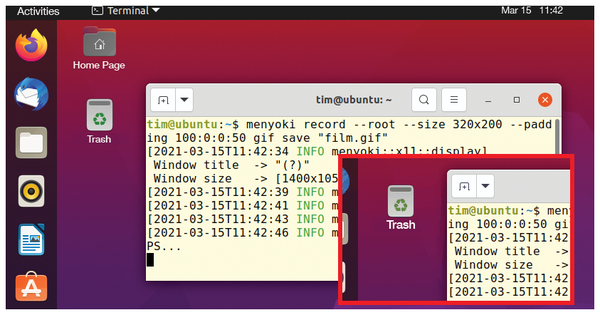 Figure 4: Menyoki will capture the section in the red frame with the settings shown in line 2 of Listing 3.
Menyoki also supports the --duration parameter, which lets you specify the recording time in seconds, avoiding the need to cancel recording manually. This parameter is especially useful if you use menyoki in a shell script. You can then pipe the generated animations to other programs (Listing 3, line 3).
The -q option tells menyoki to remain mute. The save "-" parameter sends the animation to standard output, which the | pipe then passes to convert. Finally, convert transforms the animation into the ImageMagick's MIFF format.
Cold Cuts
Some events happen too quickly to capture in a screenshot – for example, an important error message. To remedy this, first film the application at work and then break the animation into individual frames. Menyoki does this with the split action.
Line 1 of Listing 4 tells menyoki to store all frames from the video film.gif in JPEG format in ~/Videos/. The file names of the frames all start with frame_, to which menyoki appends the frame number. Consequently, in Listing 4, you will see the files frame_1.jpg, frame_2.jpg, frame_3.jpg, and so on. In addition to JPG, menyoki also supports BMP, ICO, PNG, PNM, TGA, TIFF, and FF (farbfeld) file formats.
Listing 4
Editing Movies
01 $ menyoki split --dir ~/Videos/ "film.gif" jpg
02 $ menyoki edit --ratio 1.5 "frame_3.jpg" save "frame_3_big.jpg"
03 ### Scale multiple images at the same time:
04 $ for file in *.jpg; do menyoki edit --ratio 1.5 "$file" save "$file"; done
05 ### Combine individual images to create a movie:
06 $ menyoki make --dir ~/Videos/ --fps 15 --format gif save film2.gif
07 ### Pass in image files instead of directory
08 $ menyoki make --fps 15 --format gif "frame_1.jpg" "frame_2.jpg" "frame_3.jpg" save film3.gif
You can now retrieve the rapidly disappearing error message from the individual images. If the font appears too small, menyoki can enlarge the selected image directly with the edit action (Listing 4, line 2). The --ratio parameter scales the image by a factor of 1.5, preserving the aspect ratio. The results are then stored in the frame_3_big.jpg file.
Menyoki also supports other types of image modifications (see Table 1). Currently, however, menyoki only edits a single image and not the complete image sequence. To quickly scale all frames by a factor of 1.5, use the command from line 4 of Listing 4.
Table 1
Image Processing Functions
| Parameters |
Meaning |
| --grayscale |
Converts image to grayscale |
| --crop <T:R:B:L> |
Crops the image by the specified top, right, bottom, and left pixel dimensions |
| --resize <W>x<H> |
Resizes the image by width and height without preserving the aspect ratio |
| --ratio <RATIO> |
Resizes the image proportionally preserving the aspect ratio |
| --rotate <ROTATE> |
Rotates the image clockwise (possible values: 90, 180, 270) |
| --flip <FLIP> |
Flips the image (possible values: horizontal, vertical) |
| --blur <SIGMA> |
Blurs the image |
| --hue <HUE> |
Changes the hue |
| --contrast <CONTRAST> |
Changes the contrast |
| --brightness <BRIGHTNESS> |
Changes the brightness |
After editing all the frames, menyoki can reassemble them into an animation if so desired (Listing 4, line 6). The --dir parameter defines the directory with the frames, and --fps 15 specifies a playback speed of 15 frames per second. --format is followed by the desired output format. Instead of your default directory, you can alternatively transfer to individual image files (line 8). The analyze subcommand lets you output technical information for the selected image file (Figure 5).
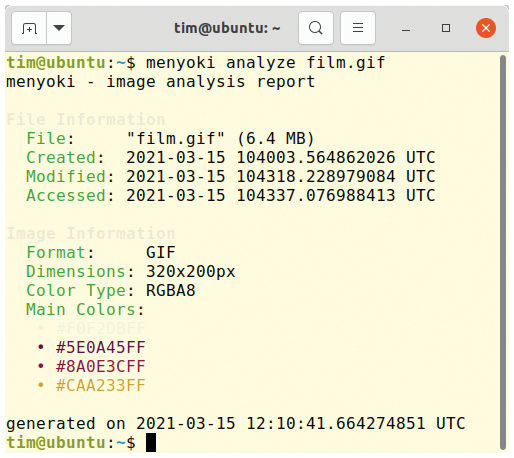 Figure 5: Using analyze gives you masses of technical information about an image or animation.
Menyoki can also create screenshots. This works in the same way as for an animation, but the associated action is capture (Listing 5).
Listing 5
Making a Screenshot
$ menyoki capture jpg save "screenshot.jpg"
Conclusions
Menyoki is the perfect tool to quickly record a process as a GIF or APNG animation. You can use menyoki to deconstruct your videos into individual frames, edit the individual images if necessary, and reassemble the image sequence into an animation. As a command-line tool, menyoki can also be easily integrated into custom shell scripts. For more examples of how to use menyoki, as well as documentation, visit the project's GitHub page [3].
However, menyoki does not yet come close to the functionality of other screencast programs. In particular, menyoki does not allow you to scale or post-process all extracted images at once. In addition, because of its mode of operation, menyoki is also only practical for short recordings.
Infos
- menyoki: https://menyoki.cli.rs
- Download menyoki: https://github.com/orhun/menyoki/releases
- menyoki project page on GitHub: https://github.com/orhun/menyoki