Optimizing the Linux Kernel
Speed Test

We explore some optimizations designed to deliver a smoother experience for desktop users.
The Linux kernel is the core part of all GNU/Linux operating systems. The kernel is designed to run on a large variety of hardware, from web servers to routers and embedded devices. The default versions of the Linux kernel that arrive with the mainstream Linux distros are optimized for some very basic use cases. For instance, Ubuntu comes in Server, Desktop, IoT, and Cloud editions – each with basic optimizations tailored for the usage scenario.
Most distros make some effort to customize the kernel for its intended purpose; however, no one but you knows exactly how you are using your own system. You can tweak the Linux kernel in hundreds of different ways to improve performance or reduce latency. I'll outline some of those techniques in this article. Of course, some of these tweaks might have already been enabled by your distro's vendor; others are more specific and are seldom used at all. The goal of this discussion is to take you down inside the kernel and to demonstrate various performance-related optimizations. Needless to say, tricks with the kernel have the potential to destabilize your system. These ideas are best explored with a test system – at least at first, until you are sure everything is working.
I'll discuss a range of Linux kernel optimizations with the goal of improving perceived desktop performance, including smoothness and snappiness. Such things may have little effect in synthetic tests (such as the ones often conducted by Phoronix), but they can have a strong effect on the user. I am aiming this discussion at desktop and laptop users, including the significant number of people who need to run Linux on low-performance and legacy hardware.
Tinkering with the Current Kernel
You don't need to recompile the kernel to improve kernel performance. The easiest way to tweak the Linux kernel is to use the optional boot parameters that run at the command line when the kernel boots up. You can make temporary changes in the GRUB 2 boot menu by editing the line that starts with linux, or you can make persistent changes by changing the GRUB 2 configuration. The steps for changing the GRUB 2 configuration vary across different Linux distros. Sometimes you can use graphical GRUB 2 configuration tools (Figure 1), like the one shipped with YaST (SLE, openSUSE), or kcm-grub2, which is designed for KDE Plasma, or the command-line grubby utility. All of these tools change the contents of the grub.cfg file and then update the GRUB 2 configuration:
$ sudo grub2-mkconfig -o /path/to/grub.cfg
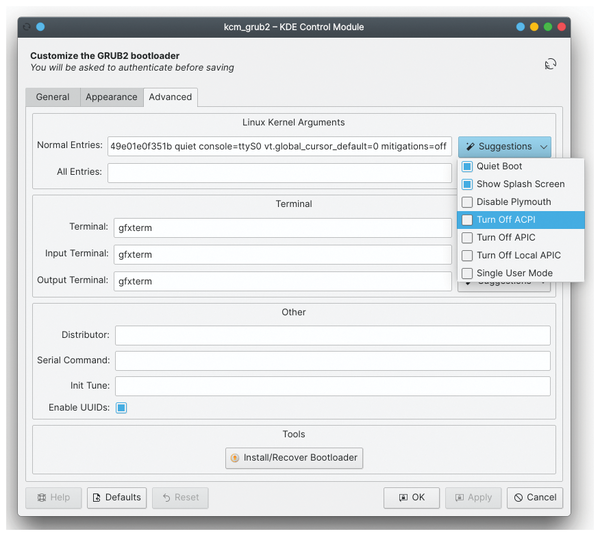 Figure 1: Editing the bootloader configuration is easy thanks to such helpful and friendly graphical front ends (in this case, kcm-grub2).
The following sections describe a few of the most useful kernel parameters.
elevator=
The elevator setting defines the Linux kernel behavior when distributing the I/O load on block devices (storage drives). This parameter defines the scheduler that will manage the I/O. Linux supports several different schedulers, which all have different strategies for balancing disk throughput and read/write latencies. Find out what schedulers are available and which one is currently used in your system with the following command:
$ cat /sys/block/sda/queue/scheduler
See the "Schedulers in Linux" box for more information on the available schedulers. The kyber scheduler is reported to have the best performance with mechanical hard drives (elevator=kyber), but if you are using a modern SSD or NVMe drive, it might be better use none to reduce the CPU overhead (elevator=none).
Schedulers in Linux
Modern hardware, with its enhanced support for multithreading and multiple CPUs, requires a new approach to scheduling. Linux is currently undergoing a transition to a new generation of multiqueuing schedulers. Consequently, some of the old schedulers that were popular in the past are gradually becoming deprecated. Ubuntu [1], for instance, has enabled multiqueue I/O scheduling by default in Ubuntu 19.10 onward and supports the following schedulers:
bfq(Budget Fair Queueing) – optimized for interactive response, especially with slow I/O deviceskyber– a simple algorithm supporting both synchronous and asynchronous requests; intended for "fast multiqueue devices"none– does not reorder requests, thus consuming minimal overhead (multiqueue version of the oldnoopscheduler)mq-deadline– multiqueue version of the old deadline scheduler
Older schedulers, such as cfq (Completely Fair Queueing), deadline, and noop are deprecated in recent versions of Ubuntu and other distros; however, they are still used with older systems and in situations that do not require multiqueuing.
Staggered Spin-Up Elimination
Even if Linux is installed on a super-fast SSD, the boot process can get slow if any other rotational hard drive is attached to the computer. This issue is called staggered spin-up, which means that the OS probes ATA interfaces serially, one by one, to reduce the peak power consumption. Normally, desktop users do not benefit from this default configuration, and they often feel annoyed with the longer boot times. To see if your system is using staggered spin-up, enter:
# dmesg | grep SSS
If it is, eliminate the issue by passing the following boot parameter:
libahci.ignore_sss=1
Turning Mitigations off
The mitigations parameter refers to some mitigations built into the kernel to address the Spectre [2] and Meltdown [3] CPU vulnerabilities. Switching all optional CPU mitigations off can improve CPU performance, but be aware of the security risks. Don't use this option if you are concerned about security. You should only consider turning off mitigations if your Linux system is not on any network or if you are certain that your CPU is not affected by the Spectre and Meltdown vulnerabilities.
nowatchdog
A watchdog timer is a tiny utility that is used to detect and recover from computer malfunctions. Specifically, it can perform a power reset for various hardware to maintain operations without manual intervention. See if your system is using a watchdog timer with the following command:
$ cat /proc/sys/kernel/watchdog
1 means the timer is on; means it is off.
This kind of hardware monitoring is good for mission-critical servers and unattended embedded devices, but definitely not desktops or laptops. Therefore it is a good idea to disable the watchdog timer completely by appending the nowatchdog boot parameter.
Benefits of Recompiling
Sooner or later, you might want to go deeper and make more solid changes by recompiling the Linux kernel. One benefit of recompiling is that you can banish all unneeded hardware support and get a smaller kernel. There are dozens of historic, legacy, and exotic hardware items that the kernel still supports even though the majority of desktop or laptop users will have no need for this support. A smaller kernel means a smaller disk and memory footprint, which can improve performance.
Second, you can rearrange the kernel drivers by removing them from the monolithic part of the system (bzImage, aka vmlinuz) and adding them to the modular part (root fs, aka initrd – see Figure 2). Making the monolithic part smaller was a good practice in the past, and it is still important these days for systems with no more than 2GB of RAM. Also, changing drivers from the statically compiled kernel to modules greatly improves the resume time after hibernation or suspension. This explains why an average Linux system takes much longer to wake up than macOS with its microkernel.
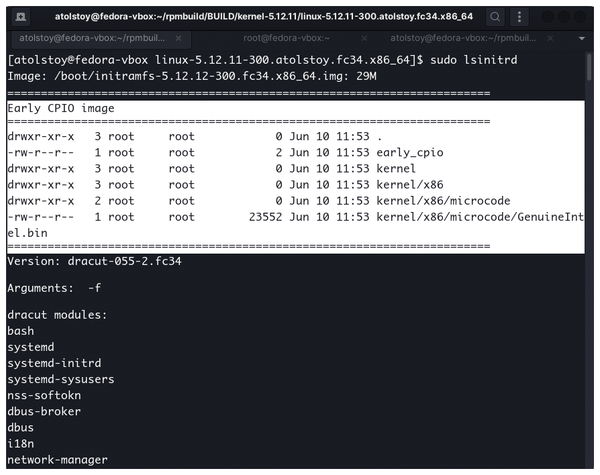 Figure 2: Use the lsinitrd command to determine which kernel modules are part of initramfs, the tiny filesystem that loads entirely into RAM upon the Linux system boot up.
Third, the Linux kernel already includes settings for better desktop performance, but they are not enabled by default. Customizing the kernel configuration lets you enable full preemption, pick higher timer frequency, define a CPU family, enable zstd compression, and more.
Fourth, you can patch the kernel with third-party patch sets to achieve many performance-related enhancements at once. As you will learn later in this article, projects like XanMod [4] and Liquorix [5] maintain custom kernels that are tuned to optimize performance for specific scenarios in case you don't want to meddle with every kernel setting by hand.
Kernel Compilation 101
Many of the best Linux tweaks require you to recompile the kernel. The steps might vary depending on your distro, but I'll briefly outline a universal recipe.
The first step is to get the source tree of the Linux kernel. You can grab the tree right from kernel.org to get a pure, vanilla kernel, which is perfectly fine depending on your needs. Another option is to get the source code used in your Linux distribution. This way, you'll also get specific patches that your vendor decided to apply to the kernel. As an example, you can download the source code for Fedora and recent RHEL versions with:
$ dnf download --source kernel
$ rpm -ivh kernel*src.rpm #
$ rpmbuild -bp --target=$(uname -m) ~/rpmbuild/SPECS/kernel.spec
Your kernel source tree with all patches applied will appear at ~/rpmbuild/BUILD/. The Ubuntu family allows you to get the kernel source via apt-get:
$ apt-get source linux-image-unsigned-$(uname -r)
The kernel source tree will then emerge under the debian subdirectory.
You will need to obtain the kernel configuration file that specifies what exact part of the kernel you want to build. This file is named .config, and it must reside under the main directory of the kernel source. You can generate .config by explicitly running the kernel configuration menu, as follows:
$ make menuconfig # ncurses-based interface
$ make xconfig # Qt-based interface
Also, you can take the configuration of the currently running kernel and use it as a template. You'll find the file with the current configuration under /boot:
$ cp /boot/config-$(uname r) kernel_source_dir
Now, you can apply extra patches to the kernel source tree (although it is perfectly fine to apply patches before running a configuration command as well). Many Linux vendors use patches to customize their kernel (for example, fix building for certain compilers, fortify security features, add support for extra hardware). Some kernel modules are not included in the default kernel tree and therefore are only available as patches. A good example is the Reiser4 file system, which consists of user-level utilities and the kernel module. The kernel module is available as a .patch file. Place it inside the kernel source directory and apply it as follows:
$ patch -p1 <filename.patch
Next you can run the configuration dialog and enable new items. Finally, build the kernel with make, although there are few more things to consider. First, keep in mind that building a Linux kernel takes a while even on high-performance machines. It is possible to save some time by running make with several threads (one per each CPU core), which will saturate the CPU load and make the process complete sooner. Second, if you plan to keep using the system while the kernel is compiling, it is important to maintain the system responsiveness by lowering the priority of the compilation task with ionice. One approach would be something like:
$ nice ionice -c idle make -j$(nproc -all)
Don't forget to build loadable modules as well:
$ nice ionice -c idle make modules -j$(nproc -all)
Finally, install the kernel with:
$ sudo make modules_install
sudo make install
In most Linux distros, you won't need to update the GRUB 2 configuration manually, and your kernel should be available for booting right away. If it is not, try the following command:
$ sudo grub2-mkconfig -o /boot/grub*/grub.cfg
The kernel's makefile also supports several extra packaging targets for several mainstream Linux distributions. For instance, you might want to try make rpm-pkg or make deb-pkg in order to get some helpful installation kernel packages for your system.
Going with a Fully-Preemptible Kernel
In order to achieve improved system responsiveness, you could rebuild the Linux kernel with full preemption enabled. This term needs additional explanation. Preemption defines the kernel behavior when it needs to distribute CPU time between processes that have different priorities. By default, the vanilla Linux kernel is not preemptive, which means that it will always first serve a high-priority process and only then serve a low-priority process. The goal of this default behavior is to keep the count of kernel context switches low and therefore maintain higher throughput of high-priority processes. This model is considered good for server appliances, where the performance of network services is crucial.
Preemptive and fully preemptive modes prioritize the speed of kernel responses over performance of individual processes. This approach introduces certain loss in the per-process throughput but in return eliminates long queues of low-priority processes that would otherwise need to wait longer. As such, a preemptive kernel plays best in a desktop multitasking environment and is a key role in those subjective "snappiness" and 'instant response" effects preferred by many users. Such a system is immune to unpredictable delays that can be encountered during syscalls, so it might be better suited for embedded or real-time tasks. To make the kernel fully preemptive, you need to open the Linux kernel configuration (e.g., make xconfig), go to General Setup and, under the preemption model, choose Preemptible Kernel (Low-Latency Desktop), as shown in Figure 3.
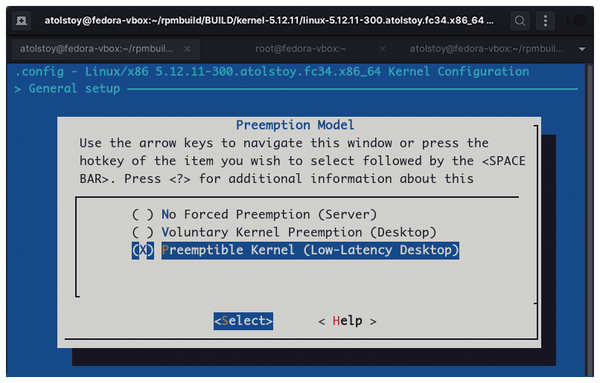 Figure 3: For years, the Linux kernel has included a special setting for better desktop responsiveness. You need to recompile the kernel in order to use it.
Another kernel setting that contributes to a more responsive workflow is the interrupt frequency timer set in Hz. The timer interrupt is the default interval at which the Linux kernel serves system calls. The higher this value, the better the timer resolution and the smaller the latencies between syscalls and actual context switches. The default configuration of the Linux kernel tends to keep the timer frequency low, so it's a good idea to increase it. Go to Processor type and features | Timer frequency and choose a higher value. It is a good idea to pick 500Hz or 1000Hz over 100Hz or 250Hz in order to receive a small but tangible minimum frame rate improvement in gaming and faster switching for productivity applications. Find any kernel setting you decided to change using the graphical front-end to Menuconfig (Figure 4).
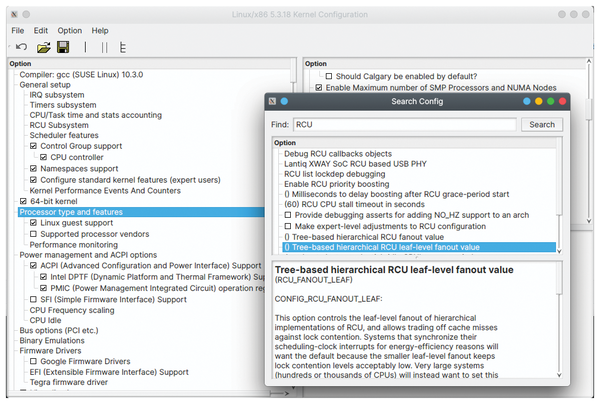 Figure 4: Consider using the Qt-based graphical UI for more comfort and control when customizing the kernel configuration.
Faster Boot Times from the Kernel Perspective
Optimizing the OS boot time is not directly a kernel-side business, but it is a complex task that involves the kernel. I will leave aside the system service part (which you can examine with $ systemd-analyze -blame) and look at the kernel part. The first consideration is to take full advantage of the zstd compression method. zstd stands for Zstandard, the open source algorithm developed by Facebook. zstd provides good compression ratios, although it is not as competitive for large file sizes. Where it does set a record is compression and decompression speeds. zstd archives are super-speedy to unpack, which is something you can benefit from when booting the compressed Linux image (vmlinuz). The Linux kernel supports zstd for the main image since version 5.9. You can also archive modules using zstd if your kernel is 5.13 or newer.
Another boot-related tweak is to ditch GRUB 2 entirely and boot the kernel directly from UEFI firmware. Obviously this technique requires a UEFI-enabled system, which is not a problem if your hardware is relatively new. As a prerequisite, manually copy the base Linux image and the initramfs image to a different location, as follows:
$ sudo cp /boot/vmlinuz-$(uname -r) /boot/efi/EFI/vmlinuz.efi
$ sudo cp /boot/initramfs-$(uname -r) /boot/efi/EFI/initrd.img
If you had /boot at /dev/sda1 and / at /dev/sda3, your EFI boot entry would look like this:
$ sudo efibootmgr --create --disk /dev/sda --part 1 --label "your_label" -u --loader '\efi\vmlinuz.efi'
"root=/dev/sda3 initrd=/efi/initrd.img resume=/dev/sda3 splash=silent quiet init=/lib/systemd/systemd
Essentially, you need to make sure that the init option points to the right location because your Linux distro might have a different systemd setup. After you ensure that your EFI boot entry is working, you can add extra boot parameters, including the parameters described earlier in this article.
Change the boot order with # efibootmgr -o and remove stale boot entries with # efibootmgr -b E -B, where E is the last character of the desired boot entry (i.e., Boot000E).
Ready-to-Use Patch Sets
Manual kernel configuration is a good way to learn about the kernel. However, if you want to play it a little safer and don't have time for a deep dive, several performance-optimized custom kernels are available for download. Two popular patch sets are XanMod and Liquorix.
The overall benefit of using a custom Linux kernel will vary depending on the workload. The average boost in synthetic tests may be around five percent, but the difference in experience (for example, the start time for Firefox while playing a high-resolution video in the background) might be considerably more significant. Keep in mind that many of the described optimization techniques that involve different scheduling and changing inner kernel timers only show up when the system has a significant load. The best way to conduct a simple home-grown benchmark is to set up a resource-hogging process, such as video encoding or a huge file compression, and then try to do some normal browsing along with it. Custom-patched kernels will likely deliver a smoother experience and maintain responsiveness even if CPU usage is nearly 100 percent.
As for real-world benchmarks, I conducted a series of tests using the sysbench tool. Sysbench can stress test Linux systems and test CPU, memory, threads, and I/O performance. The tests were run against three flavors of the 5.12 kernel: the mainline Ubuntu kernel, the XanMod kernel, and the Liquorix kernel. Table 1 shows the sysbench results for my test system running on Intel Xeon E5450 with 4GB of memory and with Pop!_OS 20.04 installed on a budget SSD drive. Keep in mind that these results are from my tests run on my hardware. The developers of these projects will likely have their own tests for specific scenarios in which their kernels excel.
Table 1
Comparing Kernels
| 5.12.14-051214-generic | 5.12.14-xanmod1 | 5.12.0-14.2-liquorix |
|
|---|---|---|---|
| CPU operations per second |
352683.54 |
357276.58 |
357004.96 |
| Threads: number of events |
17351 |
17364 |
24252 |
| Memory: min latency (less is better) |
0.65 |
0.61 |
0.38 |
| Memory: max latency (less is better) |
433.60 |
251.99 |
286.81 |
| File I/O: writes per second |
6266.96 |
6386.38 |
5794.37 |
It is clear that all three kernels run very close to each other when measured for CPU performance, with XanMod only 1.3 percent faster than the generic kernel. In the threads test, the contenders showed different results as long as each used its own process/thread scheduler. The vanilla Linux kernel comes with the completely fair scheduler (CFS), which turned out to be on par with XanMod's CacULE (enhanced ULE scheduler originally derived from FreeBSD), but both lost the race to the Multiple Queue Skiplist Scheduler (MuQSS) enabled in Liquorix. It turns out that in a densely threaded environment, MuQSS scores up to 40 percent better than its rivals.
When it comes to memory latencies, you can clearly see that both kernel flavors performance-wise try their best to reduce the maximum latency value. In that regard, the record belongs to XanMod, but the average latency is still lower in Liquorix. The I/O test for sequential writing then showed that XanMod was actually more balanced, and it delivered the best throughput figures, whereas Liquorix yielded 10 percent less write speed. By the way, both XanMod and Liquorix were using Budget Fair Queues (BFQs) for handling disk loads, whereas the generic kernel stuck with mq-deadline. So, in the end, the choice comes down to the acceptable throughput trade-off for the sake of better responsiveness. Regardless of your choice, both the customized kernels will run faster than the generic kernel.
Conclusion
Linux was created for hacking and tinkering, and users still have many options for tweaking the Linux kernel. This article touched on a few important options, and you will find many more if you spend some time with the Linux kernel configuration menu and browse the kernel documentation [6]. Just remember that it is better to test these techniques first on a non-critical system before you roll them out on your production network.
Infos
- I/O Schedulers: https://wiki.ubuntu.com/Kernel/Reference/IOSchedulers
- Spectre: https://en.wikipedia.org/wiki/Spectre_(security_vulnerability)
- Meltdown: https://en.wikipedia.org/wiki/Meltdown_(security_vulnerability)
- XanMod: https://xanmod.org/
- Liquorix: https://liquorix.net/
- Linux Kernel documentation: https://www.kernel.org/doc/