Easy entry to microcontroller programming
Microcontrollers for Beginners

© Lead Image © donatas1205, 123RF.com
The Nibble kit by CircuitMess is a freely programmable mobile game console that makes getting started with microcontroller programming a breeze.
The Nibble kit by CircuitMess [1] comes with everything you need to build a portable game console. It even includes a soldering iron to solder the buttons. The lead-free solder included in the kit will easily last for several more projects. The kit also includes a simple screwdriver for assembling the case, and you won't hear this very often: The batteries are included (Figure 1).
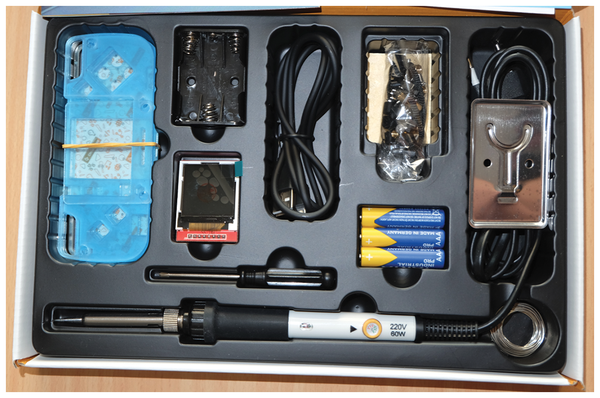 Figure 1: CircuitMess delivers all the Nibble kit parts in a neat package.
The kit is suitable for children from nine years up, but as my test shows, older users can have fun with the kit, as well. The very detailed and easy-to-understand instructions explain all the build actions step by step. In some places, links to online videos lend further help. The assembly instructions are available for download on the manufacturer's site in several languages [2]. The Nibble kit helps users acquire a number of skills, starting with the simple act of assembling the housing, to soldering, to programming the microcontroller in C.
The core of the kit is the ESP8266 microcontroller. The maker community very much appreciates this little device, not least because of its integrated WiFi interface, which is why you will see it used in many projects, including one I wrote about WiFi sniffing [3]. That article also has an installation guide for the Arduino environment.
According to the instructions, it takes about two hours to assemble the Nibble (Figure 2), but an experienced maker can do this considerably faster. The most annoying step by far is peeling the protective film off the Plexiglas, which, however, reliably prevents the modules from being scratched.
 Figure 2: The fully assembled Nibble fits well in your hands and the switches are easy to reach.
Although CircuitMess uses a subscription model and does not sell the unit anymore, you could still order the kit on the GÈnÈration Robots [4] website for about $66 (£60, EUR68) as of October 2022. This website focuses on robotics and electronics, but you will also find many other interesting products, so it's definitely worth browsing. If you want to learn more about the Nibble, visit the manufacturer's product page [5].
Programming
After assembling the Nibble according to the instructions, the preinstalled games – Invaders, Bonk, Snake, and Space Rocks – can be played directly on the device. As great as these classics may be, after a while, my fingers were itching to write my own little application for the Nibble.
You can choose between the Arduino C++ programming language and CircuitBlocks, which is more suitable for newcomers. To program, you simply click together the program functions with graphical elements. This method completely eliminates syntax errors. Only building blocks that work together can be put together. Additionally, the graphical representation of the program segments helps in understanding the code.
The CircuitBlocks software is available for free download from the manufacturer's site [6]; there are installation packages for Linux, Windows, and macOS. Detailed installation instructions with an introduction to CircuitBlocks can be found on the project page [7]. If you plan to write C++ programs for the Nibble in the Arduino IDE as well, it makes sense to install the IDE before you install CircuitBlocks, because its installer creates a board manager for the Nibble in the Arduino IDE (Figure 3).
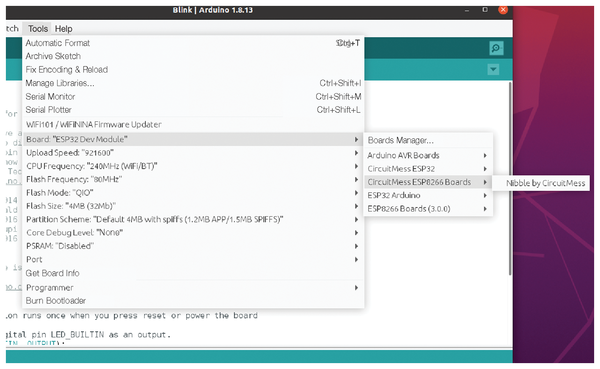 Figure 3: The CircuitBlocks installer automatically creates the board manager for the Nibble in the Arduino IDE.
The software for Nibble is completely open source, and all sample programs can be downloaded from GitHub [8]; however, the schematic is not included in the repository: You will find it on the manufacturer's page [9].
CircuitBlocks
To create a new project with CircuitBlocks and open the editor (Figure 4), click New sketch | Nibble | Block. The code blocks reside in the left pane. To create the program, drag and drop them into the center area. The window displays the corresponding C code on the right.
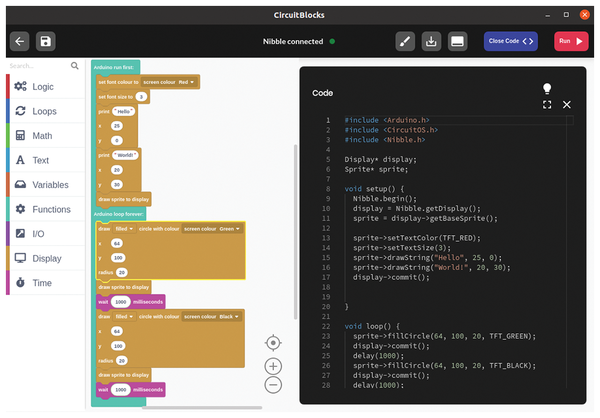 Figure 4: The CircuitBlocks user interface makes it easy to create, not least because it rules out syntax errors.
Once your program is ready for a first test, click Run in the upper right corner. Now it takes a moment for the program to launch automatically on the Nibble. That's all you need to do to write your own programs in CircuitBlocks. The sample program in Figure 4 conjures up a Hello World on the display and makes a green circle flash.
Arduino IDE
As always, the good old Flash example is used as a sample program for the Arduino IDE (Listing 1). To begin, connect the Nibble to a PC over USB and turn it on, select the appropriate board manager in the Arduino IDE, and load the program to the controller with the Upload icon, after which the blue LED on the ESP8266 starts to flash. You can see this if you look into the Plexiglas housing of the Nibble from the top.
Listing 1
Flash
void setup() {
  pinMode(LED_BUILTIN, OUTPUT);
}
void loop() {
  digitalWrite(LED_BUILTIN,!digitalRead(LED_BUILTIN));
  delay(1000);
 }
Python
As mentioned, the core of the Nibble is the ESP8266, on which you also can install MicroPython [10]. Thonny [11] would be a suitable IDE. Detailed instructions on how to install MicroPython can be found on the project page [12]. You will want to use the G2 image [13] for the ESP8266.
However, MicroPython has no manufacturer support, which means no installation documentation. Even online, you can hardly find any support on this topic. I failed to find a working driver for the display even after a thorough search, and querying the push buttons also turned out to be difficult. As a look at the schematic of the Nibble shows, these are queried with an additional I2C port expander, so I would advise against trying to use MicroPython on the Nibble.
Conclusions
The Nibble kit really contains everything you need to build it. The core ESP8266 component makes the Nibble extremely flexible and also helps to integrate other projects, such as controlling a robot or developing a multiuser game. The Arduino IDE offers access to a large number of libraries, so the Nibble could also be integrated into a smart home. Thanks to the detailed documentation, nothing stands in the way of self-study.
One small downer, however, is that the Nibble cannot be powered over USB, although the batteries are easy to replace. I definitely enjoyed the kit and plan to include the Nibble in some future projects.
Infos
- CircuitMess: https://circuitmess.com
- Nibble kit assembly instructions: https://learn.circuitmess.com/resources/guides/en/nibble-build-guide
- "Sniffing WiFi with an ESP8266 microcontroller" by Martin Mohr, Linux Magazine, issue 250, September 2021, pg. 62, https://www.linux-magazine.com/Issues/2021/250/ESP8266-for-WiFi-Sniffing/
- Order the Nibble kit: https://www.generationrobots.com/en/403786-nibble-educational-diy-retro-game-console-kit-with-tools.html
- Nibble homepage: https://circuitmess.com/products/nibble-diy-game-console
- Download CircuitBlocks: https://circuitmess.com/pages/circuitblocks
- CircuitBlocks tutorial (download): https://api.circuitmess.com/user-8/1627479759411-nibble-coding---first-steps-pdf.pdf
- Sample programs on GitHub: https://github.com/CircuitMess?q=nibble
- Nibble circuit diagram (download): https://api.circuitmess.com/user-3/1604071016365-circutmess_nibble_schematic.pdf
- MicroPython: https://micropython.org/
- Thonny: https://thonny.org
- Install MicroPython: https://docs.micropython.org/en/latest/esp8266/tutorial/intro.html
- MicroPython image: https://micropython.org/resources/firmware/esp8266-20220117-v1.18.bin