Flat-file content management systems
Simpler Content Management

Not everyone needs a conventional database content management system. For beginners and smaller websites, a flat-file content management system offers ease of use, while eliminating attack vectors.
Almost half of all websites are created with WordPress [1] according to current estimates. While WordPress is a mature, proven, and easy-to-use content management system (CMS), it is still often too complex, especially for beginners and smaller websites, and unnecessarily consumes server resources.
Beginners in particular don't need all the functions provided by a database CMS such as WordPress. Ironically, beginners often turn to WordPress, even though a flat-file CMS would be a far better choice. A flat-file CMS, such as the well-known open source Grav [2], offers most of the features of a conventional database CMS, but it does not require its own database: The content is in the form of files that reside directly on the web server. A flat-file CMS simplifies the software installation and makes it easier to set up and maintain the website. In addition, doing without a database eliminates some attack vectors for hackers.
This article introduces Bludit [3] and GetSimple CMS [4], two flat-file CMS alternatives to Grav. Both are far leaner than Grav, but still come with all the important features. Each provides a graphical user interface, multi-user capabilities, themes for custom website design, and a large selection of plugins to extend functionality. The most important difference between the two programs is that Bludit uses JSON to store web content on the server, while GetSimple CMS relies on XML.
Bludit
Bludit, the younger of the two, has been under development since 2015. Bludit only requires a recent version of the PHP scripting language on the web server. To install, download the Bludit archive from the project page [3] and unzip it. If needed, then connect to your web host via FTP and upload the 6MB content of the unzipped directory to your webroot directory.
Alternatively, Bludit can also be run in a subfolder below webroot. To start the Bludit Setup Wizard, call up your domain in a web browser. Then select a language for the user interface and the website, set a password for the site administrator, and click Install.
Bludit now redirects you to a sample page titled Welcome to Bludit. Clicking on the blue admin link will take you to the Bludit login page, where you can log in as admin.
You will then see the dashboard (Figure 1) with visitor statistics at the bottom of the page. On the right, a list of activities shows what you recently changed on the website. Right after the install, you will only see a few entries in this list. The sidebar on the left lets you access various tools, such as the page editor, for creating new content or editing the website settings.
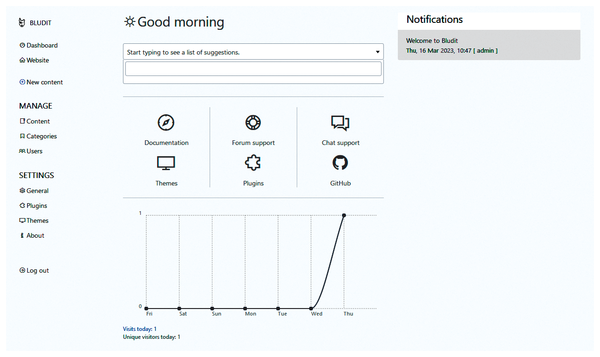 Figure 1: Right after logging in, a dashboard appears showing visitor statistics, among other things.
Creating Content with Bludit
To create a new page or blog entry, click New Content in the sidebar. A WYSIWYG editor then appears; you need to enter the post's title in the top input box and the content in the large input box below it (Figure 2). You can then use the tools in the toolbar above the large input box to format the content.
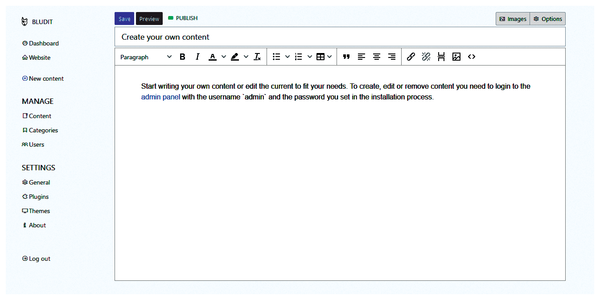 Figure 2: A convenient WYSIWYG editor is available for creating new static pages and blog entries.
To insert images, do not click on the small image icon in the toolbar. Instead, click on the Images button in the top right corner of the editor. In the upload dialog that opens, click Browse and select the image you want to insert. After uploading, select one of the options to insert the image next to the small square thumbnail. You can either insert a full-scale image or a linked thumbnail. In addition, the image can also be used as the page's lead image.
Bludit basically supports two types of content: static pages and blog posts. You access static pages via a link in the website's navigation bar. However, blog posts are only shown on the homepage. If you select the Sticky page category, the blog post will remain at the top of the homepage, even if there is newer content.
You can define the page type by clicking Options in the top right corner of the page editor and then going to the Advanced tab. When you get there, navigate to the Type menu and select the desired page type. Bludit uses Blog post as the default. To publish the page, just click Save.
Now switch to Content in the sidebar on the left under Manage. You will see a list of all existing pages or blog posts. To the right of the entry titles, you will find links that let you edit or delete the content.
Bludit Page Settings
To edit page settings, click General in the sidebar on the left under Settings. In the first tab, General, you can change the title and subtitle of the website, along with the information and copyright notice in the footer. After editing, press Save in the top right corner (Figure 3) to apply the changes.
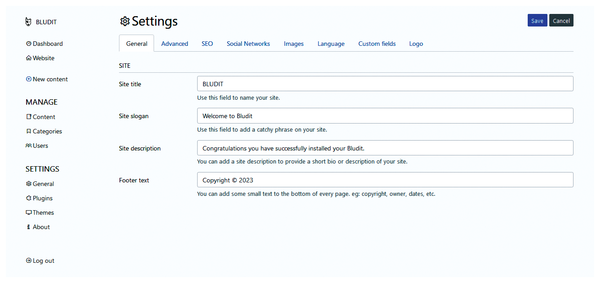 Figure 3: In Settings | General, you can set the website's title along with other information about the website.
You can change the website's design by enabling a different theme via Settings | Themes. To the right of the sidebar, you will see a list of installed themes. In a fresh Bludit installation, there are just two variants; Bludit enables Blog X by default. A very similar theme, Alternative, is also available.
You can also download a new theme from the Bludit website [5]. Once you unzip the theme, use an FTP program to move the contents of the unzipped archive to the bl-themes/ directory of your Bludit installation on the web server. Then reload the Themes page in the Bludit back end to add the new theme to the list. You can then enable the theme by pressing Activate under the theme name. The descriptions of many themes contain hints about their use or operation; you should pay attention to this information.
Bludit Plugins
Plugins are installed in the same way as themes and add new features to Bludit. If you click on Plugins below Settings, you will see that the default installation of Bludit already comes with numerous plugins, some of which are already enabled. You can find more plugins on the Bludit website [6], but many of them are not genuinely useful.
Some of the plugins cost money. For example, the ImageGallery Lite plugin only allows one photo gallery on the website; to create multiple galleries you need to purchase ImageGallery Pro ($5). However, even the pro version is missing important functions such as image titles and descriptions. Some plugins failed to work during testing, while others were difficult to use, such as the Mastodon extension.
However, Bludit is still a likable little CMS. It offers various other functions, which I don't have space to cover in this article. Thanks to the clear-cut graphical user interface, managing Bludit is extremely intuitive, which is why beginners in particular will quickly be able to find their way around Bludit.
GetSimple CMS
One of the oldest flat-file CMSs, GetSimple CMS has the same installation requirements as Bludit, and the first part of GetSimple's installation is also very similar. Download the program archive, unzip, and upload the content to your webroot directory. Then launch the installer in your browser. You additionally need to add the /admin suffix to the domain name to call the installation script. You will then see the results of the system check in your browser (Figure 4).
 Figure 4: Installing GetSimple relies on a web installer.
To continue the setup, click Continue with setup on this page. A web form then appears where you can enter the website name, a username, and an email address before pressing Install Now. On the next page, you will see a registration confirmation and a password that GetSimple created for you. Clicking Login here logs you into GetSimple and takes you to the user interface, the CMS's back end.
You will then see the Getting Started page of GetSimple. Click on Settings in the top right corner. At the bottom of this page, you will first want to change the password.
Creating Content in GetSimple
Click the Pages tab to access page management. With a fresh GetSimple installation, you will see a single sample page named Welcome to GetSimple in the list. The page cannot be deleted, but it can be edited. Click on the page to open it in the page editor (Figure 5). Now change the title and content of the page before pressing the gray Save Updates button on the right.
 Figure 5: GetSimple's page editor offers numerous settings.
To insert images into web pages, you first need to upload them to the server. To do this, click on the Files tab, go to the top of the tab, and press Browse on the right. Select the image you want to install and press Upload. Then open a page in the page editor and click on the thumbnail image in the editor toolbar. The Image Properties dialog box then opens (Figure 6); you can press Browse Server to view and select the uploaded photos.
 Figure 6: Before inserting images, you first need to upload the images to the web server using the graphical upload tool.
A default installation of GetSimple only supports static pages that you access through a link in the website's navigation bar. If you want to create a blog, you will need to install the News Manager (updated) plugin. You can download it from GetSimple's website [7]; unzip the archive and upload the contents to the /plugins/ folder on the server.
To enable the plugin, click on the Plugins tab, where the News Manager (updated) entry now appears in the list of installed plugins. Now press the Activate button in the Status column. Finally, select the page where you want to display the news or blog posts. Unlike Bludit, blog posts can be accessed from any page in GetSimple, not just via the homepage.
To do this, click News Manager on the right side of the Page Manager and then click the dark Settings button at the top. At the very top of the menu, select the appropriate page below Page to display posts: and press Save Settings at the bottom to confirm the change. To create new posts, click Create New Post at the top of the News Manager.
GetSimple Themes
You install themes in GetSimple just like in Bludit. Download the theme, unzip it, and transfer the contents of the folder to the /theme/ directory on the server. Then enable the new theme on the Theme tab of the GetSimple back end.
Components are one special feature of GetSimple themes. For example, the standard Innovation theme has the Sidebar component. The sidebar of the sample page only contains some information on the CMS's functions. To customize the content, click the Edit Components button below Choose Theme on the right and edit the text in the large Sidebar input field. The Innovation theme also lets you display or insert social media links via the Theme | Innovation Theme Settings tab.
GetSimple Plugins
In GetSimple's add-ons repository [7], you can find many useful plugins. For example, MonsterGallery and I18N Gallery (Figure 7) are two recommended plugins for photo galleries. Many of the available extensions indicate that they only work with GetSimple up to version 3.1 or 3.2. However, this is misleading and seems to mean only that they have not yet been officially released for version 3.3. A test with some of these plugins, such as the Multi User plugin, showed that they also work smoothly with the latest version of GetSimple. This also seems to apply to theme compatibility.
 Figure 7: The I18N Gallery plugin lets you create image captions and descriptions for your photo gallery.
Conclusions
Bludit and GetSimple CMS are intuitive programs that are especially recommended for beginners and smaller websites. Although the user interface designs differ, major parts of the feature set are virtually identical. GetSimple has the edge here, mainly because of its many useful extensions.
Bludit's biggest advantage is the superbly designed themes. Although there is no usable gallery plugin available for Bludit, I found it easier to design a photo or portfolio website with Bludit than with GetSimple in testing, because Bludit offers a suitable theme.
Having said this, GetSimple is better suited for most other use cases, such as for smaller companies or projects. GetSimple does require some willingness on the part of the site operator to delve deeper into the topic of web design and template or theme customization. Surprisingly, GetSimple does not come with usable visitor statistics. There is a plugin, but it requires Matomo or Piwik. And this, in turn, means setting up a database, which undermines the idea of a flat-file CMS.
Infos
- WordPress: https://wordpress.org/
- Grav: https://getgrav.org
- Bludit: https://www.bludit.com
- GetSimple CMS: https://get-simple.info
- Bludit themes: https://themes.bludit.com
- Bludit plugins: https://plugins.bludit.com
- GetSimple plugins: http://get-simple.info/extend/