Retouching with Perl
Color Play

© Saniphoto, Fotolia
In many cases, whole series of digital images need the same kind of modifications, which forces the photo-grapher to repeat the same steps time and time again in GIMP. Have you ever considered retouching in Perl?
Before posting snapshots I've taken with my digital camera to the web, I used to go through the same old steps with GIMP. First, I'd reduce the image size to a width of 1,000 pixels because the image size my Nikon D70 gives me is just too much for the web and uploading the images takes too long. Also, to improve the contrast, correct any color casting, and make images tack-sharp with GIMP's Sharpen function, I typically select a value of 20.
As you might know, GIMP has a convenient scripting interface that lets users automate recurring tasks, and you can even run it at the command line without launching the GUI. GIMP developers have made some fairly significant changes to the whole API and nothing works the way it used to. Fortunately, GIMP documents the functions completely and thoroughly in the Xtns | Procedure Browser menu.
The standard interface is implemented in the rocket scientist's favorite programming language, Scheme.
Perl Module
Thank goodness there is a Perl module. I needed a couple of tricks to install it on Ubuntu 7.10, and I'll explain the steps later. After the install, you can run the picfix script (Listing 1) at the command line by typing picfix file.jpg. Under the hood, the script calls GIMP (without the GUI) and then invokes register() to register the picfix() function.
Strangely, the GIMP interface insists on scripts that run at the command line, creating a menu entry, and picfix has no option but to comply. Line 49 of the script calls the main() function that branches off to GIMP and returns after completing its chores, and exit makes sure that the script gives the return code from main() before quitting.
Figure 1 shows the original image, a picture taken from my balcony in San Francisco with the early evening sun lighting up the city nicely. Despite this, I still wasn't happy with the colors in the original.
 Figure 1: The original image is color cast and the contrast could be better.
Listing 1
picfix
Picfix
Running picfix gave me the results you can see in Figure 2. The contrast is vastly improved and the colors are far more realistic.
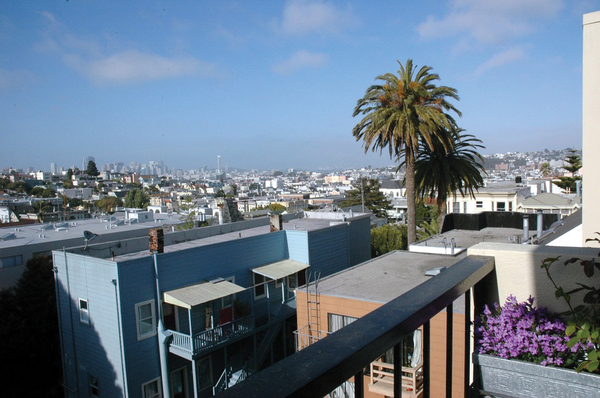 Figure 2: After retouching with picfix, the colors are far more natural and the contrast is much improved.
The picfix() function defined in lines 52ff., which GIMP executes as a callback, runs the gimp_file_load() function that loads the digital image from a given file on disk. A call to image_scale() (line 134) scales the image to a width of 1,000 pixels.
The gimp_levels_stretch() function (line 74) then simulates the Auto button in the GIMP Levels dialog and maximizes the contrast by distributing the color values used in the image across the whole of the available bandwidth.
The plug_in_sharpen() method (line 90) with a parameter of 20 then improves the focus, then gimp_file_save() (line 97) saves the file as file-1.jpg using the original format. Whether the image is a JPEG or PNG makes no difference; internally, the load/save methods hand control over to the GIMP routines for the format in question.
Loading the supporting modules by calling use Gimp qw(:auto) and use Gimp::Fu has the practical side effect of loading all of GIMP's functions into the script's namespace. Programmers will be happy to hear that the :auto tag also includes GIMP constants, such as RUN_NONINTERACTIVE.
Options
Image rescaling defaults to a width of 1,000 pixels; however, the -s (size) command-line option supports arbitrary values. A command line of picfix -s 500 file.jpg reduces the maximum image width to 500 pixels, for example, with the maximum size relating to the width in landscape images, but to the height in portrait format. The scale_image_down() subroutine in line 109ff. provides the If/Else logic for this.
If you prefer to check the results of your scripted actions on the image, you can set the -x (for X Window) option to view the image in the viewer set as a default in line 13 (in this case, Eye of Gnome, eog).
To disable the Autolevel function, which does not always return satisfactory results, set the -l 0 option.
Color Cast
If you have a photo that is too green, too red, or too blue, you can assume that something is wrong with the color balance. A white object in a scene you photograph really should be white. The same principle applies to gray or black objects. However, if you have not adjusted your camera's white balance – something professional photographers always do – you could experience unnatural-looking colors. Later, you can correct color casting in the digital image by a method described in Grokking the GIMP [2]. Although the JPEG format used by many low-budget cameras restricts your options here, you can typically achieve fairly satisfactory results.
One problem is that many photos simply do not contain pure white, black, or gray elements; however, photographic equipment retailers have plastic cards that can help you. Simply place the cards somewhere in a test shot, and then use the measured values to compensate any further shots you take of the same scene.
Of course, if the lighting changes – if, for example, the sun comes out from behind a cloud – you will need to take another test shot with the cards before you continue.
In Figure 3, I used the GIMP's Color Picker tool to measure the color values of the gray card. The results were Red: 122, Green: 127, and Blue: 123. For a perfect picture, all three color channels should have identical values. The same thing applied to the white and black cards: the values I got here were 227/235/228 and 16/10/17, respectively.
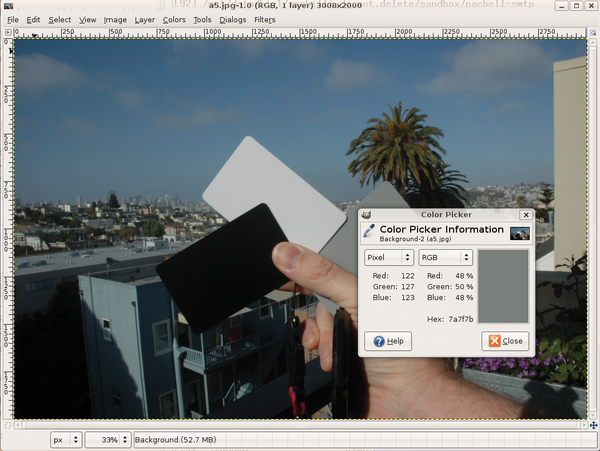 Figure 3: A set of white, gray, and black cards makes it easier to locate control points.
The colorcast.yml file (Figure 4) shows the values GIMP returned in YAML format. The script parses these values from a file whose name you pass in at the command line, as in picfix -c colorcast.yml file.jpg. This lets the script adjust any number of images of the same scene. To do so, it has to transform all the colors used in the image in such a way that it removes color components in those sections of the image that are actually colorless.
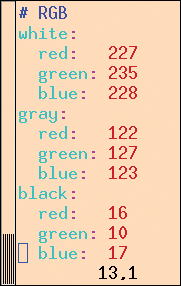 Figure 4: The file colorcast.yml stores the color values I measured for the black, gray, and white cards.
To allow this to happen, I needed to define a transition function with a graph that covers the known measuring points, and performs spline-style interpolations for all other values. GIMP's Curves dialog from the Tools | Color Tools menu supports this. All you must do is set the color that needs adjustment in the dialog's selection box at the top and then make a dent in the graph, which is initially straight, so that the line touches the control values that you determined.
If you assume the gray card gives values of Red: 122, Green: 127, and Blue: 123, to adjust the image, just set the values for the red and blue channels to the same value as green, 127, which gives you a pure gray.
To do so, open the red channel in the Curves dialog and drag the straight line at the 122/122 point to 122/127, which makes a slight dent into the graph as the curve auto-adjusts. While you are dragging the line, GIMP shows you the current coordinates at the top left-hand side. Then do the same for the blue channel, dragging 123/123 to 123/127. The red and blue channels have slightly bumpy curves when you are done, as you can see in Figure 5.
 Figure 5: Correcting color casting in the Curves dialog. This example uses three control points to adjust the line for the red channel.
Now repeat the process for the black and white cards; This gives you a total of three control points in the red and blue channels, all of which adjust the color balance.
Of course, you can script the whole process. Listing 2, ColorCast.pm, shows that its constructor expects two values: yml_file, the YAML file with the measured values, and drawable, the GIMP layer in which to perform the color transformation.
Listing 2
ColorCast.pm
The load() method then parses the YAML values, which are stored in a hash of hashes. Starting in line 53, adjust_to() then accepts a channel (e.g., green), and it adjusts the values for the other two channels (red, blue) to match the green values. The GIMP function that handles this is gimp_curves_spline(), which accepts the active layer in the image to be modified and a series of control points as parameters.
On top of the control points, you need to pass (0,0) and (255,255) to adjust_to() to make sure that the graph starts at the bottom left-hand side and finishes at top right, as shown in Figure 5.
If you do not specify any values, the picfix script will not perform any color correction. The -c option passes in a YAML file that you created previously, and the -a (adjust) option accepts the channel name to which the other two channels will be adjusted. This defaults to green.
Tricky Install
By typing
sudo apt-get install libGIMP-perl
on Debian-based Linux distributions, you should be able to install the whole Perl GIMP enchilada.
Unfortunately, the Ubuntu 7.10 release goes haywire. Synaptic takes the insanity a step farther and even suggests uninstalling GIMP and the Ubuntu desktop to install libgimp-perl.
The reason for this madness seems to be a broken GIMP package, which contains a couple of files belonging to the libgimp-perl distribution, but not the required Perl modules.
Solution
To work around this, use the steps outlined in the "Ubuntu Tricks" box: Download the libgimp-perl source code, rebuild, increase the version number by 1 (that is … dfsg-2 becomes … dfsg-3), and go on to install.
This solution is quick and dirty and probably will not survive the next GIMP update, but it's good enough to get by for now. Ubuntu Hardy fixes the problem for good.
After the install, you will need the ColorCast.pm module in a path where picfix can find it; alternatively, you could hard code the usr lib directory; in picfix to match your ColorCast.pm installation directory.
The other Perl modules you need to get started are available from CPAN and can be installed in a CPAN shell or can be installed more conveniently in Ubuntu by typing apt-get install libyaml-perl and liblog-log4perl-perl.
Line 16 in picfix sets the logging level to $DEBUG, but you can switch to $ERROR if all this verbosity is bugging you (Figure 6).
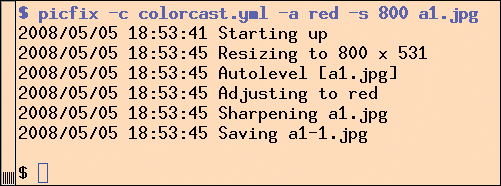 Figure 6: If you keep the default Loglevel, the script will log its activities in detail.
Ubuntu Tricks
Some Like It Raw
Digital SLR cameras, such as the Nikon D70, will store your images in raw format on request. Of course, doing so consumes vast amounts of card space, and you will need to install the Ubuntu gimp-ufraw package to allow GIMP to handle the raw data.
Although GIMP can read the .nef formatted raw data, it can't actually store files in this format, which explains why picfix changes the file suffix to .png shortly before writing to tell GIMP to save the results in PNG format.
Infos
- Listings for this article: ftp://ftp.linux-magazin.com/pub/listings/magazine/94/
- Grokking the GIMP by Carey Bunks: http://gimp-savvy.com/BOOK/
- Additional GIMP and photo-manipulation books: http://gimp-savvy.com/EXTRAS/books.html
- Tutorial on the GIMP Perl interface: http://imagic.weizmann.ac.il/~dov/gimp/perl-tut-2.0/
The Author

Michael Schilli works as a Software Developer at Yahoo!, Sunnyvale, California. He wrote "Perl Power" for Addison-Wesley and can be contacted at mailto:mschilli@perlmeister.com. His homepage is at http://perlmeister.com.