Investigating Windows systems with Linux
Window Kit

© Max, Fotolia
A forensics expert explains how to extract interesting details from a confiscated Windows hard disk using standard Linux tools.
Criminals, intruders, and corporate saboteurs leave data behind on the hard disks of any computers they visit. Many of these computers are Windows systems, but you don't need Windows to extract valuable forensic information from a Windows hard disk. In this article, I will describe some simple techniques for getting forensic data from a Windows disk using Linux.
Before starting any forensic analysis, it is important to create a copy of the storage medium you will be investigating, either as a 1:1 copy or as an image or collection of images. You can copy the medium as a raw image (with dd) or use a format such as Expert Witness Format (EWF).
EWF is a proprietary format developed by Guidance Software [1] that is also supported by the X-Ways [2] commercial forensic tool. EWF images are compressed and thus are far smaller than raw images.
Linux tools such as Linux Encase (Linen) or Ewfacquire [3] will help you create an EWF image. Linen is included on the Helix forensics CD [4] as a free contribution by Guidance Software, but the dd tool, which is included on any Linux distribution, will normally do the trick. If you use dd, you can even launch a copy of the Windows system in a virtual environment such as VMware; EWF will not let you launch Windows without the proprietary add-on software because of its compressed format.
A command such as dd if=/dev/sda of=win_hd.dd bs=4096 conv=noerror, sync will create a dd image. Instead of /dev/sda, just specify the disk you want to copy. The block size bs=4096 accelerates the copy. The conv parameter ensures that the copy will not terminate if it encounters defective sectors.
By entering fdisk -lu, you can obtain information on the disk image. The administrator simply needs to pass in the image name (Listing 1).
Listing 1
Getting Information with fdisk
In Listing 1, the image contains a partition; the filesystem is NTFS. The disktype program from the standard Debian repositories provides more information (Listing 2). The partition obviously contains the Windows bootloader.
Listing 2
Disktype Data
To access the filesystem, the administrator first needs to mount it. The partition starts with sector 63, which is normal for a hard disk. The exception to this is Microsoft's latest offspring, Windows Vista, in which the first sector is 2047. The mount command thus specifies the matching offset:
# losetup -o $((63*512)) /dev/loop0 U win_hd.dd
# mount -o ro,noatime,noexec /dev/loop0 /mnt
A quick glance at /mnt reveals the startup files and filesystem of a Windows drive. A quick glance at the boot.ini file reveals that they belong to a Windows 2000 Server (Listing 3).
Listing 3
Windows Filesystem
Seeking with Find
Criminal investigators often use the Linux find command with the --exec or xargs xx options to search for files with illegal content. After creating and mounting an image, find /mnt -type f will give you a detailed list of files. Because this approach does not take file names with blanks or non-standard characters into account, the investigator might opt for find /mnt -type f -print0 | xargs -0 ls -al.
Hash values help find identical and suspicious files on a system. You can create a hash automatically with a command such as find /mnt -type f -print0 | xargs -0 md5sum; you can even compare the hashes on the fly with existing reference material. However, it makes more sense to create a file containing hashes for all files (Figure 1).
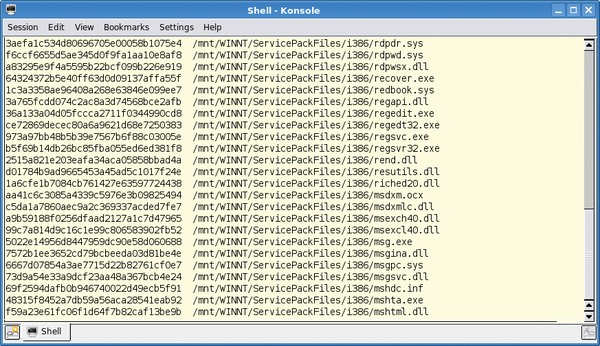 Figure 1: Md5sum can create unique hashes for the files on a Windows filesystem. You can compare the values in the first column with the hash values for known files.
Hashes Find Duplicates
In most cases, investigators already have hashes for files they want to find. Forensics experts compile databases with hashes of known files to help search for criminal material. If you just want to filter out Microsoft DLLs on a system you are investigating, this approach is useful.
A simple grep command will find any correlations between the subject of the investigation and your search targets. The following command, from which we have removed the individual filenames, saves a list of hashes for existing files in a file called big.txt:
# find /mnt -type f -print0 | xargs -0 md5sum | awk '{print $1}' | sort -g | uniq > big.txtThe awk command takes the hash values in the first column; sort -g sorts them, and uniq removes duplicate entries. An investigator who has stored the desired hash values in a file called small.txt, can then run grep -f small.txt big.txt to find duplicates, and thus any matching files.
Keyword Search
Forensic investigators search confiscated systems for specific keywords.
Creating a text file with the search keys for this purpose – such as keywords.txt – is a good idea. For example, you could add the words password and secret.
The command line
# cat win_hd.dd | strings | egrep -i --color -f keywords.txt
searches the complete Windows image for the keywords password and secret and highlights them in red in the output, as you can see in Figure 2. This approach is particularly interesting if you extend the search beyond the filesystem to other areas of a hard disk, such as:
- the swap file or hibernation file,
- unallocated areas of the disk,
- file slack data
- deleted files.
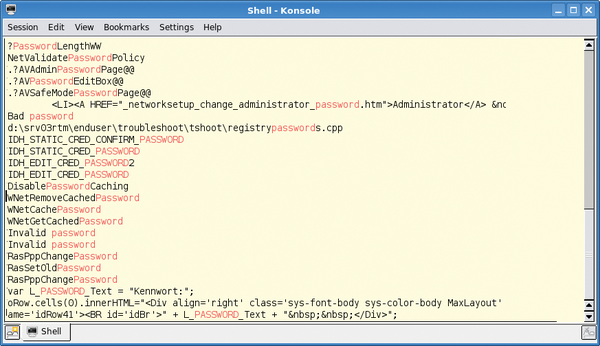 Figure 2: Standard Linux tools in action. Cat, Strings, and Grep search the Windows partition for keywords and highlight any matches they find.
To find keywords stored in the 16-bit Unicode text that the Windows NT operating systems use, you must tell the strings command whether to perform a little – or big – endian [5] search. The required arguments are either -eb or -el. Listing 4 uses Ntfsundelete as an example of restoring files via inode allocations.
Listing 4
Restoring Files
The Sleuth Kit
The Sleuth Kit [6] is one of the leading forensic tools. You'll find The Sleuth Kit packages in the standard Debian repository, and you can use Aptitude to install it. The Sleuth Kit mainly contains three tools that extend the functionality of ls; the names help explain the functions:
- fls lists files at file system level,
- ils lists files on the basis of inodes,
- dls restores deleted files.
In addition to these files are a couple of close relatives of the standard Unix tools cat (icat) and find (ifind), and statistics tools such as istat. The Sleuth Kit starts by creating a list of all files with timestamp information (Listing 5). If you want a neatly grouped view with a time-line of the events, you can run mactime -b /tmp/body. To tell the tool to look for keywords in the deleted files on an NTFS partition:
# dls /dev/loop0 > unallocated
# cat unallocated | strings | egrep -i --color -f keywords.txt
The dls command converts the unallocated space into a file, which cat then pipes to strings and egrep.
Listing 5
File Timestamps
File Slack
File slack [7] refers to data in the unused space on a filesystem. This effect occurs when you save, for example, a 2KB file on a filesystem with 4KB blocks. All popular Windows systems just pad the unused space with random data from RAM to fill up the blocks.
Tools such as dls from The Sleuth Kit, or bmap [8], let an investigator recreate data that the user sometimes didn't even knowingly store on their disk. Some investigators have used this approach to reconstruct incriminating emails.
dls with the -s option is particularly useful for this purpose:
# dls -s /dev/loop0 > fileslack
# cat fileslack | strings | egrep -i U--color -f keywords.txt
This gives the forensics expert the ability to search the file slack for keywords. According to a study [9], modern Linux filesystems are not affected by this problem; they pad the unused bytes with harmless zeros courtesy of /dev/zero.
Restore Deleted Files
ntfsundelete, from the ntfsprogs package, gives any Linux admin the ability to restore deleted files on NTFS partitions. Before you run ntfsundelete, you first need to release the /dev/loop0 device, typically by issuing a umount /mnt. Without specifying any additional options, ntfsundelete /dev/loop0 just outputs a list of all undeletable files (Figure 3). The example in Figure 3 undeletes the msiinst.exe file on inode 11137.
 Figure 3: Ntfsundelete shows deleted files that can be undeleted. The first column contains the inode number required to restore the file on the filesystem in the image file.
Files existing on the hard disk could provide much user information. Both Microsoft's Internet Explorer and Firefox store their history on the filesystem. The investigator needs to install two programs to analyze the information:
Listing 6 shows a typical analysis sequence: Internet Explorer stores information for each profile in files titled index.dat. Running a find command against the file gives the investigator a list of the pages accessed in the browser.
Listing 6
Browser History
Revealing Mozilla
Firefox stores its data in history.dat. The first column contains the date and time information in Unix timestamp format. The third command in Listing 6 converts this to a human-compatible format. Dumphive [12] provides an approach to making the registry on a Windows system more easily readable (Figure 4). The dumphive /mnt/WINNT/system32/config/system system.txt command stores the register in a separate text file, which the investigator can probe using Unix text tools.
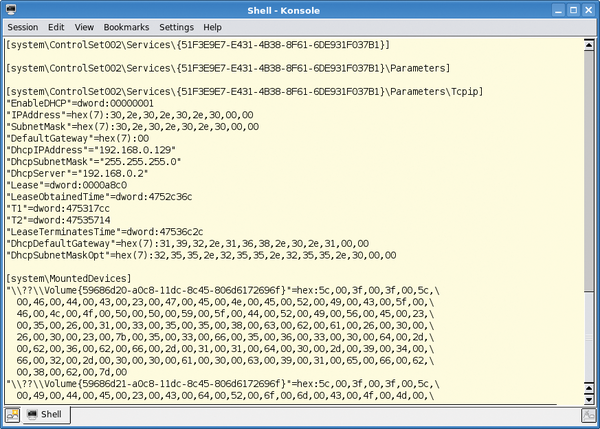 Figure 4: Dumphive converts the Windows Registry to cleartext. Search tools such as grep can then help you reconstruct critical settings, for example, the password hash or IP data.
Windows Passwords
Access to the system is interesting in its own right, but discovering the user's passwords often opens up other vectors to the investigators, as most users don't bother changing their passwords when they log in to various websites and services. On top of this, passwords give the forensics investigator the ability to log in to a virtualized image system on VMware and to investigate various system logs and files.
In addition to employing brute force attacks and tools like John the Ripper, which use dictionaries or rainbow tables, the Linux admin can turn to other tools such as Bkhive, Samdump2, and Ophcrack [13].
Extracting local passwords from a SAM file is not hard, as used by Windows NT-based operating systems, especially if you combine various tools. For example, John the Ripper automatically detects a Windows SAM file if you feed it to the tool. The Microsoft-specific password genus is useful here: Although Windows credentials can be up to 14 characters, the system splits them into two strings of seven characters each. This is a useful contribution by the manufacturer that makes it easier for investigators to break passwords without extreme number crunching.
As of Windows Vista, Microsoft closed this gap and replaced the Lanmanager hashes with NT hashes. XP admins can set this up manually; investigators on Linux have to run dumphive to check whether the Registry contains an entry that sets HKEY_LOCAL_MACHINE/SYSTEM/CurrentControlSet/Control/Lsa to 1. If so, your only option might be to open your wallet and buy an 8.5GB dual-layer DVD with commercial LM or NT Rainbow Tables.
Like the other tools referred to in this article, Ophcrack is included in the Debian repositories. The Ophcrack utility requires rainbow tables and the hashes from the Windows machine. After completing the install, the investigator can work conveniently with the GUI and just double-click to decipher a user's password (Figure 5).
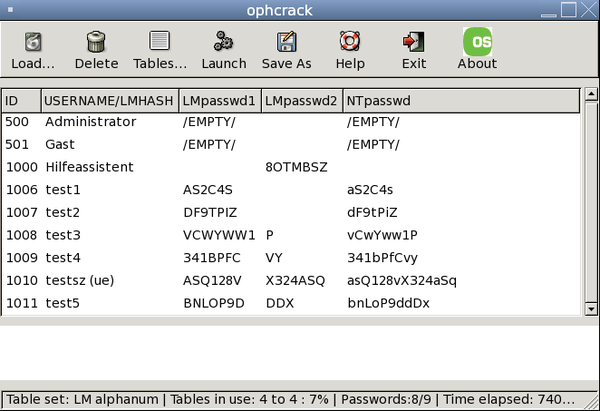 Figure 5: Double-click to crack a Windows user's password. An automated Live CD is also available.
Domain Controllers
A different approach is required for Windows systems that log in to domain controllers; in this case, the credentials are not stored locally on the client. However, in many cases it is sufficient to run a network sniffer to capture the login exchange, identify the relevant data packets, save them to a file, and then feed a dump to Ophcrack. Of course, this is more complex, and you do need live access to the network.
Comparatively Simple
With the addition of a couple of extra packages, the Windows world is wide open to an investigator running Linux. If you need more of this good thing, take a look at the free forensic tools by Foundstone [14]. These tools give investigators the ability to restore cookies, long-gone entries from the Windows trash can, and many other things.
Experienced Linux users might find the shell approach refreshing, but some users will prefer to avoid the complex command-line syntax. The learning curve for Linux newcomers will likely be steeper for open source tools compared with more expensive commercial products. The winner in the usability stakes has to be the fully automated Ophcrack Live CD, which removes the need for users to type pesky shell commands and displays the local user's Windows passwords shortly after booting.
When we tested this on an XP system (SP2), the CD took just 280 seconds to discover the credentials of the five user accounts (which included up to 14 characters; see Figure 5). The live Linux version on the CD includes just the tables for alphanumeric passwords without non-standard characters. If you want more, you will have to invest in the commercial Rainbow Tables.
Infos
- Guidance Software: http://www.guidancesoftware.com
- X-Ways: http://www.x-ways.net/corporate/index-m.html
- Ewfacquire: https://www.uitwisselplatform.nl/projects/libewf
- Helix: http://www.e-fense.com/helix
- Endianness: http://en.wikipedia.org/wiki/Endianness
- The Sleuth Kit: http://sleuthkit.org
- Wikipedia on file slack: http://en.wikipedia.org/wiki/File-Slack
- bmap: http://www.packetstormsecurity.org/linux/security/bmap-1.0.17.tar.gz
- File slack analysis on Linux: http://www.woerter.at/dud/stuff/fileslack.pdf
- Pasco download: http://downloads.sourceforge.net/odessa/pasco_20040505_1.tar.gz?modtime=1083715200&big_mirror=0
- Mork.pl: http://www.jwz.org/hacks/mork.pl
- Dumphive: http://v4.guadalinex.org/guadalinex-toro/pool/main/d/dumphive/dumphive_0.0.3-1_i386.deb
- Ophcrack and Ophcrack Live CD: http://ophcrack.sourceforge.net
- Foundstone Forensic Tools: http://www.foundstone.com/us/resources-free-tools.asp
The Author

Hans-Peter Merkel has been an active member of the open source forensics community for many years. He trains criminal investigators in Germany and Tanzania, and he is one of the founders of Freioss and Linux4afrika.