Remotely controlling digital cameras with gPhoto
In Charge

© hypermania2, 123RF
Commercial software that lets users remotely control their camera usually is not available for Linux. gPhoto gives users a free alternative.
Some vendors offer commercial add-ons to help users remotely control their cameras – for example, to take a series of photos at set intervals. Time exposures of the night sky and time-lapse photos of a growing plant are excellent choices of subject as well. However, vendors such as Canon and Nikon only offer their software for Windows and the Mac OS, and Nikon even charges for the program [1]. To make things worse, the software is closed source and not suitable for scripting, which tends to restrict its usefulness.
gPhoto
The gPhoto [2] project mainly comprises the libgphoto2 library, the gphoto2 command-line interface, and the gtkam front end (see also the "Gtkam Graphical Front End" box). The software lets users read and change the status of their digital cameras, copy files in both directions, and remotely control digital cameras.
As of this writing, gPhoto supports more than 1,100 digital camera models. A lack of cooperation on the part of camera manufacturers has forced developers to reverse engineer most of the protocol information and explains why the software does not support all of the features that are available on every single digital camera.
Although most state-of-the-art digital cameras that support simple tasks – such as transferring images – use the popular Picture Transfer Protocol (PTP) standard, the remote control protocols are typically undocumented. The examples in this article have been tested on a Canon 50D and should work with any digital camera supported by gPhoto with slight modifications (especially with Canon models).
Gtkam Graphical Front End
The gtkam graphical front end (Figure 1) currently has only a rudimentary set of functions, although it does vastly simplify image downloads. From the drop-down menu, you can select the connected digital camera and use the thumbnails to navigate through your collection of images. Gtkam does not support remote control functionality for digital cameras. Applications such as the KDE digiKam [3] tool offer more convenience than gtkam.
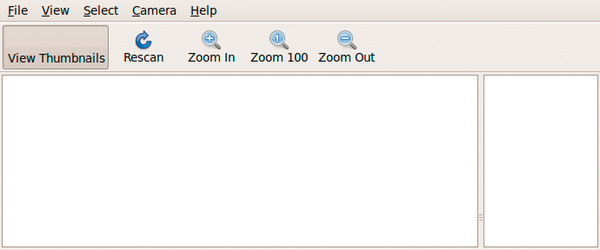 Figure 1: The gPhoto gtkam graphical front end makes transferring images child's play, although it does not support remote control.
Data Management
Before you start working with gPhoto, determine whether your camera's transfer mode is set to PTP; otherwise, the program will not support it. To find out whether gPhoto has correctly identified your camera, type gphoto2 --auto-detect at the console to see the following output:
$ <B>gphoto2 --auto-detect<B>
Model              Port
---------------------------------
Canon EOS 50D       usb:
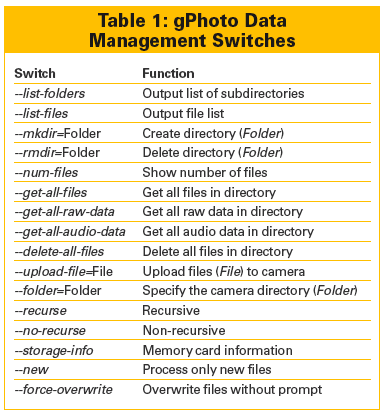
In this example, the software found a Canon 50D. The gphoto2 --summary command provides some basic information about the camera, including the memory card (capacity and space usage), designation, serial number, firmware version, and supported file formats. If you set the --list-files flag, you also get a listing of all the images on the memory card. To download the images, try --get-all-files. Table 1 lists a selection of file and directory management options.
Remote Control
Although file downloads work with some 1,100 digital camera models, remote control through gPhoto works with less than 10 percent [4] of them. Most of the supported models are made by Nikon and Canon, and the function is not available at all for cameras by Samsung, Sigma, and Sony.
The gphoto2 --list-config command lists all supported functions offered by the software for the connected camera. For Canon SLR cameras such as the 50D and 400D, you can add capture=on to get a full list of configuration parameters (Listing 1). The --get-config switch reads all the configuration parameters and their possible values; --set-config assigns a parameter. For example, the command in Listing 2 tells gPhoto to output all available ISO settings.
Listing 1
Listing Configuration Parameters
$ gphoto2 --set-config capture=on  --list-config
/main/settings/eos-time
/main/settings/eos-synctime
(...)
/main/imgsettings/eos-iso
/main/imgsettings/eos-whitebalance
/main/capturesettings/eos-exposurecompensation
/main/capturesettings/picturestyle
(...)
Listing 2
ISO Settings for the Canon EOS
$ gphoto2 --set-config capture=on  --get-config=/main/  imgsettings/eos-iso
Label: EOS ISO speed
Type: RADIO
Current: 400
Choice: 0 Auto
Choice: 1 100
Choice: 2 200
(...)
Choice: 6 3200
To set the ISO value to 1600, simply type gphoto2 --set-config capture=on --set-config eos-iso=1600. The supported values for configuration parameters such as the ISO setting (eos-iso), exposure compensation (eos-exposurecompensation), white balance (eos-whitebalance), or picture style (picturestyle) depend on the camera you are using. The available values for the aperture setting (eos-aperture) are driven by your choice of lens (Listing 3). Also note that the path following --get-config= must match your camera model.
Listing 3
Aperture Settings for Canon EOS
$ gphoto2 --set-config capture=on --get-config=/main/ capturesettings/eos-aperture
Label: EOS aperture
Type: RADIO
Current: 5.6
Choice: 0 1.4
Choice: 1 1.6
Choice: 2 1.8 (1/3)
(...)
Choice: 24 22
Taking a Series of Pictures
In the example provided in Listing 4, gPhoto takes five pictures at ISO 200, aperture 2.8, at intervals of 10 seconds. It automatically transfers the images to the directory from which you ran the command.
Listing 4
Remotely Controlling the Camera
$ gphoto2 --set-config capture=on --set-config eos-iso=200 --set-config eos-aperture=6 --frames=5 --interval=10 --capture-image-and-download
Because the camera transfers the images directly to the disk, without the use of intermediate storage, you don't even need a memory card for this step. However, make sure the camera does not generate RAW and JPG images at the same time; otherwise, the large RAW files will soon fill up the cache because the application only auto-transfers and deletes the JPG images from cache memory. If the images are not automatically transferred to your computer, you can use --capture-image instead of --capture-image-and-download.
If you do not want to limit the number of images and let gPhoto take snapshots until your disk is full, or the battery is dead, delete the --frames switch from Listing 4. If you want the software to perform some action after transferring an image, you can specify the --hook-script=File option, which will launch the specified script (File; e.g., to rename or move an image, upload an image to an FTP server, or even send an email).
Infos
- Nikon Camera Control: http://imaging.nikon.com/products/imaging/lineup/software/control_pro2/
- gPhoto: http://www.gphoto.org
- digiKam: http://www.digikam.org
- Remote control cameras: http://www.gphoto.org/doc/remote/