
Visual Studio Code for programming a Raspberry Pi
Remote Pi Installation
VS Code is now ready to reach out and connect to the Raspberry Pi. The remote connection from the Ubuntu workstation to the Pi must be configured to support the SSH connection without a password. From the VS Code console, press F1; in the search field, enter remote and select Remote-SSH: Add New SSH Host.
The prompt displays the standard command format ssh hello@microsoft.com to make an SSH connection. Enter the connection details for the Raspberry Pi. Now, press the F1 key again and select Remote-SSH: Connect to Host; the entry you made for the Pi connection is displayed, so select that item.
If all goes well, VS Code opens another console. At the bottom of the screen it displays the connection details and indicates that it is busy using the connection to bring the Raspberry Pi into the VS Code fold (Figure 4). When complete, the console will remain, and VS Code will be ready for you to program on your Pi (Figure 5).
 Figure 4: VS Code sets up the Raspberry Pi to communicate with the host remotely over SSH.
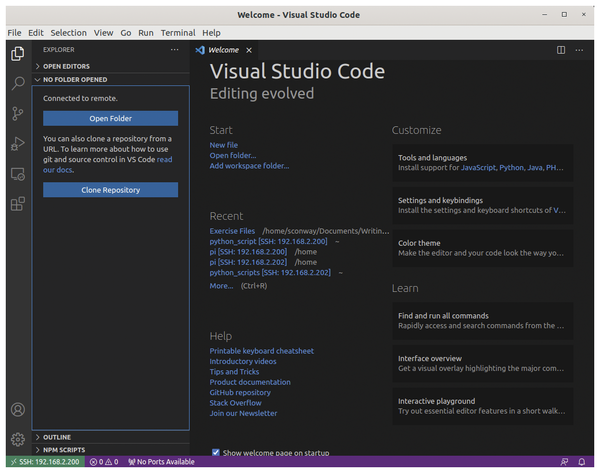 Figure 5: The VS Code Welcome page. This article is based on version 47. At the time of publication, the software had advanced to version 51. The instructions are still valid for the Raspberry Pi VSC install, but the "Start" page has changed in the most recent version.
The Suspended Tour
Now that VS Code is installed on the Raspberry Pi development environment, I'll review the interface. Instead of describing the interface options (Figure 6), I will introduce them by performing some tasks to condition the Pi development environment.
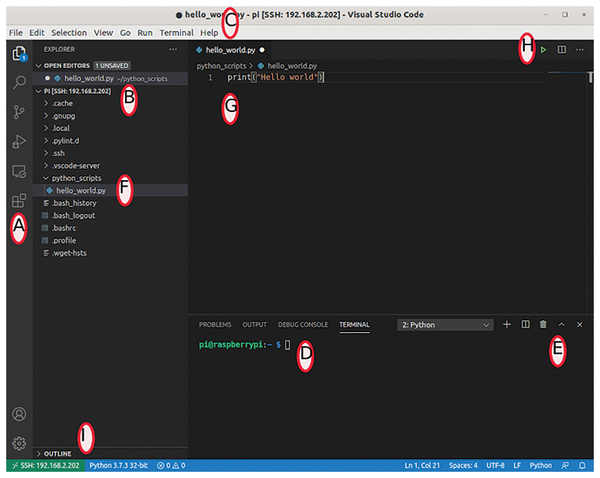 Figure 6: VS Code workspace: (A) Activity Bar, (B) Sidebar, (C) Menubar, (D, E) Panels, (F) Explorer view, (G) Editor workspace, (H) Run arrow, (I) Outline view.
In the interface, the Activity Bar (A), the vertical bar on the left side of the screen, contains the icons for the various views (from the top): Explorer, Search, Source Control, Run, Remote Explorer, and Extensions. From the Explorer view of the Welcome page, select Open Folder, choose the directory /home/pi, and press the OK button.
VS Code opens the folder and creates a panel in the workspace (B), which is basically just a collection of related panels. The Explorer view displays the files and folders for the current project workspace, along with any currently open editors.
The left panel of the workspace is a list of the Raspberry Pi's home directory. It also shows how many files have been modified and not yet saved. The .vscode-server directory is where VS Code for the remote Pi install was created.
From the main menubar (C), select Terminal | New Terminal to open a panel (D) at the bottom of the workspace that displays a terminal window for the Raspberry Pi. The plus (+) icon in the terminal panel (E) enables you to open additional terminal windows, the drop-down lets you choose between the named terminal windows, and the trash can icon closes the terminal.
From the Explorer view, create a new folder named python_scripts from the icon options and then create a file named hello_world.py (F). An Editor panel opens in the workspace (G), where you can modify, add, and delete file content. In the editor, add the line
print("Hello World")to create a simple line of Python code that will print Hello World when the script is run. Use the Save icon on the left in the Open Editors line to save the file.
The .py extension has significance for VS Code. The extension is the trigger for the application to customize the environment for the programming language – in this example, Python.
After saving the file, VS Code opens a notification message about recommended extensions for Python (Figure 7). The application indicates that it could use a little support on the Raspberry Pi for Python programming. Ignore the notification message by closing the message window. Instead of letting VS Code do the preparation, you can install the recommended Python extensions manually.
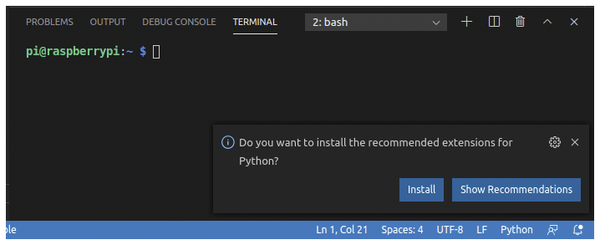 Figure 7: Although you installed Python packages on the Ubuntu host, the Raspberry Pi needs Python support, too.
From the Activity Bar, select the Extensions view, which lists all of the installed extensions. This view also shows you which extensions need to be updated and lets you update them. The workspace on the left will indicate that no extensions are found on the SSH: <IP Address> connection, because the extensions that were installed to this point were all on the Ubuntu VS Code workstation.
The goal has been to create a Python development environment for the Raspberry Pi. In the Extensions view, enter python in the Search Extensions in Marketplace field. The search results will display Python extensions that can be installed to the SSH connection. Select the Python (Microsoft) extension to install (Figure 8). Recall that you installed this same extension on the VS Code host workstation.
 Figure 8: The results of a search for Python extensions available for installation.
After a brief installation interlude of flashing dots, a Reload Required button appears. Now you can reload VS Code by pressing the button to enable this extension on the Raspberry Pi. The screen refreshes the Extensions workspace panel on the left and indicates that the Python extension has been installed.
To see what this manually loaded VS Code recommended extension does for the development environment, select the Explorer view from the Activity Bar and open the Python hello_world.py file created earlier. If any terminal windows are open in the lower portion of the workspace, select the trash can to close them. VS Code is constantly looking to tailor the environment, so you might also have a notification message (discussed later). At some point, the environment will be stable and the messages will stop. Ignore them for now, but don't close the message.
In the upper right-hand corner of the Editor workspace (Figure 6, H), select the green arrow icon to run the Python file. A terminal panel then opens in the lower right workspace and the Python script is executed, displaying the Hello World output.
In addition to the extensions notification message received earlier, you will also get a notice that autopep8 (which formats Python code to conform to PEP 8 coding conventions [3]) is missing from the development environment on the Raspberry Pi. VS Code attempts to help you by indicating missing software components that aid Python code development.
Go ahead and use the Install button in the notification message to install the pyline Python linter package. Earlier in the tutorial, when preparing the Raspberry Pi environment, you installed Pip, which VS Code uses to install the required Python packages on the Pi. In the terminal panel, feedback is displayed as the package is installed. For now, close the notification about autopep8. After some additional instruction you will be better prepared to deal with that notification message.
So far, the VS Code Remote SSH connection (Figure 6, I) to the Raspberry Pi has provided a graphical file and folder listing, an editor for modifying code, the ability to add or delete Python scripts, and a terminal panel that allows you to run the code. It also informs you when it discovers missing Python packages. VS Code also lets you install Python extensions and packages. As a huckster on a television commercial would say, "but wait, there is more!"
Tour Continued
In the Editor panel (Figure 6, G) use the mouse to select all lines of code, then right-click for the command context menu and choose Run Selection/Line in Python Terminal. A Python terminal opens in the bottom panel and runs the code selection. Recall the Python programming language itself has its own terminal or console. VS Code lets you to take a portion of the code from the editor and run it in the Python terminal. Click the trash can in the terminal panel when you are done examining it.
One of the difficulties experienced by professional and casual code writers alike is code formatting. Programming rules help make code easier to read and understand. Python is particularly sensitive to formatting because indentations and white spaces affect code. VS Code provides support through extensions for automatically applying formatting to Python code.
From the Editor workspace, add an octothorpe, another term for the hash sign (#), to the end line of code in the hello_world.py file,
print("Hello World") #and save the file. The octothorpe triggers the notification regarding PEP 8 formatting. Select Yes in the notification message to apply the changes. Now that Python on the Raspberry Pi has the package it requires, you need to configure VS Code to use it.
Style guides are all about code consistency. The guidelines are intended to improve the readability of code and make it consistent across a wide spectrum of Python code. VS Code has other formatters, but for this exercise, I'll explore PEP 8.
To implement the PEP 8 style guide, select the Extensions view from the Activity Bar and search for autopep8. Use the Install to SSH button to install the Python-autopep8 extension and press the Reload Required button to complete the PEP 8 install on the Raspberry Pi.
From the main menubar (Figure 6, C) select File | Preferences | Settings. In the search bar, enter python formatting. From the search returns, scroll down to Python>Formatting:Provider and confirm that autopep8 is selected. In the search bar, enter format on save as the search criterion. Put a checkmark beside the setting Editor:Format on Save. Now VS Code will use the PEP 8 style guide before a file is saved.
To take the PEP 8 formatter for a test drive, select the Explorer view in the Activity Bar and open the Python file hello_world.py you created earlier. Modify the line containing the print command as follows,
import math,os,time
print("hello world")#this is a comment
and save the file.
If Python PEP 8 support is functioning correctly, the script will change after the save (Figure 9). For example, the import statement is divided across multiple lines and the comment line will have some spaces inserted, as per the PEP 8 rules for Python code.
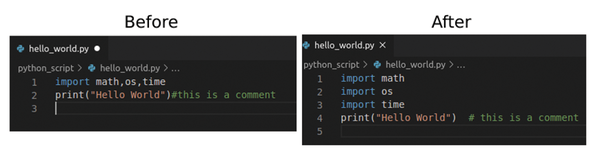 Figure 9: Python code before and after formatting, courtesy of the Python-autopep8 extension.
« Previous 1 2 3 Next »
Buy this article as PDF
(incl. VAT)
Buy Linux Magazine
US / Canada
UK / Australia
Subscribe to our Linux Newsletters
Find Linux and Open Source Jobs
Subscribe to our ADMIN Newsletters
Support Our Work
Linux Magazine content is made possible with support from readers like you. Please consider contributing when you’ve found an article to be beneficial.

News
-
TUXEDO Computers Unveils Linux Laptop Featuring AMD Ryzen CPU
This latest release is the first laptop to include the new CPU from Ryzen and Linux preinstalled.
-
XZ Gets the All-Clear
The back door xz vulnerability has been officially reverted for Fedora 40 and versions 38 and 39 were never affected.
-
Canonical Collaborates with Qualcomm on New Venture
This new joint effort is geared toward bringing Ubuntu and Ubuntu Core to Qualcomm-powered devices.
-
Kodi 21.0 Open-Source Entertainment Hub Released
After a year of development, the award-winning Kodi cross-platform, media center software is now available with many new additions and improvements.
-
Linux Usage Increases in Two Key Areas
If market share is your thing, you'll be happy to know that Linux is on the rise in two areas that, if they keep climbing, could have serious meaning for Linux's future.
-
Vulnerability Discovered in xz Libraries
An urgent alert for Fedora 40 has been posted and users should pay attention.
-
Canonical Bumps LTS Support to 12 years
If you're worried that your Ubuntu LTS release won't be supported long enough to last, Canonical has a surprise for you in the form of 12 years of security coverage.
-
Fedora 40 Beta Released Soon
With the official release of Fedora 40 coming in April, it's almost time to download the beta and see what's new.
-
New Pentesting Distribution to Compete with Kali Linux
SnoopGod is now available for your testing needs
-
Juno Computers Launches Another Linux Laptop
If you're looking for a powerhouse laptop that runs Ubuntu, the Juno Computers Neptune 17 v6 should be on your radar.