
Comparing the CherryTree and Piggydb outline editors
Links
To link fragments, mouse over a fragment's gray header bar and drag the plus and arrow symbol (far left) to another fragment's header (Figure 2, item 5). By default, the dragged element now becomes the parent element. In the pop-up that appears after dragging and dropping, however, the link direction can be reversed.
So far, Piggydb shows you the previously created entries in a two-column view on the left and a keyword palette and a list of the last fragments you visited (Figure 4) on the right. This changes when you click on one of the blue hashtag links (e.g., #3) to open one of the fragments. The left column then shows you the selected fragment including all its sub-fragments. From the second level onwards, the fragments can be expanded using the small plus icons to the left of the fragment titles (Figure 5, item 1).
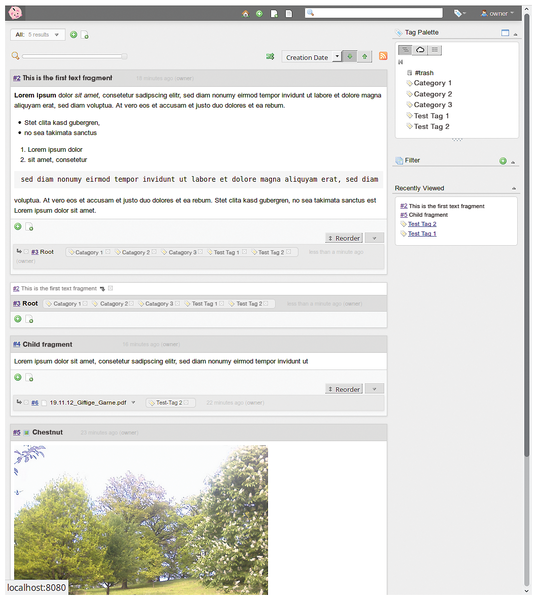 Figure 4: The new Piggydb database after creating some index cards: Since none of the elements has been marked yet as a root, the left column with the overall outline view is missing.
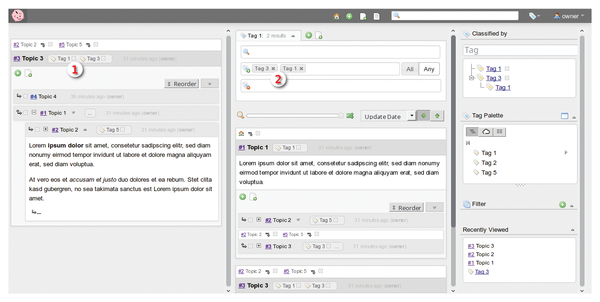 Figure 5: Clicking on the blue hashtag link (#3) opens the corresponding element as the root in the left column. In addition to the text it contains, the symbol for a linked parent element and all subordinate index cards are located at the top.
In a middle column below the item detail view, you can still find the list of the newest items. However, if the open fragment contains tags (Figure 5, item 1), only those that also contain at least one of the tags of the opened element (Figure 5, item 2) will appear, rather than all recently changed fragments.
The middle column is actually the search function's result list. You can change the search filter by clicking on the down arrow to the right of the hit list. Three search fields are then unfolded. The top one is used for a keyword search. The middle one limits the search to tags – All and Any give you AND or OR link options. The lower field excludes fragments with specific tags.
If you drag the detail slider located below the hit list to the far right, 10 fully expanded index cards appear below. Move it all the way to the left, and you'll see 200 hits instead. There are several intermediate steps between these extremes. If you mouse over the title of an element that is not completely visible, a detailed preview appears in the window's lower right corner.
A drop-down menu with function buttons, which appears as soon as you mouse over an element's top bar, allows you to select as many fragments as you like using the checkbox on the far right (Figure 2, item 6); the fragments then appear in the Selected Fragments sub-window. You can link them all at once by dragging another element's Create a new relationship icon onto this sub-window.
The left outline column appears as soon as you mark one or more index cards in the button drop-down menu using the #home tag (by clicking the home button, Figure 6).
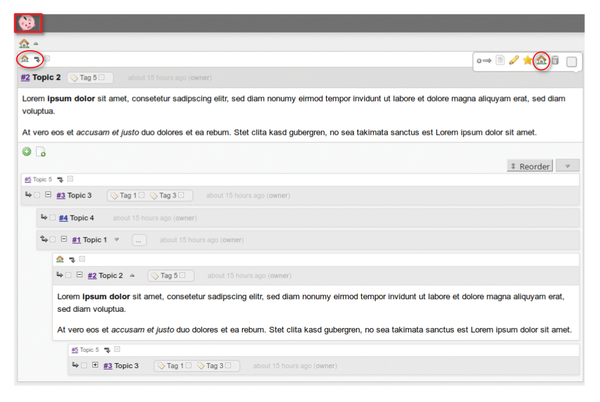 Figure 6: In contrast to linear outlines, Piggydb does not have an "Item 1" where the outline begins. Therefore, you can select any number of root elements using the #home tag; Piggydb then displays them on the main page with all linked elements as subordinate drop-down index cards.
Piggydb: Mesh not Tree
At first glance, like CherryTree, Piggydb seems to use the linear-hierarchical outline principle (Figure 2, item 1). However, this is only true for the view level.
In Piggydb, each node can be linked to any other node. The network structure is not subject to the restrictions of a hierarchical tree structure (Figure 7, left). In a tree, each node is assigned to exactly one parent element; the branches only spread outwards from the trunk, and the software does not allow back references.
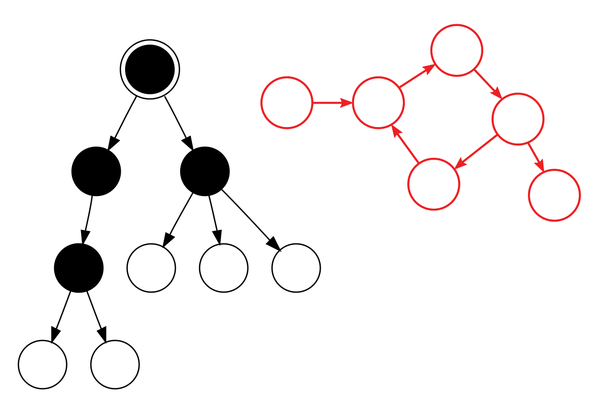 Figure 7: Tree graphs (black) branch away from the root, while mesh graphs (red) allow an arbitrary relationship of links.
Unrestricted meshing (Figure 7, right) is helpful when structuring a knowledge base [5]. Not every index card can always be clearly assigned to a single topic (Figure 8). It is often more appropriate to place the card in several places at the same time.
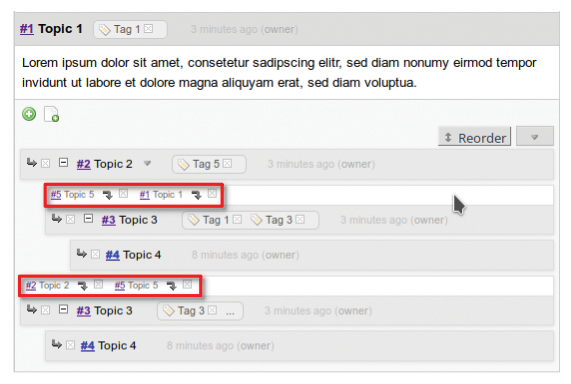 Figure 8: Behind the seemingly linear-hierarchical arrangement of the index cards in Piggydb, there is actually a mesh of relationships that – unlike tree graphs – allows several parent elements per node (outlined in red).
As an example, imagine creating a Piggydb outline for the necessary components to assemble a PC. First, you create a file card for each component as a child element of Market overview and then structure it by hardware type. At some point, you create a Parts list fragment and drag the desired component into it. The elements combined to form the Parts list still belong to the Market overview. As soon as you discover new information about a component, you can edit the corresponding index card in one of the two sections – the other is automatically synchronized with it.
If you mouse over a file card's header, a pop-up with function buttons appears. Click on the document symbol (second from left) to open a static text page in a new web browser tab with the index card titles appearing as main headings (Figure 9). At the top of the page, you will also see a list of the index card titles that you can copy to a word processer for a printable parts list.
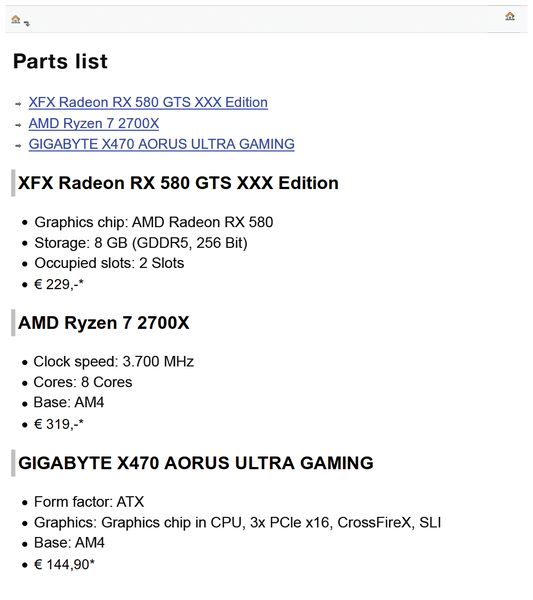 Figure 9: The document view, which combines the index cards' title and text content on a static web page, is suitable as a summary for knowledge bases and for copying the text to a word processor.
Tagged
In addition to element links, Piggydb supports keywords (tags) as a secondary ordering principle. However, Piggydb goes beyond the usual range of functions by allowing tags to be linked hierarchically. Subordinate tags are transitive. For example, let's imagine you define a tag named Computer hardware and assign to it the subordinate tags Graphics cards, CPUs, and Motherboards. If you now select a fragment with Graphics cards, it automatically belongs to the higher-level category Computer hardware.
The Tag Palette on the right in the Piggydb window (Figure 10) initially displays only the first keyword level. Given an intelligent hierarchical tag arrangement, everything remains clear even if you have a large number of keywords. Simply clicking on the arrow on the right shows you a tag's subordinate categories. The arrow above and directly to the left of the tags takes you back to the higher-order category.
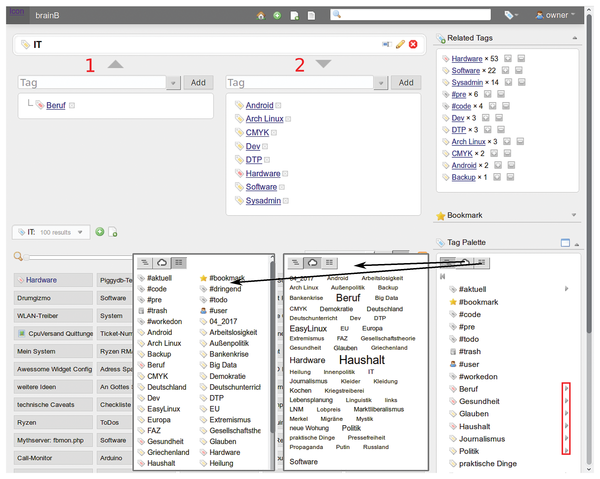 Figure 10: In Piggydb, you can assign parent (1) and child (2) tags to each keyword. The standard Tag Palette displays only first-order keywords with arrows to navigate through the hierarchy. However, there is also a tag cloud view and a flat tag list (both shown to the left of the Tag Palette).
Alternatively, you use the middle button with the cloud symbol to switch to a tag cloud display. It scales the categories to reflect the number of assignments. The flat view (right button) shows the tags of all layers.
You can create new keywords by typing them into the second field in the Fragment Editor, as a comma-separated list. Alternatively, click on the arrow to the right of the input box for a keyword palette. To view all the tagged fragments, click on the desired term in the palette. The middle column then lists the elements in the detail level specified by the detail-level slider.
In the left column, you can now see the tag editor. This is where you can rename the keyword and assign subordinate or superordinate keywords to it. The left column, marked by an arrow pointing upwards, represents the higher-order categories; the right column, marked by an arrow pointing downwards, represents the lower-order categories. In a column's text input boxes, you can either type keywords or select a keyword by clicking on the small arrow to the right of the input box and then clicking Add.
For maximum flexibility, Piggydb combines previously structured headings and longer text blocks into one object type, the text fragment. This tendency towards standardization goes even further. In Piggydb, each keyword optionally functions as a text fragment, and each text fragment also functions as a tag. However, you first need to create the other object type for assignment explicitly.
If you want to assign a text fragment to an existing tag and use the tag's name for the fragment, first click on the tag in the keyword palette. In the tag editor in the left column, click on the pen icon top right; this opens the Fragment Editor. After clicking on Register, the text fragment then becomes available as an initially unlinked element, and you can integrate it into your knowledge base like any other element.
If you created the text fragment first and want to assign it a new tag with the same name, click on the tag symbol to the left of the title field in the Fragment Editor. If you now open the text fragment in the detail view or click on the keyword of the same name in the palette, the same thing happens in both cases. In the left column, you see the text fragment together with its child elements, while all the text cards marked with the tag appear in the right-hand column.
The advantages of this synchronization of text fragment and keyword may not be obvious at first glance. However, it is often helpful to explain the tag, which is limited to a short keyword, in more detail in the linked text. If, on the other hand, you notice that you want to link a text fragment with many more fragments, it is useful to create an associated tag. You can then link new fragments directly in the text editor by typing the keyword into the Tag field.
« Previous 1 2 3 Next »
Buy this article as PDF
(incl. VAT)
Buy Linux Magazine
US / Canada
UK / Australia
Subscribe to our Linux Newsletters
Find Linux and Open Source Jobs
Subscribe to our ADMIN Newsletters
Support Our Work
Linux Magazine content is made possible with support from readers like you. Please consider contributing when you’ve found an article to be beneficial.

News
-
TUXEDO Computers Unveils Linux Laptop Featuring AMD Ryzen CPU
This latest release is the first laptop to include the new CPU from Ryzen and Linux preinstalled.
-
XZ Gets the All-Clear
The back door xz vulnerability has been officially reverted for Fedora 40 and versions 38 and 39 were never affected.
-
Canonical Collaborates with Qualcomm on New Venture
This new joint effort is geared toward bringing Ubuntu and Ubuntu Core to Qualcomm-powered devices.
-
Kodi 21.0 Open-Source Entertainment Hub Released
After a year of development, the award-winning Kodi cross-platform, media center software is now available with many new additions and improvements.
-
Linux Usage Increases in Two Key Areas
If market share is your thing, you'll be happy to know that Linux is on the rise in two areas that, if they keep climbing, could have serious meaning for Linux's future.
-
Vulnerability Discovered in xz Libraries
An urgent alert for Fedora 40 has been posted and users should pay attention.
-
Canonical Bumps LTS Support to 12 years
If you're worried that your Ubuntu LTS release won't be supported long enough to last, Canonical has a surprise for you in the form of 12 years of security coverage.
-
Fedora 40 Beta Released Soon
With the official release of Fedora 40 coming in April, it's almost time to download the beta and see what's new.
-
New Pentesting Distribution to Compete with Kali Linux
SnoopGod is now available for your testing needs
-
Juno Computers Launches Another Linux Laptop
If you're looking for a powerhouse laptop that runs Ubuntu, the Juno Computers Neptune 17 v6 should be on your radar.