
DIY project with the versatile Arduino board
Like Magic

With a few lines of self-written firmware and a simple Perl script, Perlmeister Mike Schilli trains one of his Linux computers with a plugged in Arduino board to switch electrical equipment on and off using a relay. Enchanting.
Every morning at four o'clock, the Ubuntu system in my office switches on an ancient Debian PC with 6TB of disk space to grab a backup of important data via rsync. It uses the popular home networking protocol X10 to switch on the power on the backup PC via the power grid. The backup PC boots automatically, because its Boot After Power Loss BIOS option is set to On. Once the SSH server on the running Debian system responds, the backup starts. After the final act, the PC shuts down, and the controlling Ubuntu box cuts the power.
Because my X10 setup fails for some reason in an estimated 1 out of 100 cases, I have now converted the PC on/off control to an Arduino board (around US$ 20) with an attached Relay Board (US$ 12). The controlling Ubuntu machine uses the USB port to send a command to the microcontroller, which listens on a serial interface.
The microcontroller's firmware switches the signal on an output pin, which I have connected to one of two relays on an extra board [1]. Figure 1 shows the set up with a simple circuit on a breadboard. For test purposes, it even uses light-emitting diodes to indicate whether a specific output pin on the Arduino is on or off.
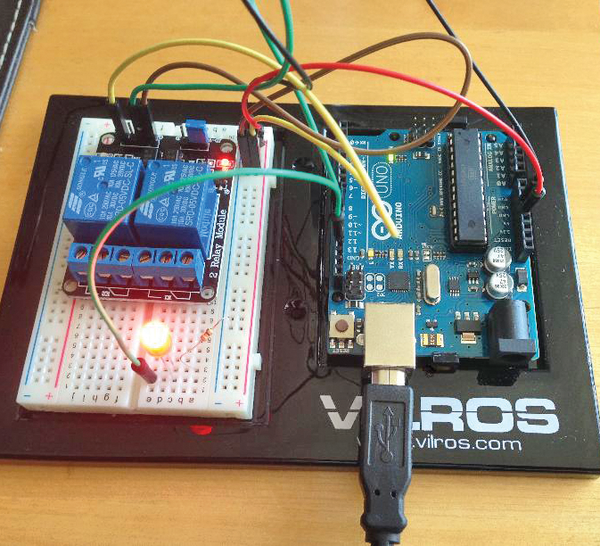 Figure 1: Experimental circuit setup with the Arduino, LED, and power grid-capable relay board.
The grid-connected relay actuates with a click; the main power connector wired to the other end of the relay switches on, and the consumer plugged into it wakes up. The relay I use can handle up to 10 amps at 250 volts (Figure 2) – more than enough to operate a regular home PC.
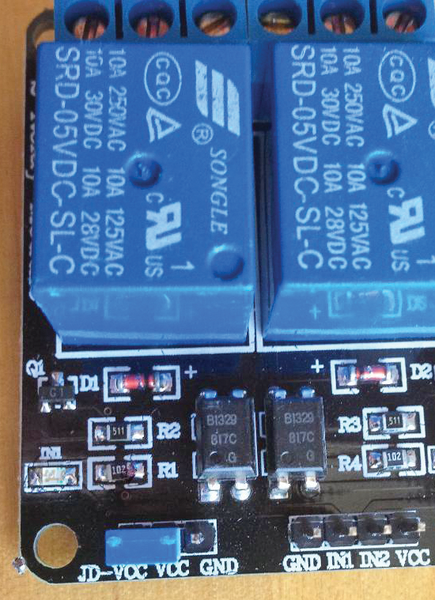 Figure 2: The circuit board with two relays that can control devices up to 10 amps at 250 volts.
Easily Programmable
Unlike industry-standard microcontrollers, the Arduino board can be programmed directly via a USB interface. A PC or Mac uploads compiled, C-like code that the Arduino then stores permanently. Thanks to its bootloader, the firmware installed in this way runs infinitely after the board is plugged in.
The USB port provides the board not only with signals for controlling the firmware but also with the required supply voltage for operating the electronic components. The board and the relay board do not need an external power source. After each cold boot, the code immediately starts to run. To switch the Arduino pins on and off from a PC, the uploaded Arduino firmware listens for commands from the USB port and switches its output pins accordingly.
Off-the-Shelf vs. Tailor-Made
As a turnkey solution, you could use Firmata [2], free, general-purpose firmware, instead of writing a firmware program yourself. Once loaded on the Arduino, the firmware awaits commands via the USB interface in line with the Firmata protocol, manipulates the voltage on the board's digital output pins as needed (or reads their values), and provides feedback to the requesting host.
However, the relay board that I purchased from SainSmart [1] operates in low-active mode. In other words, the relay closes if the input voltage drops off and opens if a 5-volt supply is provided. Because Firmata always sets the output pins to low at startup, this approach would switch on the electric consumers every time the USB connector was plugged in – before a program could take control.
Consequently, my do-it-yourself Arduino Sketch – which is what the Arduino community calls firmware source code – uses the setup() function in Listing 1 [3] to set the output voltage at pin 11 immediately to 5 volts when the Arduino boots up:
digitalWrite( 11, HIGH );
Listing 1
relay_on_off.ino
Later, in the main loop(), the Serial module's available() method checks whether data exists on the Arduino's serial port. If so, Serial.read() reads an incoming byte and stores it in the val variable. If the host has sent a 1 (ASCII code 49), the firmware sets pin 11 to low, and the relay is energized on the relay board connected to it.
Serial via USB
Microcontrollers traditionally listen for commands that arrive from the host via a serial interface. Unfortunately, PCs did away with nine-pin sockets years ago in favor of a number of USB slots. That's not too much of a problem, though, because the USB and serial interfaces can be converted easily both ways using a chip (USB-to-serial converter).
This bit of history explains why there is still an extra chip that converts the USB signals into serial commands, which the microcontroller understands, on the old Arduino boards. The relatively new Arduino Leonardo is the first to use a microcontroller that natively understands USB. However, the host continues to send serial signals.
On the breadboard in Figure 1, I have also connected an LED with a 220-ohm resistor to pin 13. And, because the firmware sets pin 13 to reflect the incoming command (i.e., it does the opposite of the relay output pin), the LED lights up when the relay is active.
Using the Arduino IDE written in Java [4] [5], the firmware can now be uploaded as shown in Figure 3. The IDE normally discovers Arduinos connected to a Linux system without any help; however, some older Arduino boards use different device interfaces. The serial interface on a relatively recent "Arduino Uno" board, for example, is accessed on the host system as /dev/ttyACM0, whereas the fairly ancient "Arduino Duemilanove" still goes by the name /dev/ttyUSB1.
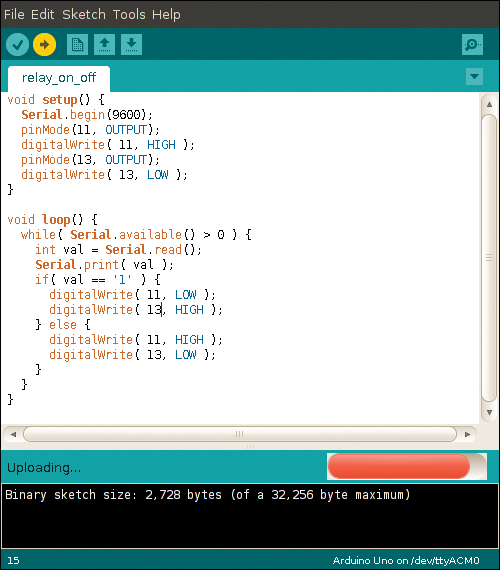 Figure 3: The Arduino IDE loads the firmware into the microcontroller. In this case, it's the script in Listing 1. The board stores the program permanently.
The IDE supports all board versions ever to have been released, and the user can select the board currently used from a drop-down menu.
Buy this article as PDF
(incl. VAT)
Buy Linux Magazine
US / Canada
UK / Australia
Subscribe to our Linux Newsletters
Find Linux and Open Source Jobs
Subscribe to our ADMIN Newsletters
Support Our Work
Linux Magazine content is made possible with support from readers like you. Please consider contributing when you’ve found an article to be beneficial.

News
-
OSJH and LPI Release 2024 Open Source Pros Job Survey Results
See what open source professionals look for in a new role.
-
Proton 9.0-1 Released to Improve Gaming with Steam
The latest release of Proton 9 adds several improvements and fixes an issue that has been problematic for Linux users.
-
So Long Neofetch and Thanks for the Info
Today is a day that every Linux user who enjoys bragging about their system(s) will mourn, as Neofetch has come to an end.
-
Ubuntu 24.04 Comes with a “Flaw"
If you're thinking you might want to upgrade from your current Ubuntu release to the latest, there's something you might want to consider before doing so.
-
Canonical Releases Ubuntu 24.04
After a brief pause because of the XZ vulnerability, Ubuntu 24.04 is now available for install.
-
Linux Servers Targeted by Akira Ransomware
A group of bad actors who have already extorted $42 million have their sights set on the Linux platform.
-
TUXEDO Computers Unveils Linux Laptop Featuring AMD Ryzen CPU
This latest release is the first laptop to include the new CPU from Ryzen and Linux preinstalled.
-
XZ Gets the All-Clear
The back door xz vulnerability has been officially reverted for Fedora 40 and versions 38 and 39 were never affected.
-
Canonical Collaborates with Qualcomm on New Venture
This new joint effort is geared toward bringing Ubuntu and Ubuntu Core to Qualcomm-powered devices.
-
Kodi 21.0 Open-Source Entertainment Hub Released
After a year of development, the award-winning Kodi cross-platform, media center software is now available with many new additions and improvements.