
Creating vector graphics using Inkscape
Splines are Everything
Vector graphics consist essentially of splines – a mathematical term. A spline denotes the shortest possible route between two imaginary points ("nodes") on a surface. You can thus already represent a simple body by spreading many points on a graph and connecting them with splines. Essentially, anything with square edges can be arranged this way. Vector graphics draw on "tangents" for displaying curves. In a vector graphic, a tangent is not a straight line without end, but a line segment. The length of a tangent to the left and right of a node determines the curvature of the corresponding spline.
You can put this theory into practice with a simple experiment: In the toolbar on the left, you will see the Bézier tool that you can use to draw straight lines and curves – you will see a pen with a straight line underneath it on the corresponding button (the lower of the two pencil icons). Click on the sheet of paper at any point and move straight downward using the mouse pointer, then double-click. You will now see a black line.
Next, move the mouse pointer down a bit and quite a bit to the left. Create a second line, but this time in the horizontal plane. Now click in the middle of the first line, move the mouse pointer to the center of the second line; click and hold down the mouse pointer. Drag the mouse pointer straight to the left, making sure the formerly straight line of nodes is now "bulbous." After releasing the mouse, move vertically and double-click to finish the curve (Figure 1). You have succeeded with the first milestone in using Inkscape: You can insert and edit any number of splines in the image later.
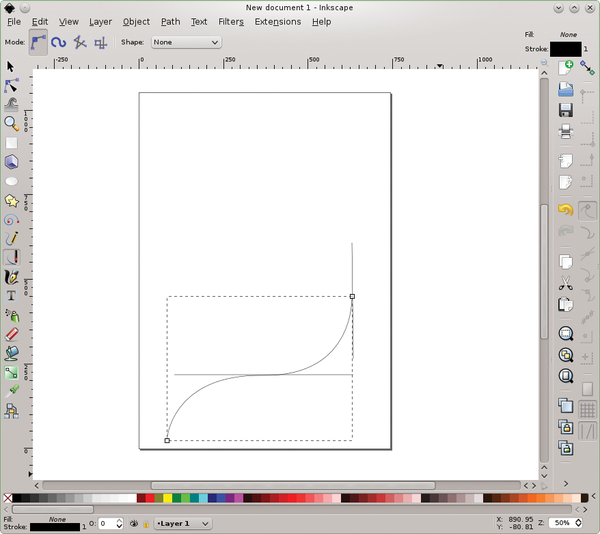 Figure 1: The easiest exercise in Inkscape helps you understand the ideas behind splines and tangents. The gray lines are the tangents.
Forms
If you regularly work with vector graphics, then you will find out quickly which forms are very useful: They can be used often to make other graphic elements from them. In addition to circles and rectangles, Inkscape also provides some special cases, such as stars that appear on the document with a mouse click. You next convert the shape into a path via (Path | Object to Path and only edit the individual points of the generated form to customize their appearance. First, draw a circle using the circle tool. By holding down Ctrl when dragging the circle, you create a perfect circle.
With knowledge of splines, you can now imagine how Inkscape internally converts the circle: It uses four splines, which it turns into a circular shape with four segments using tangents. This is of great importance for making an apple out of the circle, for example. At the moment, you can only change the relationship of the segments to each other. Click the selection tool (the arrow) on one of the circle segments, hold down the mouse button and then drag the pointer to the outside of the circle's center; this creates a "bulge." However, an apple is much less uniform and has many small dents instead of a few big ones.
In simple terms, in the next step you therefore need to further divide the already existing segments. The more segments are available, the more accurately you can determine the appearance of the circle. That's why the next step is to add points to the existing path (the circle) using the path tool.
Splitting Up the Circle Segments
You will find the path tool – you can recognize it from the arrow tip located on a square – in the toolbar to the left directly below the selection tool. Enable it and click on the circle. You will now see small squares on the four connecting points of the circle segments. Select a single segment by clicking on the two squares enclosing it.
A function bar for paths will appear directly below the quick-start bar when enabling the path tool. The icon with the plus sign at the very left in this toolbar adds a point to the selected segment; it therefore divides the segment into two smaller segments. For logical reasons, Inkscape leaves this selected so that you simultaneously get several marks for a finer segment division. Furthermore, you can also select several circle segments at the same time by keeping the Shift key pressed when clicking on the squares of different segments.
No particular rule of thumb indicates how many points per segment are sensible. The more points you have, the more delicately you can work in those places. However, division that is too fine means you will have to edit many points to obtain visible effects. If you are editing a single segment – namely a spline – all other splines remain unaffected.
« Previous 1 2 3 4 Next »
Buy this article as PDF
(incl. VAT)
Buy Linux Magazine
US / Canada
UK / Australia
Subscribe to our Linux Newsletters
Find Linux and Open Source Jobs
Subscribe to our ADMIN Newsletters
Support Our Work
Linux Magazine content is made possible with support from readers like you. Please consider contributing when you’ve found an article to be beneficial.

News
-
OSJH and LPI Release 2024 Open Source Pros Job Survey Results
See what open source professionals look for in a new role.
-
Proton 9.0-1 Released to Improve Gaming with Steam
The latest release of Proton 9 adds several improvements and fixes an issue that has been problematic for Linux users.
-
So Long Neofetch and Thanks for the Info
Today is a day that every Linux user who enjoys bragging about their system(s) will mourn, as Neofetch has come to an end.
-
Ubuntu 24.04 Comes with a “Flaw"
If you're thinking you might want to upgrade from your current Ubuntu release to the latest, there's something you might want to consider before doing so.
-
Canonical Releases Ubuntu 24.04
After a brief pause because of the XZ vulnerability, Ubuntu 24.04 is now available for install.
-
Linux Servers Targeted by Akira Ransomware
A group of bad actors who have already extorted $42 million have their sights set on the Linux platform.
-
TUXEDO Computers Unveils Linux Laptop Featuring AMD Ryzen CPU
This latest release is the first laptop to include the new CPU from Ryzen and Linux preinstalled.
-
XZ Gets the All-Clear
The back door xz vulnerability has been officially reverted for Fedora 40 and versions 38 and 39 were never affected.
-
Canonical Collaborates with Qualcomm on New Venture
This new joint effort is geared toward bringing Ubuntu and Ubuntu Core to Qualcomm-powered devices.
-
Kodi 21.0 Open-Source Entertainment Hub Released
After a year of development, the award-winning Kodi cross-platform, media center software is now available with many new additions and improvements.