
Manage passwords with gpgpwd
Secure Safe

© Lead Image © DmytroDemianenko, 123RF.com
The gpgpwd command-line program manages a list of passwords and matching usernames.
People order new electronic gadgets on Amazon, communicate with friends on Facebook, and organize their appointments with a Google calendar. These and many other Internet services all require you to log in with a username and password. The passwords should be both fairly long and fairly cryptic, and it is a good idea to use a different username for each service. Secure passwords and dissimilar usernames make it difficult for attackers to break in, but you'll need to remember a huge collection of login credentials.
A tool that helps you stay organized is gpgpwd [1]. Gpgpwd remembers all of your passwords and the matching usernames. When you register with a new service, you don't even need to think of a new password: Gpgpwd automatically suggests a random and secure password for you. It stores all of your login data in an encrypted file, thus keeping your credentials safe, even if somebody else steals the file or your computer.
Installing a Safe
To get started with gpgpwd, you need to use your package manager to install a Perl environment (version 5.10 at least), the Perl modules JSON and Try::Tiny, and the GnuPG, Git, and xclip programs.
Git
Friends of the Git version management system can use it to synchronize stored passwords across multiple computers. To do this, first check the password file into a new Git repository using the gpgpwd git init command. Before gpgpwd makes any changes to the file in the future, it first issues a git pull, then writes the changes, and finally issues a git commit followed by git push.
The gpgpwd git pull, gpgpwd git fetch, and gpgpwd git push commands let you synchronize the Git file with other Git repositories. In a similar fashion, gpgpwd git clone git://example.com/gpgpwd/ clones the gpgpwd repository stored on git://example.com/gpgpwd/.
Perl is installed by default by most distributions. If you use Ubuntu, the following command will install all of the required packages.
$ sudo apt-get install libjson-perl libtry-tiny-perl gnupg xclip git
Next, download the archive with the current version of gpgpwd [2] to any folder on your hard disk. Pop up a terminal window and change to the folder created in the previous step: When you get there, call sudo make install. Now, any user on the system can benefit from gpgpwd.
Key Maker
Gpgpwd does not encrypt the file with the passwords itself; instead, it delegates this job to GnuPG [3]. Just as with a physical padlock, GnuPG uses a key for this process. You need to create a key once only with the gpg --gen-key command, which will prompt you for a couple of settings.
You can press the Enter key to respond to the first question, then type 4096 for the second question, and use the defaults for the third question. Confirm the fourth question by typing y (Figure 1). Next, enter your complete name and your email address. You can again press Enter to confirm the Comment and wind up by pressing f to finish.
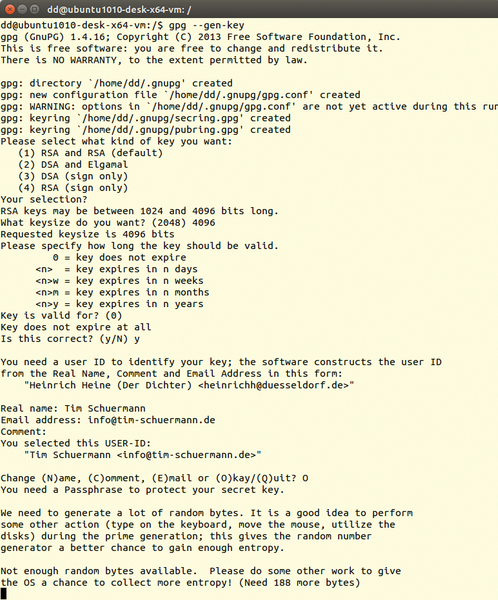 Figure 1: GnuPG will use the key created here to encrypt the passwords later on. The Passphrase is the password that you use to authorize encryption and decryption with GnuPG.
Gpgpwd and GnuPG will not insert the key into the padlock protecting the file until you supply the password you agreed upon previously. You need to know this password to be able to open the file and view or modify the credentials stored in it. Thus, this password is known as the master password, and it is the only password that you will need to remember in future. However, because it provides access to all your other passwords, you should choose it wisely and make sure it is cryptic. Needless to say, it should never get into the hands of a third party.
Choose a suitable master password with care and enter it. A new window might appear for this – on Ubuntu, it will tend to be in the top right corner. To rule out typos, you need to enter the password again. Then, GnuPG needs a couple of random numbers. You can speed up the process of collecting them by continuing to work normally with your system for a while.
If you have worked with GnuPG previously and generated other keys, you can simply select a suitable key: Stupidly, gpgpwd tells GnuPG to encrypt the password file with the default key. You just need to select the newly created key explicitly in the ~/.gnupg/gpg.conf file as the default. The gpg --list-keys command shows the key IDs you will need for this process.
Packaged
Now gpgpwd can finally start managing your passwords. To save your access credentials for Amazon.com, for example, you need to type gpgpwd set amazon.com. As shown in Figure 2, gpgpwd now sets a randomly generated password. If you are registering with Amazon for the first time, there is nothing to stop you from using this password. Then, press Enter to tell gpgpwd to save it directly.
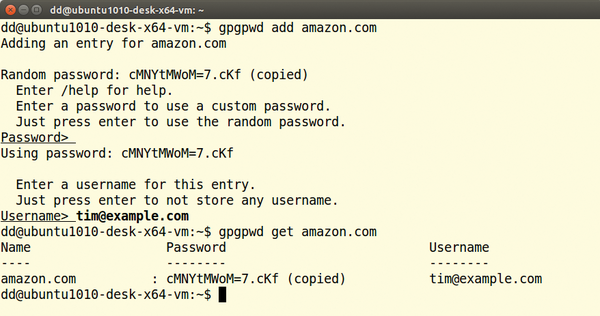 Figure 2: Gpgpwd remembering the password /5@dI/rQL7W~VH and the username tim@example.com.
If you already have an Amazon user account, you can simply type your current password. In both cases, gpgpwd will want to know your username. In the example, this is the email address used to register with Amazon. Finally, you will need to provide the master password.
Gpgpwd saves your usernames and passwords in the ~/.config/gpgpwd.db file, which GnuPG encrypts with the previously generated key following each action. If you want to change the storage location, you can use the -p switch to define an arbitrary location. The command
$ gpgpwd set amazon.com -p ~/documents/letter.bin
would send your passwords to the ~/documents/letter.bin file.
Buy this article as PDF
(incl. VAT)
Buy Linux Magazine
US / Canada
UK / Australia
Subscribe to our Linux Newsletters
Find Linux and Open Source Jobs
Subscribe to our ADMIN Newsletters
Support Our Work
Linux Magazine content is made possible with support from readers like you. Please consider contributing when you’ve found an article to be beneficial.

News
-
So Long Neofetch and Thanks for the Info
Today is a day that every Linux user who enjoys bragging about their system(s) will mourn, as Neofetch has come to an end.
-
Ubuntu 24.04 Comes with a “Flaw"
If you're thinking you might want to upgrade from your current Ubuntu release to the latest, there's something you might want to consider before doing so.
-
Canonical Releases Ubuntu 24.04
After a brief pause because of the XZ vulnerability, Ubuntu 24.04 is now available for install.
-
Linux Servers Targeted by Akira Ransomware
A group of bad actors who have already extorted $42 million have their sights set on the Linux platform.
-
TUXEDO Computers Unveils Linux Laptop Featuring AMD Ryzen CPU
This latest release is the first laptop to include the new CPU from Ryzen and Linux preinstalled.
-
XZ Gets the All-Clear
The back door xz vulnerability has been officially reverted for Fedora 40 and versions 38 and 39 were never affected.
-
Canonical Collaborates with Qualcomm on New Venture
This new joint effort is geared toward bringing Ubuntu and Ubuntu Core to Qualcomm-powered devices.
-
Kodi 21.0 Open-Source Entertainment Hub Released
After a year of development, the award-winning Kodi cross-platform, media center software is now available with many new additions and improvements.
-
Linux Usage Increases in Two Key Areas
If market share is your thing, you'll be happy to know that Linux is on the rise in two areas that, if they keep climbing, could have serious meaning for Linux's future.
-
Vulnerability Discovered in xz Libraries
An urgent alert for Fedora 40 has been posted and users should pay attention.