
Raspberry Pi media center with DIY ambient light
Let There Be Light

© Lead Image © Nelli Valova, 123RF.com
Ambilight lights up the wall behind Philips TVs with LEDs mounted on the device to enhance the onscreen visual impression. With Lightpack and a Rasp Pi media center, every TV can be upgraded with ambient light.
The Ambilight technology, originally developed by Philips, lights up the wall behind the television set by monitoring the colors in the current image and generating the appropriate color to extend the image content beyond the monitor surface. The "extended" image is easier on the eyes, because the field of vision is enlarged for the viewer.
An Ambilight system basically comprises three components: at least three edges (left, right, and top) on the back of the TV for strips of RGB LEDs, a control unit that ensures the individual LEDs light up accordingly, and a signal to the control unit provided by software that continuously analyzes the video image.
If you don't want to buy a Philips Ambilight TV, but you already watch movies and TV series on the Kodi multimedia platform, you can upgrade to ambient lighting in a DIY project with either a Raspberry Pi with Raspbian, a Kodi distribution like Open/LibreELEC, or a Linux PC. Various preexisting solutions such as Lightpack [1], Lightberry [2], or AmbiLED [3] remove the need for further programming
For the test, I chose the Lightpack PC [4] package by Woodenshark, which made the best overall impression. It originated from a Kickstarter campaign and costs $89, for which you receive 10 pre-assembled LED strips, an unobtrusive control unit, an AC power supply with adaptors, cables, and mounting accessories. All components can be attached with double-sided adhesive tape without causing damage to the TV.
On the software side, Boblight [5] and Hyperion [6] are two popular solutions. Thanks to Hyperion's less complicated configuration, you can achieve the desired results faster. Therefore, the ambient light system setup in this example comprises Lightpack PC, Hyperion, and a Raspberry Pi.
Setup
When attaching the LED strips to the back of the screen, be careful not to block the connections and any attachment points that can be used on the TV. In the Lightpack packaging, you will find adhesive pads and cable ties that facilitate cable management (Figure 1).
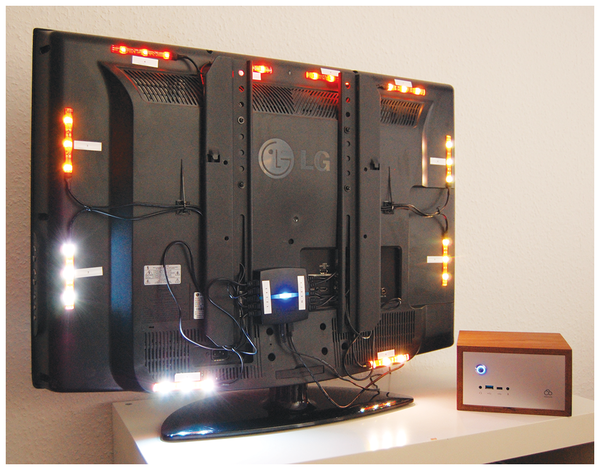 Figure 1: The complete Lightpack kit mounted behind a TV set. A classic PC delivers the image data.
Lightpack's manufacturer recommends that the strips should be applied in the "Andromeda" pattern, which promises the most uniform illumination possible (Figure 2). Gradually mount the LEDs in a clockwise direction, starting at the bottom left-hand side of the TV housing; then, connect the strips to the control unit in the same order.
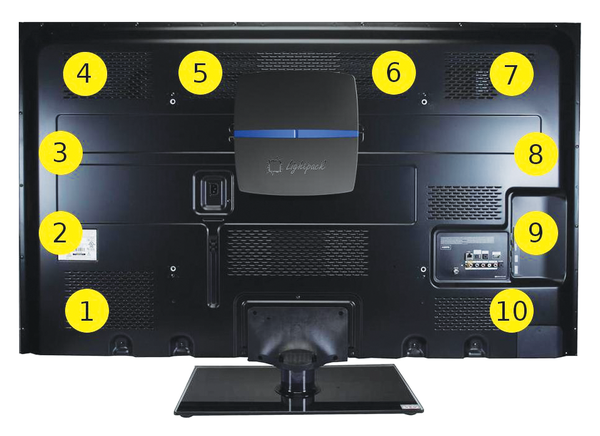 Figure 2: In the "Andromeda" arrangement, you attach the LED strips clockwise from the bottom left.
To make the assembly of individual modules as easy as possible, lay the screen display-side down on a soft surface so that the relevant points remain easily accessible without the fear of scratching the screen. After connecting the power supply unit and USB cable, you need to teach the Raspbian system how to install the ambient lighting system.
Hyperion
To set up Hyperion, download an installation script offered on the project page, make it executable, and then call it with root privileges:
$ cd /tmp
$ wget https://raw.github.com/hyperion-project/hyperion/master/bin/install_hyperion.sh
$ chmod +x install_hyperion.sh
$ sudo ./install_hyperion.sh
The program then prompts you to reboot the system.
Hyperion imports the installation routine together with a unit for systemd, but the service cannot start successfully yet. Because the system does not automatically detect how many LED strips it is supposed to control and where they are located, you have to carry out the rest of the configuration manually.
For the LED setup, download the program HyperCon [7] (suitable for all current operating systems) onto your computer. Hyperion and HyperCon do not necessarily have to run on the same system: The configuration file written by HyperCon can be copied to the media center computer at a later stage.
The Java application does not require an installation procedure, but it does require the Java Runtime Environment version 1.7 or later, which comes with the Raspbian "Stretch" distro with the Pixel desktop. Listing 1 shows how to view the Java version and then launch the application. You need to be in the same directory as the JAR file for this step.
Listing 1
Launching HyperCon
In the HyperCon application window, first change Type to Lightpack. The Serial # input field (Figure 3) then appears below it. This serial number does not correspond to the sequence of digits printed on the back of the control; instead, you need to look it up in the Raspberry Pi's kernel log (Listing 2). However, this only works if you have previously connected the Lightpack control unit to the Rasp Pi via USB.
Listing 2
Finding the Lightpack Serial Number
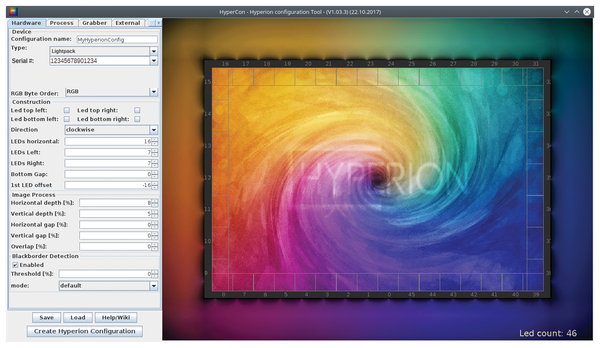 Figure 3: HyperCon makes creating a configuration file for the Hyperion service easy.
After entering the serial number, reduce the number of LED strips to 10. To do this, first enter 4 in the LEDs horizontal field under Construction; then, enter 2 for LEDs left, LEDs right, and Bottom gap; accept the remaining values and click Save.
Now create the configuration file by clicking Create Hyperion Configuration and save it as hyperion.config.json in the home directory. Next, copy it with root privileges to /etc/hyperion/ and restart the Hyperion service:
$ sudo cp ~/hyperion.config.json /etc/hyperion
$ sudo systemctl restart hyperion
All LEDs should now light up and flash in several colors. The flashing colors show you that Hyperion is communicating successfully with Lightpack. To ensure that the service will load automatically at system startup, enable it in systemd:
$ sudo systemctl enable hyperion
If the service cannot be started immediately, you might have an incorrect setting in the configuration file. In hyperion.config.json, check that HyperCon also searches for the effects in /usr/share/hyperion/effects/ and not only under /storage/hyperion/effects (Listing 3).
Listing 3
Hyperion Effects Paths
Video Grabbing
If the colors of the LEDs do not yet match the screen content, the software has to evaluate the video signal. Add-ons for a Rasp Pi media center with a Kodi installation like Boblight [8] or AmbiBox [9] analyze the video signal supplied by Kodi and transmit the control signals to the Hyperion service.
Instead of picking up the video signals in the application software, Hyperion can also evaluate the X server image directly. Ambilight thus supports all screen content. Hyperion comes with the hyperion-x11 module, which you launch with the X server by creating the hyperion-x11.desktop file in the ~/.config/autostart/ folder and adding the contents of Listing 4.
Listing 4
Desktop File
After restarting the system, the LEDs respond to changes in the screen content. To try this out, simply move a window that is not too large and with the brightest possible background (e.g., a file manager) back and forth on your desktop.
Buy this article as PDF
(incl. VAT)
Buy Linux Magazine
US / Canada
UK / Australia
Subscribe to our Linux Newsletters
Find Linux and Open Source Jobs
Subscribe to our ADMIN Newsletters
Support Our Work
Linux Magazine content is made possible with support from readers like you. Please consider contributing when you’ve found an article to be beneficial.

News
-
So Long Neofetch and Thanks for the Info
Today is a day that every Linux user who enjoys bragging about their system(s) will mourn, as Neofetch has come to an end.
-
Ubuntu 24.04 Comes with a “Flaw"
If you're thinking you might want to upgrade from your current Ubuntu release to the latest, there's something you might want to consider before doing so.
-
Canonical Releases Ubuntu 24.04
After a brief pause because of the XZ vulnerability, Ubuntu 24.04 is now available for install.
-
Linux Servers Targeted by Akira Ransomware
A group of bad actors who have already extorted $42 million have their sights set on the Linux platform.
-
TUXEDO Computers Unveils Linux Laptop Featuring AMD Ryzen CPU
This latest release is the first laptop to include the new CPU from Ryzen and Linux preinstalled.
-
XZ Gets the All-Clear
The back door xz vulnerability has been officially reverted for Fedora 40 and versions 38 and 39 were never affected.
-
Canonical Collaborates with Qualcomm on New Venture
This new joint effort is geared toward bringing Ubuntu and Ubuntu Core to Qualcomm-powered devices.
-
Kodi 21.0 Open-Source Entertainment Hub Released
After a year of development, the award-winning Kodi cross-platform, media center software is now available with many new additions and improvements.
-
Linux Usage Increases in Two Key Areas
If market share is your thing, you'll be happy to know that Linux is on the rise in two areas that, if they keep climbing, could have serious meaning for Linux's future.
-
Vulnerability Discovered in xz Libraries
An urgent alert for Fedora 40 has been posted and users should pay attention.