
Deleting metadata from files
ExifTool
The cross-platform ExifTool [4] has become the quasi-standard for editing metadata. The command-line tool has a powerful command set and can handle a wide variety of image and video formats. ExifTool's developers provide an easily understandable table [5] that lists the editing options for each format.
ExifTool can be found in the repositories of most common Linux distributions; consequently, it can usually conveniently be set up via the respective package manager. After installing ExifTool, in the simplest case, you can display a file's existing Exif data by entering the command:
exiftool FILE
The application takes all the existing metadata into account, so the output is usually quite long and confusing (Figure 2).
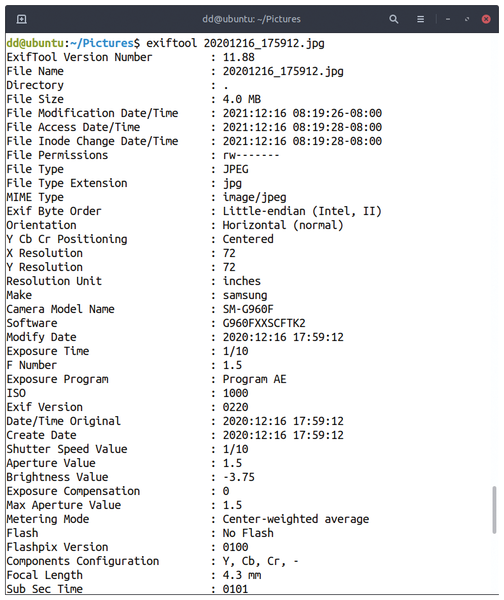 Figure 2: Working from the command line, ExifTool lists existing metadata in detail.
To save the most important metadata separately, redirect the output to a text file (Listing 1, line 1). In addition to the metadata, the Exif tags are also included in the file. To edit individual Exif tags, use the command from line 2 and then verify the modified tag with the command from line 3. As a result, you get a single line with the desired Exif tag and its value. If you want to delete all the tags to protect your privacy prior to publishing an image on the Internet, enter the command from the line 4 at the prompt.
Listing 1
Typical ExifTool Commands
01 $ exiftool --common FILE FILE.txt
02 $ exiftool -EXIF TAG='TAG CONTENT' FILE
03 $ exiftool --EXIF TAG FILE
04 $ exiftool -all=FILE
jExifToolGUI
Due to the complexity of the editing options and the large volume of metadata, ExifTool requires a longer learning curve. It is far easier to edit metadata using the jExifToolGUI [6], which provides a graphical user interface (GUI). The Java-based application requires the installation of ExifTool and version 11 of the Java Runtime Environment, which can be easily installed from the repositories of almost all popular distributions.
After a somewhat slow start, jExifToolGUI comes up with a clear-cut interface. On the left, below the menubar and buttonbar, you will find a pane that displays small thumbnails of the files discovered by jExifToolGUI. To the right of this pane, you can view and edit the metadata of the selected files using the tabs at the top of this pane.
To get started, click on the folder icon in the top left corner of the window and select the desired folder in the file manager that then opens. jExifToolGUI then reads the files it discovers and displays them one below the other as thumbnails in the pane on the left. After clicking on one of the files, the associated metadata appears in a table on the right in the View Data tab (Figure 3).
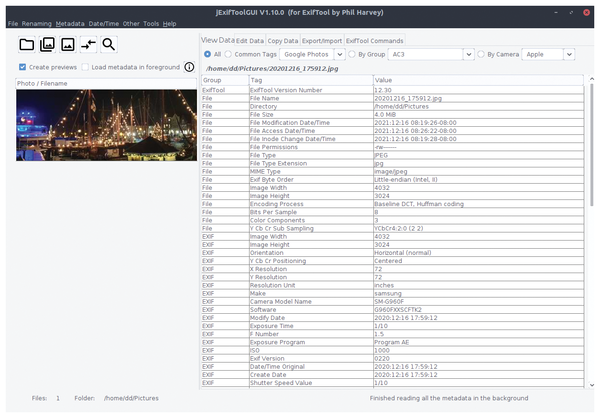 Figure 3: jExifToolGUI lets users view and edit metadata in an easy-to-use GUI.
Using the Edit Data tab, you can then modify the existing data. A second tab bar, which categorizes the corresponding data, lets you to reach the data quickly without having to trudge through a long, confusing table of Exif tags and their values. The Exif tags belonging to the respective category appear one below the other on the individual tabs; you can enter the modified values in corresponding input fields. To the right, you click checkboxes to save the new values; by default, jExifToolGUI checks all the boxes for saving the values.
After completing the modifications, transfer the new metadata to the respective image(s) in each tab by clicking the Copy to selected image(s) and save button at the bottom of the active dialog. jExifToolGUI will then transfer the modified data to the correct location in the metadata inventory. If necessary, you can also simply copy existing data to the appropriate tab category by clicking Copy from selected images at the bottom of the relevant editing segment after selecting an image. By selecting this option, you must reread the data in each category for the selected images.
Metadata | Remove metadata saves you from having to laboriously go through the individual editing dialogs one by one to remove metadata. Clicking on it opens a new dialog in which you select the categories in question by checking the matching options (Figure 4). At the same time, the default Back up originals option ensures that backups of the original data are preserved.
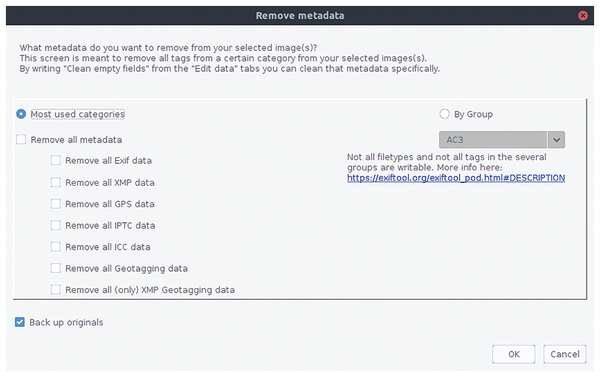 Figure 4: Existing metadata is quickly deleted in jExifToolGUI if necessary.
After clicking OK and confirming the prompt, jExifToolGUI removes the metadata from the image header. If you then reselect the image and reread the metadata using the Copy from selected images button, you will see empty fields for the corresponding Exif tags.
ExifCleaner
ExifCleaner [7] also relies on ExifTool as the basis for reading and removing Exif data. Due to its simple user interface, ExifCleaner is best suited for users who only occasionally want to remove metadata from images. The program cannot edit metadata. You will find RPM and DEB binary packages for ExifCleaner on GitHub, as well as a generic AppImage package. The source code is also available on GitHub.
ExifCleaner opens a spartan-looking empty window with only one menubar. Drag the image files whose metadata you want to remove into the empty space. In two columns, the tool shows how many Exif values it has found in each image file and how many values will remain after the removal process (Figure 5). You can only see the number of read-only values that cannot be removed, but not which Exif tags the values belong to.
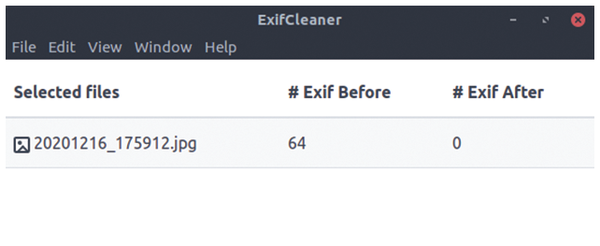 Figure 5: ExifCleaner is a plain vanilla metadata removal tool.
ExifCleaner automatically starts removing the metadata immediately after loading the files. Since the tool does not back up the original files, the deleted metadata cannot be reconstructed. Take care when selecting and transferring image files to ExifCleaner to avoid data loss.
Contrary to what the program name suggests, ExifCleaner does not just manipulate image files, but also video formats such as M4A, MOV, QT, and MP4. In addition, ExifCleaner removes all metadata except for read-only metadata (which cannot be deleted) from PDF files.
« Previous 1 2 3 4 Next »
Buy this article as PDF
(incl. VAT)
Buy Linux Magazine
US / Canada
UK / Australia
Subscribe to our Linux Newsletters
Find Linux and Open Source Jobs
Subscribe to our ADMIN Newsletters
Support Our Work
Linux Magazine content is made possible with support from readers like you. Please consider contributing when you’ve found an article to be beneficial.

News
-
So Long Neofetch and Thanks for the Info
Today is a day that every Linux user who enjoys bragging about their system(s) will mourn, as Neofetch has come to an end.
-
Ubuntu 24.04 Comes with a “Flaw"
If you're thinking you might want to upgrade from your current Ubuntu release to the latest, there's something you might want to consider before doing so.
-
Canonical Releases Ubuntu 24.04
After a brief pause because of the XZ vulnerability, Ubuntu 24.04 is now available for install.
-
Linux Servers Targeted by Akira Ransomware
A group of bad actors who have already extorted $42 million have their sights set on the Linux platform.
-
TUXEDO Computers Unveils Linux Laptop Featuring AMD Ryzen CPU
This latest release is the first laptop to include the new CPU from Ryzen and Linux preinstalled.
-
XZ Gets the All-Clear
The back door xz vulnerability has been officially reverted for Fedora 40 and versions 38 and 39 were never affected.
-
Canonical Collaborates with Qualcomm on New Venture
This new joint effort is geared toward bringing Ubuntu and Ubuntu Core to Qualcomm-powered devices.
-
Kodi 21.0 Open-Source Entertainment Hub Released
After a year of development, the award-winning Kodi cross-platform, media center software is now available with many new additions and improvements.
-
Linux Usage Increases in Two Key Areas
If market share is your thing, you'll be happy to know that Linux is on the rise in two areas that, if they keep climbing, could have serious meaning for Linux's future.
-
Vulnerability Discovered in xz Libraries
An urgent alert for Fedora 40 has been posted and users should pay attention.