
Four Raspberry Pi advertisingand tracking blockers
Pi-hole
Pi-hole [5], designed for the Raspberry Pi but also available for Intel/AMD architectures, is one of the best known ad and tracking blockers. The appliance requires at least 2GB of free disk space and 512MB of RAM. Pi-hole turns the Raspberry Pi into a DNS server that filters all data packets. You can even save profiles for defined terminal devices (e.g., to block adult websites).
You can add the Pi-hole application to an existing operating system with curl. Before you install the application on Pi OS or Debian, the best approach is to enable an SSH server so that you can later access the Raspberry Pi from any terminal on the network. On Pi OS, you simply enable the SSH server with a slider in the operating system's configuration dialog. On Debian, you need to install the openssh-server package manually and install Pi-hole in a terminal window with:
curl -sSL https://install.pi-hole.net | bash
After the install, an ncurses configuration wizard pops up automatically.
In the wizard, first set a static IP address for the computer, select a DNS provider from the list (Pi-hole uses this provider to resolve web requests), and load a block list. The next step is to enable the web interface for management and specify some more details for logging the data. The software then displays a screen with all the important data, including the password for logging in to the web interface. A message tells you that you need to enter the Pi-hole computer as the DNS server on all the terminal devices on your LAN.
You can now access the Pi-hole system's web interface from any web browser on the local network. Type http://pi.hole/admin or the Pi-hole IP address. After logging in, you are taken to an interface that groups the settings options for configuring the tool (Figure 6).
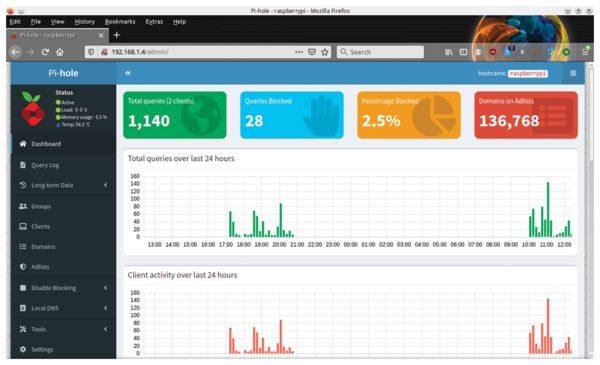 Figure 6: The Pi-hole dashboard has an ergonomic and contemporary design.
You will find the most important data relating to existing clients, their requests, blocked calls, and filter lists displayed in a graphically appealing way. Below this information, bar graphs visualize the number of network requests, followed by pie charts and tables on the most frequently accessed domains, which Pi-hole sorts by allowed and blocked domains and the type of request. The system also shows as percentages which upstream servers were used. At the very bottom of the window is additional statistical information about the clients logged in to the network.
One key feature in Pi-hole is its ability to group individual endpoints and apply separate filtering rules to each. For example, you can group tablet PCs or smartphones that are predominantly used by children in a separate group and define uniform rules for the group. This filtering option eliminates the time-consuming configuration of individual devices.
In the Groups menu in the sidebar, you can create arbitrary groups, which you then enable or disable individually with sliders. Just below Groups is the Clients option, where you create individual clients. The terminal devices discovered by Pi-hole appear here along with their MAC addresses in a drop-down menu. You can create a separate entry for each client on the LAN and assign each of the clients to a group, as shown in a table.
One of two approaches can be taken to extend Pi-hole's blocking lists: To add a single domain to the blocking list, you would use the Domains dialog. You can also opt to include all subdomains in the list. Alternatively, you can add lists of domains to be blocked in the Adlists section by typing the URL of the new list in the address field and then running the pihole -g command in the terminal to add the listing to the system. Alternatively, you can follow the link provided in the dialog to update the existing block lists in the browser window.
The newly added lists appear in a table below the input dialog and can be removed again, if needed, by clicking on the red trash can icon on the right of the list entry. By default, Pi-hole enables new blocking lists for all groups. However, you can also assign new lists specifically to individual groups of terminal devices. Newly added lists can be switched on or off at any time during operation with the slider in the Status column.
To disable Pi-hole for specified periods of time, select the appropriate option from Disable Blocking in the sidebar by specifying periods during which you do not want the application to run any blocking functions.
One hundred entries are shown in each case. If you want to add one of the domains to a blacklist, click Blacklist. After confirming the prompt, Pi-hole adds the domain into the additional list of individual domains to be blocked (Figure 7).
 Figure 7: Selectively add individual domains to blocking lists in Pi-hole.
upribox
Upribox is one of the senior citizens among central filtering solutions for intranets. You can download the free software for your Raspberry Pi (older third generation only) as a 655MB image from the project's GitHub page [6].
The upribox already sets up a WiFi network at initial startup, but you do need to connect to the LAN over a cable connection to complete the setup. Working on any computer on the network, log in to the upribox WiFi network with the changeme WPA2 key and call the URL https://upri.box:4300 in the machine's web browser. After a security prompt, you are taken to the system's administration interface. On the login screen, log in with the upri account and changethedefaults! password. You are now taken to the dashboard with the device overview (Figure 8).
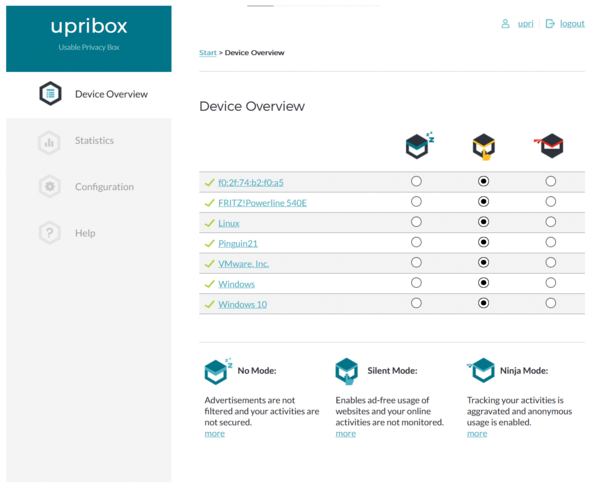 Figure 8: The upribox dashboard looks simple, but it gives you all the information you need.
To begin, change the password for the upri user by clicking on the username top right in the browser window. The software now opens a dialog where you can enter a new password and change the name of the administrative user.
For each device logged in to the wireless LAN, you will also find its status in the dashboard. Upribox lets you change the protection status of each workstation on the WiFi network individually by setting a radio button. The devices are in silent mode by default, which hides ads and trackers. Ninja mode, which you activate in the right column, enables browsing over the Tor network [7]. However, the data throughput is then significantly lower than in silent mode.
If content is no longer displayed correctly in one of the two protection modes, click the radio button in the left column to disable all protection mechanisms for the workstation. Clicking on one of the device names tells the software to display the Internet usage statistics for that client.
To set up the system, click the Configuration link on the left; this step just involves a few simple boxes to check or uncheck to control access to upribox and your WiFi network and to enable services such as SSH or an integrated VPN server (Figure 9). You can also enable a static IP address for the Raspberry Pi. The Settings link to the right of each option lets you configure the matching service.
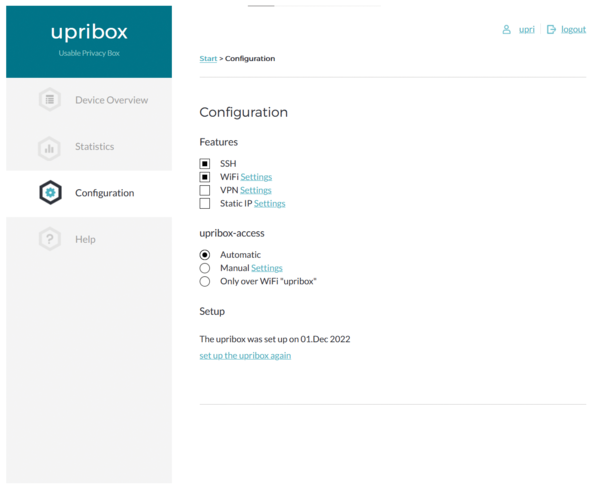 Figure 9: The upribox configuration dialog is fairly spartan.
The Statistics category in the vertical bar on the left of the main window opens a graphical display that shows statistics for blocked and filtered content, which you can sort by calendar week. A small table lists the most frequently filtered and blocked domains.
Conclusions
All of the solutions looked at in this article reliably perform their task of centrally filtering advertising and trackers. The differences lie in the feature set and user ergonomics (Table 1). The easiest solution in terms of handling is upribox, which offers only a few settings.
Table 1
Raspberry Pi Ad Blockers
| Functions | AdGuard Home | eBlocker | Pi-hole | upribox |
|---|---|---|---|---|
| GPL v.3 | EUPL v.1.2 | EUPL v.1.2 | GPL v.3 |
|
| Advertisement blocking |
Yes |
Yes |
Yes |
Yes |
| Malware blocking |
Yes |
No |
No |
No |
| Web-based configuration |
Yes |
Yes |
Yes |
Yes |
| Automatic filter list updates |
Yes |
Yes |
Yes |
Yes |
| Setup wizard |
Yes |
Yes |
Yes |
Yes |
| Multiple configurable DNS upstream servers |
Yes |
No |
No |
No |
| Logging function |
Yes |
Yes |
Yes |
Yes |
| Graphical statistics |
Yes |
Yes |
Yes |
Yes |
| Additional filter list support |
Yes |
Yes |
Yes |
No |
| Tor network integration |
No |
Yes |
No |
Yes |
| VPN option integration |
No |
Yes |
No |
Yes |
Pi-hole and eBlocker have the largest feature sets. Both require some basic knowledge of network technology. Pi-hole impresses right from the outset with the most extensive blocking lists. Like upribox, AdGuard Home is primarily intended for use on small LANs and requires very little knowledge for the installation and configuration steps. For professional use on large networks, Pi-hole and eBlocker (in particular) impress with their more detailed configuration options.
In common, all solutions do their work virtually transparently and, with the exception of upribox in Ninja mode, do not affect latency or speed when you browse the Internet. The ideal solution therefore depends primarily on your requirements and preferences.
Infos
- AdGuard: https://adguard.com/de/adguard-home/overview.html
- eBlocker: https://eblocker.org
- Speed classes: https://www.sdcard.org/developers/sd-standard-overview/speed-class/
- balenaEtcher: https://www.balena.io/etcher
- Pi-hole: https://pi-hole.net/
- upribox: https://github.com/usableprivacy/upribox
- Tor network: https://www.torproject.org/de/ @IE"
« Previous 1 2
Buy this article as PDF
(incl. VAT)
Buy Linux Magazine
US / Canada
UK / Australia
Subscribe to our Linux Newsletters
Find Linux and Open Source Jobs
Subscribe to our ADMIN Newsletters
Support Our Work
Linux Magazine content is made possible with support from readers like you. Please consider contributing when you’ve found an article to be beneficial.

News
-
Canonical Releases Ubuntu 24.04
After a brief pause because of the XZ vulnerability, Ubuntu 24.04 is now available for install.
-
Linux Servers Targeted by Akira Ransomware
A group of bad actors who have already extorted $42 million have their sights set on the Linux platform.
-
TUXEDO Computers Unveils Linux Laptop Featuring AMD Ryzen CPU
This latest release is the first laptop to include the new CPU from Ryzen and Linux preinstalled.
-
XZ Gets the All-Clear
The back door xz vulnerability has been officially reverted for Fedora 40 and versions 38 and 39 were never affected.
-
Canonical Collaborates with Qualcomm on New Venture
This new joint effort is geared toward bringing Ubuntu and Ubuntu Core to Qualcomm-powered devices.
-
Kodi 21.0 Open-Source Entertainment Hub Released
After a year of development, the award-winning Kodi cross-platform, media center software is now available with many new additions and improvements.
-
Linux Usage Increases in Two Key Areas
If market share is your thing, you'll be happy to know that Linux is on the rise in two areas that, if they keep climbing, could have serious meaning for Linux's future.
-
Vulnerability Discovered in xz Libraries
An urgent alert for Fedora 40 has been posted and users should pay attention.
-
Canonical Bumps LTS Support to 12 years
If you're worried that your Ubuntu LTS release won't be supported long enough to last, Canonical has a surprise for you in the form of 12 years of security coverage.
-
Fedora 40 Beta Released Soon
With the official release of Fedora 40 coming in April, it's almost time to download the beta and see what's new.