
Avoiding Eye Strain
Color Temperature Tools
ByDo you have problems getting to sleep after a late night computer session? Does the monitor brightness hurt your eyes? Several Linux tools are available that could help with these problems.
Most people are at least somewhat familiar with the notion of the circadian rhythm, an approximately 24-hour cycle of biological processes in human bodies. (The word “circadian” comes from Latin circa dies meaning “about a day.”) Practically every organism on Earth follows such a cycle, although not always in the same way; for example, many humans work during the day and sleep at night, whereas nocturnal animals sleep during the day and forage at night. The principle remains: Activities of all animals follow such cycles and have been doing so for hundreds of thousands of years.
The human body falls into this cycle by following external cues, called “zeitgebers” (from German zeit meaning “time” and geben meaning “to give”); the main zeitgeber is light. Most animals evolved being exposed to different light conditions in the morning, during the day, and at night.
Humans are diurnal animals; thus, our bodies “understand” that bright white light means “be alert, move around, do things,” whereas more reddish, less intense light means “slow down, seek shelter, go to sleep.” This isn’t a cultural thing, but rather a behavior brought forward by evolutionary common sense, as favored by natural selection: Humans are not well-equipped with night vision, so wandering around at night is an easy way to become dinner!
On the other hand, humans are quite adept at messing with nature, and man-made lights can skew this natural cycle, disturbing your sleep and provoking eyesight problems. For example, your body might respond to the bright, white/bluish light from your monitor or TV set as if it were daylight, ramping up for action instead of preparing for rest. Reading by candlelight, lamplight, or firelight is not as disruptive because you are getting a yellowish/reddish light that matches the evening, so your body prepares to sleep.
Unless you decide to stop using computers and TVs late in the day, you’ll have to find some way to help your body adjust. Fortunately, several tools can be of service. These tools do their job by slightly changing the tint and brightness of your monitor screen, so your body gets the kind of light it would expect given the time of the day. Of course, these tools aren’t a panacea, and if you don’t get enough sleep, you can still suffer from negative side effects.
F.lux – A Flexible Option
The first tool I’ll consider is f.lux. It is available for Linux as well as Windows and Mac computers, including iPhones and iPads, so it’s quite likely you’ll be able to use it. The latest version is dated July 2010, but I tested it on an Ubuntu 12.04 machine, and it worked fine.
F.lux works by dynamically changing the screen color – from cool white during the day to a warm yellowish tone at night. To see the effect more clearly, you can try changing the screen background from “Ubuntu” (the standard brown/purple design) to “London Eye from Beneath,” which is more white/gray. Figure 1 shows Ubuntu’s standard, unmodified look.
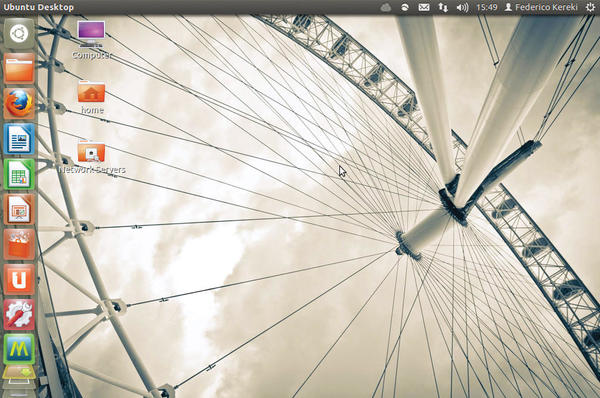 Figure 1: This is what the Ubuntu desktop usually looks like – either without f.lux or during the day.
Installation of f.lux is simple (Listing 1), and to set it up, all you have to do is specify your latitude and longitude.
Listing 1: Installing f.lux from a PPA
sudo su
add-apt-repository ppa:kilian/f.lux
apt-get update
apt-get install fluxgui
exit
(Your ZIP code is a valid alternative if you are in the United States.) The first time you run fluxgui (Figure 2), it will ask for these parameters.
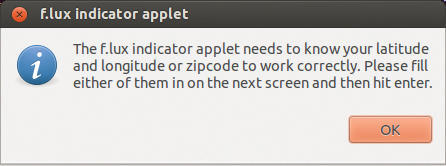 Figure 2: The first time you use f.lux, it will remind you to set up your location data.
If you don’t know your coordinates, click on Find your latitude and longitude and a browser window will open to find the information through Google Maps (Figure 3).
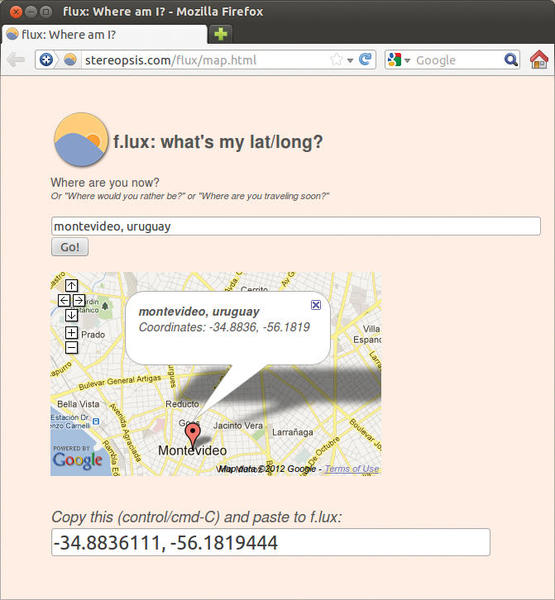 Figure 3: Finding your coordinates is easier with Google Maps. Don’t worry too much about precision!
Enter your current address, press Go!, and your (possibly only approximate) location will be shown on a map. Don’t worry if it’s not your exact position – all f.lux needs to know is the local time at your city. Copy the coordinates shown at the bottom of the screen and paste them into the f.lux GUI window – note that latitude and longitude go into separate text boxes – and you’re set (Figure 4)!
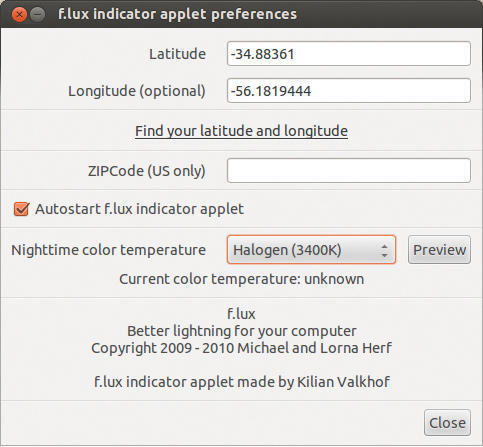 Figure 4: After getting your (approximate) coordinates, enter them in the f.lux GUI, check if you want it to autostart, and pick your preferred color temperature.
You might want to adjust some other settings, too. I’d suggest checking Autostart f.lux indicator applet, so it will run automatically. Also, you must pick the desired kind of lighting you want at night. Your options are Tungsten, Halogen (the default), Fluorescent, and Sunlight. You’ll probably want one of the two first options. Throughout the day, f.lux will progressively adjust the screen lighting, from maximum brightness (around noon) to your selected value (at night). The change is gradual, but by comparing Figures 1 and 5, you can see the difference; this screenshot was taken around midnight.
Figure 1: This is what the Ubuntu desktop usually looks like – either without f.lux or during the day.
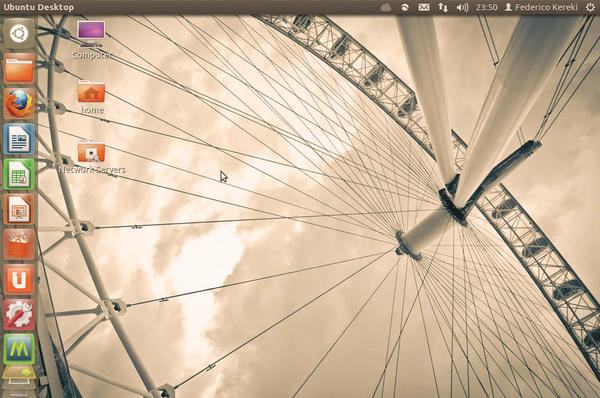 Figure 5: The Ubuntu desktop around midnight, showing a markedly warmer tone than the daytime desktop (in Figure 1).
See the box “What Are Color Temperatures?” for more specific information.

You can also run the underlying xflux command (which controls the lighting) from the command line:
/usr/bin/xflux -l -35 -g -56 -k 2700
This example sets your coordinates to Montevideo, Uruguay (roughly 35° South, 56° West), and the color to 2700K (Listing 2).
Listing 2: f.lux from the Command Line
> xflux -l -35 -g -56 -k 2700
--------
Welcome to xflux (f.lux for X)
This will only work if you're running X on console.

Your location (lat, long) is -35.0, -56.0

Your night-time color temperature is 2700
It's night time. Your screen is changing now.
Going to background: 'kill 15960' to turn off.
The command-line usage provides a simple way to use f.lux in any Linux system; you could set up a simple command (as follows) and make it autostart on login. Note that here the output of the xflux command is sent to a file (/tmp/xflux.out), so you can learn the command’s PID and eventually kill it if desired – although you could also killall xflux.
#!/bin/bash
xflux -l -35 -g -56 -k 2700 >/tmp/xflux.out
With all its possibilities, f.lux is still a simple solution, mostly for Ubuntu and derived distributions. When you can take advantage of the GUI control, it’s definitely worth a try!
Redshift – A Command-Line Solution
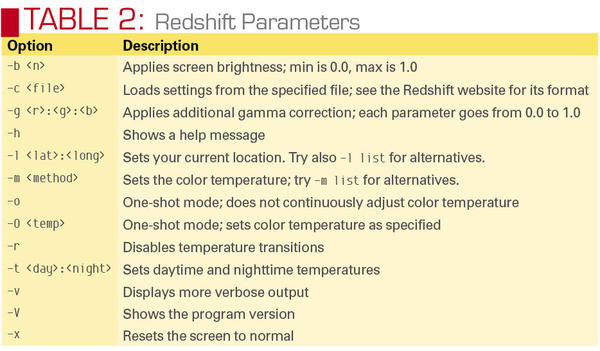
Redshift was inspired by f.lux (the author says he wrote it out of dissatisfaction with some aspects of the Linux version of f.lux), and its latest version is 1.7, dated July 2011. It was written for Linux, but experimental builds are available for Windows. When enabled, Redshift also works by periodically changing the screen tint to match the time of day, according to your current coordinates. If you want to try out a specific setting, you can run it in “single shot” mode (see the -o and -O parameters in Table 2) and whatever color you pick will remain unchanged, despite what the clock says.
As to installation, the Redshift website offers packages for many distributions (Arch Linux, Debian, Fedora, Ubuntu, etc.), and if you look around, you can probably find even more repositories. For example, for openSUSE, I used the package search function and found that the X11 Utilities repository included it.
Because I wanted to try a different approach than using a repository, I decided to install Redshift in Linux Mint through the command line. Linux Mint is derived from Ubuntu, so the PPA probably would have worked, but I wanted to show a different way, so I downloaded packages from the Redshift site and then entered the following lines at the command line:
tar zxf redshift_1.7.orig.tar.gz
cd redshift-1.7
./configure
make
sudo make install
If the ./configure step warns you that it needs RANDR or VIDMODE, you can use the package manager, search by name for all relevant packages, install them, and try again.
After having installed the program, type
redshift -h
to see all possible parameters (Table 2). Note that the location parameters are mandatory, and if you don’t specify the desired temperatures, they default to 5500K and 3700K for day and night, respectively.
Redshift works directly with color temperatures; I prefer
redshift -l -35:-56 -t 5000:3300
myself, so even at noon I’ll get a somewhat subdued screen (Figure 6), compared with the night screen (Figure 7).
 Figure 6: Linux Mint without Redshift, or at noon.
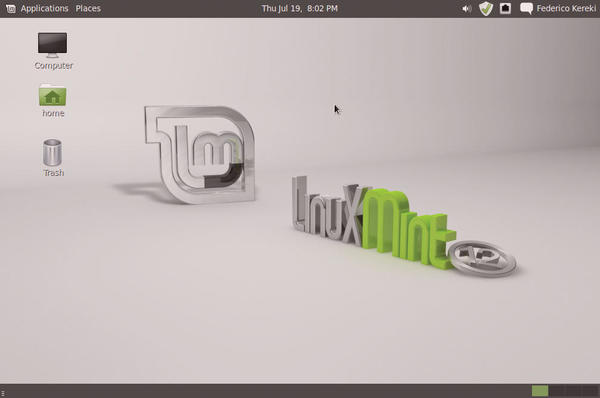 Figure 7: Linux Mint with Redshift running from the command line later at night.
If you want to try a specific color temperature, you can use something like:
redshift -O 4000
Entering redshift -x restores the screen to normal.
An indicator is also available; if you enter gtk-redshift instead of redshift, a small icon showing a red or blue lamp will appear in your system tray. By clicking on the lamp, you can enable (red lamp) or disable (blue lamp) Redshift. You can also set it to autostart, or you can kill it completely using Quit (Figure 8).
Redshift works very well from the command line, and its system tray icon provides feedback – although not a way to configure it. I have used it with several distributions in which it performed quite well, so it’s worth trying out.
Calise – A Webcam-Aware Option
Calise is the newcomer, and its latest version is 0.4.0, dated July 2012. It works differently from f.lux and Redshift in that it won’t change the screen color. Instead, it adjusts the screen backlight up or down depending on the current lighting, as detected by the webcam (hence its name: Calise stands for “Camera Light Sensor”). If you are working in the dark – whatever the time of day – Calise will lower the lighting of your screen, and if you are in a fully lighted ambient, Calise will set the screen backlighting to maximum. (Figures 9 and 10).
 Figure 9: The standard openSUSE desktop, without Calise running.
 Figure 10: At night, Calise lowers the brightness of the monitor backlight.
To use Calise, you will obviously need a webcam and a monitor with controllable backlight. If you are not sure about the latter item, check to see whether directory /sys/class/backlight exists and that it is not empty; if it is, you’ll probably be able to run Calise. Because of these requirements, in my particular case, I can run Calise on my laptop but not on my desktop machines.
Calise is a Python application, and it can be installed in several distributions such as Arch Linux, Ubuntu, Fedora, or openSUSE. Given that the project is in flux right now, you should check the “Installation” page at the Calise wiki, because it’s quite likely that setup instructions will change with future releases. Check the Calise website, too; right now, there are three patches that you should apply to the 0.4.0 version, and you can find the required commands online.
Follow the wiki instructions to proceed after installing and patching the source code. You’ll probably have to install several packages before attempting to build and install Calise. The documentation is clear on that and provides the required commands. Next, change to the source directory and run the following commands.
env python2 setup.py build
sudo env python2 setup.py install --prefix=/usr
You might get an error message, such as ERROR: Python module msvcrt not found, but don’t worry; “msvcrt” is a Windows module and doesn’t exist in Linux. Again, check the wiki for commands that should be run after this install. Depending on your distro, you might have to do some extra work.
After a successful installation, you can calibrate Calise by running:
calise --calibrate
You can have several named profiles for use at different places; for example, one profile for your workplace in the day and another for your room in the evening. You’ll have to specify the backlight directory, then Calise will check that it works and determine how many possible values your monitor supports. Calise will then try to determine your coordinates from your IP or let you enter them manually.
Finally, Calise will ask you to choose which camera to use (if more than one) and involve you in a couple of experiments (including covering the webcam’s lens with your finger) to finish its setup.
Calise also has a system tray icon or indicator and a graphic interface (Figure 11) with which you can start or stop the brightness changes. However, the author recommends running the program in daemon mode, with calised, which requires less CPU and power usage.
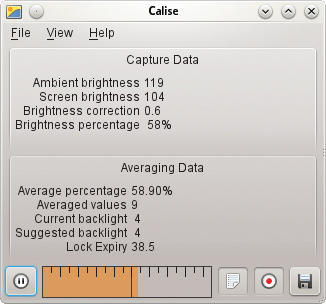 Figure 11: Calise also provides a graphic interface that shows its status and lets you start and stop light balancing.
Calise behaves differently depending the time of the day. Between dawn and sunset, it does relatively few screen adjustments. At dawn and sunset, it does frequent screen captures to follow the rapidly varying light conditions, and, at night, it makes the fewest number of adjustments.
Calise is another interesting tool, that might prove most useful in combination with a color temperature tool; feel free to experiment.
Summing Up
Working at night can disrupt your sleeping habits and sleep cycles and even result in health problems, but Linux, as usual, provides several tools to help you cope with this problem. See the box titles "What about Android" to learn about alternative tools for mobile devices. Give the tools in this article a try and see whether you start feeling better!
Info
[1] Color temperature
[2] Kelvin scale
[3] Chainfire3D
[4] Color Filter Service
[5] Lux Auto Brightness
[6] NeyetLight
[7] Screen Adjuster
The Author
Federico Kereki is a Uruguayan Systems Engineer, with more than 20 years of experience teaching at universities, developing, consulting, and writing articles and course material. In 2011, he wrote Essential GWT, on programming techniques for the Google Web Toolkit development tool. He has been using Linux for many years, having installed it at several different companies.
Subscribe to our Linux Newsletters
Find Linux and Open Source Jobs
Subscribe to our ADMIN Newsletters
Support Our Work
Linux Magazine content is made possible with support from readers like you. Please consider contributing when you’ve found an article to be beneficial.

News
-
Gnome Working on Test Center App to Make Testing Easier
It's now possible to test experimental features on the Gnome desktop without worrying that you'll break things.
-
New Vulnerability Discovered in Linux Kernel
Hiding out for nearly 15 years, the Ghostlock vulnerability allows a standard logged-in user to gain root privileges.
-
New Linux Flaw Lets Attackers Escape VMs
A 16-year-old vulnerability allows an attacker to escape a virtual machine, gain access to the host, and execute malicious code.
-
Hannah Montana Linux Is Back!
Developer Noah Cagle decided the world needed the once obscure but beloved Linux distribution and gave it a decidedly pink refresh.
-
System76 Refreshes the Lemur Laptop
If you're looking for a laptop with tons of power and battery, look no further than the latest iteration of the System76 Lemur Pro.
-
More than 43 Million Lines of Code in Linux Kernel 7.2
Using the cloc utility, Michael Larabel of Phoronix discovered that Linux kernel 7.2 has over 43 million lines of code.
-
Kubuntu Focus Goes Ultra
The Kubuntu Focus team has upped the performance ante of its M2 and Zr laptops with the latest, greatest CPUs from Intel.
-
Linux Gamers May Soon See Less Mouse Lag in KDE Plasma
Gamers using KDE’s Plasma desktop have been suffering from a slight input delay in mouse movement that could lead to getting fragged.
-
Three Lines of Code Improve Linux Storage Performance
A developer changed three lines of code, giving Linux storage performance a 5% bump.
-
AUR Hit Again with Malicious Packages
Once again the Arch User Repository is plagued by a high volume of malicious packages.