
Retouching with Perl
Color Cast
If you have a photo that is too green, too red, or too blue, you can assume that something is wrong with the color balance. A white object in a scene you photograph really should be white. The same principle applies to gray or black objects. However, if you have not adjusted your camera's white balance – something professional photographers always do – you could experience unnatural-looking colors. Later, you can correct color casting in the digital image by a method described in Grokking the GIMP [2]. Although the JPEG format used by many low-budget cameras restricts your options here, you can typically achieve fairly satisfactory results.
One problem is that many photos simply do not contain pure white, black, or gray elements; however, photographic equipment retailers have plastic cards that can help you. Simply place the cards somewhere in a test shot, and then use the measured values to compensate any further shots you take of the same scene.
Of course, if the lighting changes – if, for example, the sun comes out from behind a cloud – you will need to take another test shot with the cards before you continue.
In Figure 3, I used the GIMP's Color Picker tool to measure the color values of the gray card. The results were Red: 122, Green: 127, and Blue: 123. For a perfect picture, all three color channels should have identical values. The same thing applied to the white and black cards: the values I got here were 227/235/228 and 16/10/17, respectively.
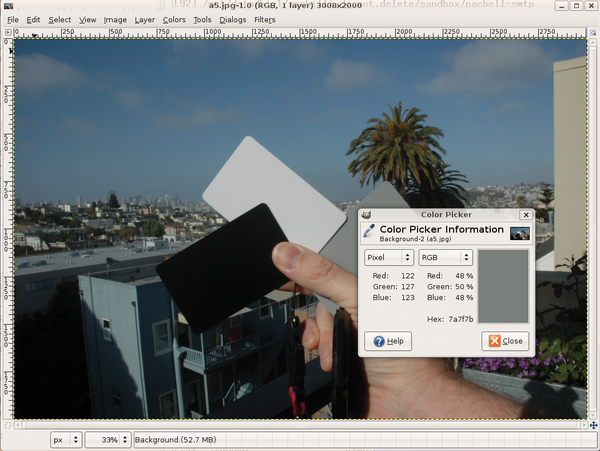 Figure 3: A set of white, gray, and black cards makes it easier to locate control points.
The colorcast.yml file (Figure 4) shows the values GIMP returned in YAML format. The script parses these values from a file whose name you pass in at the command line, as in picfix -c colorcast.yml file.jpg. This lets the script adjust any number of images of the same scene. To do so, it has to transform all the colors used in the image in such a way that it removes color components in those sections of the image that are actually colorless.
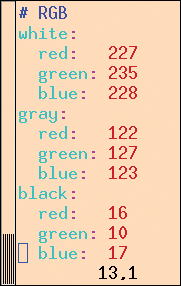 Figure 4: The file colorcast.yml stores the color values I measured for the black, gray, and white cards.
To allow this to happen, I needed to define a transition function with a graph that covers the known measuring points, and performs spline-style interpolations for all other values. GIMP's Curves dialog from the Tools | Color Tools menu supports this. All you must do is set the color that needs adjustment in the dialog's selection box at the top and then make a dent in the graph, which is initially straight, so that the line touches the control values that you determined.
If you assume the gray card gives values of Red: 122, Green: 127, and Blue: 123, to adjust the image, just set the values for the red and blue channels to the same value as green, 127, which gives you a pure gray.
To do so, open the red channel in the Curves dialog and drag the straight line at the 122/122 point to 122/127, which makes a slight dent into the graph as the curve auto-adjusts. While you are dragging the line, GIMP shows you the current coordinates at the top left-hand side. Then do the same for the blue channel, dragging 123/123 to 123/127. The red and blue channels have slightly bumpy curves when you are done, as you can see in Figure 5.
 Figure 5: Correcting color casting in the Curves dialog. This example uses three control points to adjust the line for the red channel.
Now repeat the process for the black and white cards; This gives you a total of three control points in the red and blue channels, all of which adjust the color balance.
Of course, you can script the whole process. Listing 2, ColorCast.pm, shows that its constructor expects two values: yml_file, the YAML file with the measured values, and drawable, the GIMP layer in which to perform the color transformation.
Listing 2
ColorCast.pm
The load() method then parses the YAML values, which are stored in a hash of hashes. Starting in line 53, adjust_to() then accepts a channel (e.g., green), and it adjusts the values for the other two channels (red, blue) to match the green values. The GIMP function that handles this is gimp_curves_spline(), which accepts the active layer in the image to be modified and a series of control points as parameters.
On top of the control points, you need to pass (0,0) and (255,255) to adjust_to() to make sure that the graph starts at the bottom left-hand side and finishes at top right, as shown in Figure 5.
If you do not specify any values, the picfix script will not perform any color correction. The -c option passes in a YAML file that you created previously, and the -a (adjust) option accepts the channel name to which the other two channels will be adjusted. This defaults to green.
Tricky Install
By typing
sudo apt-get install libGIMP-perl
on Debian-based Linux distributions, you should be able to install the whole Perl GIMP enchilada.
Unfortunately, the Ubuntu 7.10 release goes haywire. Synaptic takes the insanity a step farther and even suggests uninstalling GIMP and the Ubuntu desktop to install libgimp-perl.
The reason for this madness seems to be a broken GIMP package, which contains a couple of files belonging to the libgimp-perl distribution, but not the required Perl modules.
Solution
To work around this, use the steps outlined in the "Ubuntu Tricks" box: Download the libgimp-perl source code, rebuild, increase the version number by 1 (that is … dfsg-2 becomes … dfsg-3), and go on to install.
This solution is quick and dirty and probably will not survive the next GIMP update, but it's good enough to get by for now. Ubuntu Hardy fixes the problem for good.
After the install, you will need the ColorCast.pm module in a path where picfix can find it; alternatively, you could hard code the usr lib directory; in picfix to match your ColorCast.pm installation directory.
The other Perl modules you need to get started are available from CPAN and can be installed in a CPAN shell or can be installed more conveniently in Ubuntu by typing apt-get install libyaml-perl and liblog-log4perl-perl.
Line 16 in picfix sets the logging level to $DEBUG, but you can switch to $ERROR if all this verbosity is bugging you (Figure 6).
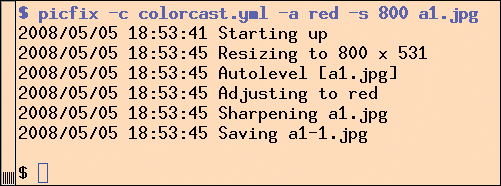 Figure 6: If you keep the default Loglevel, the script will log its activities in detail.
Ubuntu Tricks
« Previous 1 2 3 Next »
Buy this article as PDF
(incl. VAT)
Buy Linux Magazine
US / Canada
UK / Australia
Subscribe to our Linux Newsletters
Find Linux and Open Source Jobs
Subscribe to our ADMIN Newsletters
Support Our Work
Linux Magazine content is made possible with support from readers like you. Please consider contributing when you’ve found an article to be beneficial.

News
-
So Long Neofetch and Thanks for the Info
Today is a day that every Linux user who enjoys bragging about their system(s) will mourn, as Neofetch has come to an end.
-
Ubuntu 24.04 Comes with a “Flaw"
If you're thinking you might want to upgrade from your current Ubuntu release to the latest, there's something you might want to consider before doing so.
-
Canonical Releases Ubuntu 24.04
After a brief pause because of the XZ vulnerability, Ubuntu 24.04 is now available for install.
-
Linux Servers Targeted by Akira Ransomware
A group of bad actors who have already extorted $42 million have their sights set on the Linux platform.
-
TUXEDO Computers Unveils Linux Laptop Featuring AMD Ryzen CPU
This latest release is the first laptop to include the new CPU from Ryzen and Linux preinstalled.
-
XZ Gets the All-Clear
The back door xz vulnerability has been officially reverted for Fedora 40 and versions 38 and 39 were never affected.
-
Canonical Collaborates with Qualcomm on New Venture
This new joint effort is geared toward bringing Ubuntu and Ubuntu Core to Qualcomm-powered devices.
-
Kodi 21.0 Open-Source Entertainment Hub Released
After a year of development, the award-winning Kodi cross-platform, media center software is now available with many new additions and improvements.
-
Linux Usage Increases in Two Key Areas
If market share is your thing, you'll be happy to know that Linux is on the rise in two areas that, if they keep climbing, could have serious meaning for Linux's future.
-
Vulnerability Discovered in xz Libraries
An urgent alert for Fedora 40 has been posted and users should pay attention.