
Visualizing your Nagios network with NagVis
Configuring Maps
By selecting Manage | Maps from the popup menu, you can create a map or perform administrative functions like renaming or deleting an existing map. At the top of the form (Figure 3), you input the map name, then enter which users have read access (allowed_user) and which can change the map configuration (allowed_for_config). These users are the same users the web server recognizes, but NagVis does not do any checking at this point. Therefore, you need to be sure that the users are defined correctly.
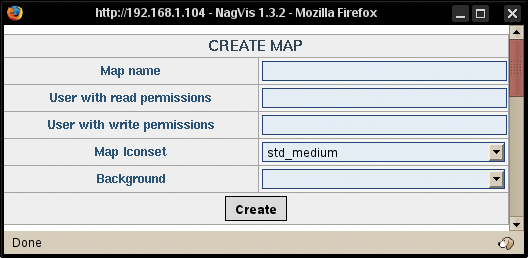 Figure 3: The NagVis Map Creation form.
Note that you get a warning if you leave either of the User fields blank. By default, you should include at least nagiosadmin or the name you use for your primary Nagios administrator. If security is an issue, you can use a different user. Also, you can set this parameter to EVERYONE, without listing the users explicitly, so that every authenticated user can see the map.
Next, select the background image from the drop-down menu map_image. In this case, The image map you created earlier needs to already be present on the system. Keep in mind that NagVis does not scale images, so it is possible that your image looked fine in whatever application you used to create it, then ended up being too large on a particular monitor, forcing you to scroll to see all of it. If necessary, you can scale the image in an external graphics tool.
If you have several maps with a deep hierarchy, you can use the show_in_lists parameter to reduce clutter. A 0 setting prevents NagVis from displaying the map in the drop-down list or start page.
The Map Iconset field defines the set of icons used to display the status. By default, NagVis uses three sets of icons (big, medium, and small), which reside in ../nagvis/nagvis/images. If you want, you can edit the existing image to suit your needs or create your own set of new images. The set is configured for the entire map, but you can also elect to define an icon for individual services and hosts. For details on creating your own set, see the documentation on the Nagvis homepage [1].
When you are done, click Save to return to the Map Image window.
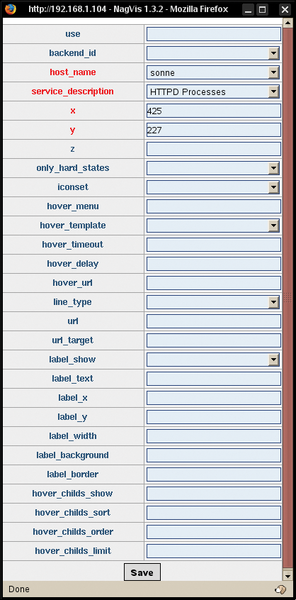 Figure 4: Creating a service with the Nagios Service Configuration form.
Adding Objects to Maps
At this point, the map exists only as the background image, and you need to add the icons for your hosts and services. First, right-click the map and select Add Object, then Icon for a choice of Host, Service, Hostgroup, Servicegroup, and Map. The first four options are self-explanatory. The Map icon lets you create a link to a different map.
Linking different maps is useful for creating a map hierarchy of buildings, servers, and server cabinets. Also, you can define icons for host or services to link to a URL completely outside of NagVis and Nagios. For example, if you are monitoring the availability of a website, you could link to the site to verify the status.
When you select the option to add an object, the cursor changes into a cross. Now you move the mouse and left-click on the location you want to place the icon. A pop-up window lets you input configuration information for the host or service you want to add.
Like Nagios, NagVis employs the use field to define configuration templates that are accessible to all services and hosts on the map. Then you only need to configure options that are different from the template.
When editing an icon, you do not necessarily need to click on it to make changes. If you mouse over an icon, a small window pops up in a couple of seconds with the icon's configuration and a link that allows you to change that configuration. If you prefer a hands-off approach, you can also configure icons to automatically display text rather than wait for a mouse-over event.
When configuring a host, NagVis only shows the status of the host itself by default. The recognize_services parameter tells NagVis to include the services on the given host. If you include both services and the host icon on a single map, this is probably not necessary. However, for higher level maps, it can be useful to combine this information.
Note that you are not limited just to individual services and hosts. NagVis supports both host groups and service groups, which appear in the configuration menu alongside hosts and services. Because hosts or services within a given group can have different priorities, Nagvis displays the status with the highest priority.
It Ain't Over Yet
NagVis helps you visualize your Nagios environment with custom maps. Once your maps are set up with the basic configuration, you are ready to experiment with some more advanced options to see how they fit into your environment.
Infos
- NagVis: http://www.nagvis.org
« Previous 1 2
Buy this article as PDF
(incl. VAT)
Buy Linux Magazine
US / Canada
UK / Australia
Subscribe to our Linux Newsletters
Find Linux and Open Source Jobs
Subscribe to our ADMIN Newsletters
Support Our Work
Linux Magazine content is made possible with support from readers like you. Please consider contributing when you’ve found an article to be beneficial.

News
-
Canonical Releases Ubuntu 24.04
After a brief pause because of the XZ vulnerability, Ubuntu 24.04 is now available for install.
-
Linux Servers Targeted by Akira Ransomware
A group of bad actors who have already extorted $42 million have their sights set on the Linux platform.
-
TUXEDO Computers Unveils Linux Laptop Featuring AMD Ryzen CPU
This latest release is the first laptop to include the new CPU from Ryzen and Linux preinstalled.
-
XZ Gets the All-Clear
The back door xz vulnerability has been officially reverted for Fedora 40 and versions 38 and 39 were never affected.
-
Canonical Collaborates with Qualcomm on New Venture
This new joint effort is geared toward bringing Ubuntu and Ubuntu Core to Qualcomm-powered devices.
-
Kodi 21.0 Open-Source Entertainment Hub Released
After a year of development, the award-winning Kodi cross-platform, media center software is now available with many new additions and improvements.
-
Linux Usage Increases in Two Key Areas
If market share is your thing, you'll be happy to know that Linux is on the rise in two areas that, if they keep climbing, could have serious meaning for Linux's future.
-
Vulnerability Discovered in xz Libraries
An urgent alert for Fedora 40 has been posted and users should pay attention.
-
Canonical Bumps LTS Support to 12 years
If you're worried that your Ubuntu LTS release won't be supported long enough to last, Canonical has a surprise for you in the form of 12 years of security coverage.
-
Fedora 40 Beta Released Soon
With the official release of Fedora 40 coming in April, it's almost time to download the beta and see what's new.