The Raspberry Pi as a motion-sensing webcam

Big Pi is Watching

© Lead Image © racorn, 123RF.com

© Lead Image © racorn, 123RF.com

Article from Issue 160/2014
Author(s):

The new PiCam camera for the Raspberry Pi delivers image data with very little overhead, making it ideal for video surveillance applications. We find the bumps in the road you'll encounter and show you how to smooth them out with a few Linux commands and pipes.

Video surveillance has become a hot topic, but most cameras available are not really recommended: A colleague recently described the hair-raising vulnerabilities that Linux-based web and netcams typically entail in a blog post [1]. After this kind of read, Linux admins will probably prefer to look for alternatives, which will take them right to the Raspberry Pi with the PiCam add-on (see the "Rasp Pi HD Video Camera" box).

Rasp Pi HD Video Camera

Photo resolution: 5 megapixels (2592x1944)

Video resolution: 1080p at up to 30fps, 720p at 60fps, VGA at 90fps

Lens: aperture 2.9, focal length 3.6mm (equivalent to 36mm wide-angle lens on a DSLR)

The Hardware

The equipment need not cost an arm and a leg. Figure 1 shows the components used in this example: Anyone wanting to use the camera in places without Ethernet wiring will need a WiFi dongle and case. The Pi detects most wireless dongles automatically; in our lab, I used a USB dongle by Edimax. The SD card comes with several OS images, which will save you a huge amount of work for a small additional price.

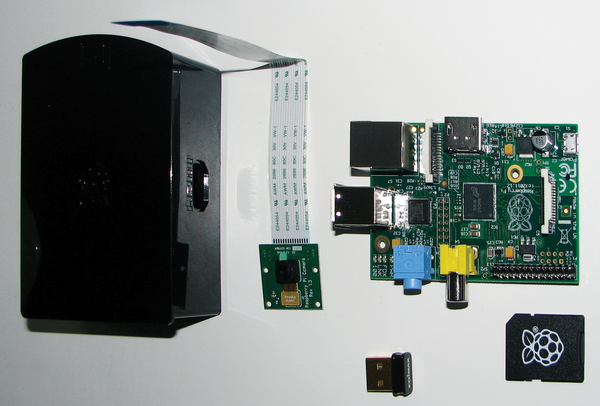
Figure 1: The individual components of the test setup; clockwise from top right: Rasp Pi Model B, SD card with the operating system, WiFi dongle, special PiCam housing with a peephole, PiCam.

The Raspberry Pi project website has devoted a page to the camera with instructions [2] and a video documenting installation steps. The connector for the camera lies between the Ethernet and HDMI ports (Figure 2).

Figure 2: The PiCam connector is around 19mm wide, is protected with a cover, and lies between the Ethernet and HDMI ports.

If you have never connected anything to this port before, you might be surprised how it works. To begin, you need to squeeze the ends of the cover and lift it up a couple of millimeters. The flat ribbon cable then inserts into the exposed slot with the blue side of the cable facing toward the Ethernet connector. Finally, push the holder back down to complete the installation.

Putting

The flat ribbon cable connects the camera to the Pi board, but it must not be kinked. The board of the camera module itself measures in at 25x20mm, the optical sensor is 0.5cm2 and is about 3mm high. In principle, you could cut a hole in the lid of most cases available on the market to give the camera's sensor a clear view, then fasten the board from above. Make sure you exercise great care, especially when folding the cable. You need to consider beforehand where the camera is to be used or order a matching case for the PiCam from the outset.

Before you can use the camera, you first need to activate it. To do so, log in to your Pi as the administrator and run raspi-config. If your Rasp Pi is using the latest software release, you need to select the Enable Camera option (Figure 3). A reboot applies the changes.

Figure 3: The Enable Camera option activates the camera module driver.

The Raspbian distro used in the example has two binaries for interacting with the camera: raspistill and raspivid. As the names imply, raspistill is for generating images, whereas raspivid records video data.

Try taking a first test photo with:

raspistill -o test.jpg

The program has many options; for example, -w and -h let you specify the width and height of the image, and -e <encoding> lets you produce PNG, GIF, or bitmap files instead of standard JPEG images. Also, the user can influence the exposure values of the image.

Another option worth mentioning is -tl <seconds>, which creates time-lapse recordings with a snapshot every few seconds. The command also provides a preview for the Pi console: Raspivid and Raspistill write directly to video memory, so an X11 environment is not necessary (Figure 4).

Figure 4: An X11 environment on the Rasp Pi is not absolutely necessary because the tools can also display previews on the console.

The raspivid command shares many options with raspistill; for example, the resolution of the recording. However, the -t option defines the length of the recording in milliseconds: 0 instructs the Pi to record indefinitely. The

raspivid -t 10000 -o test.h264

command thus captures a 10-second video clip. Again, a number of parameters affect the recording quality; even video effects are possible.

The output format is predefined in the video command as an H.264 stream. You can use the file type identifier to classify the output file as a JVT NAL sequence, H.264 video @ L 40, which is precisely the video format that the ubiquitous FFmpeg understands really well. Even ffplay plays it easily, and MPlayer needs only a little help; Xine fails, but VLC works.

On the Network

It is relatively easy to serve up these images on a network. For example, a script can periodically call Raspistill and assign unique file names. The files end up in a web server directory; the script author has a useful option: -l <linkname>. Listing 1 shows how to make sure the latest image is always stored in the latest.png file. In this case, however, caution is advised: The option -l surprisingly sets a hardlink, not a softlink.

Listing 1

raspistill Loop


Even real video streams are possible here via two approaches: The Pi could write the capture data to a file, or it could broadcast live over the network. The Raspberry Pi website also has an approach for transferring the data with Netcat and playing back with MPlayer [2]. The whole thing is simple and uses traditional Linux tools: On the receiving computer, which will be rendering the video, the user starts:

nc -l -p 12345 | mplayer -fps 31 -cache 1024 -

Netcat thus waits for connections on port 12345 and passes the data through to MPlayer, which then dutifully plays the data with these parameters. On the Pi with camera, the user needs to start the command

raspivid -t 0 -o - | nc <target> 12345

and, hey presto, you have live video streaming! This creates a data stream of about 20Mbps for a full HD video. The picture is smooth but comes with a slight delay. It is interesting to note that, according to top, the Raspivid process consumes just 8 percent of the Raspberry's CPU power, whereas the Netcat process that forwards the data needs almost 50 percent.

If you also want to use a Pi as a receiver, follow the recommendation from the same source and play the video with:

/opt/vc/src/hello_pi/hello_video/hello_video.bin buffer

In the hardware configuration I tested with the Edimax wireless dongle, streaming also worked at full resolution via WLAN with 802.11n. However, the receiving computer needed to recode using FFmpeg (within the nc reception pipe), because only VLC was installed and the desktop client did not get along with the streamed data. If you experience jerky images because of CPU or bandwidth problems, you should try to reduce the video resolution or the frame rate in the call to Raspivid.

Buy this article as PDF

Express-Checkout as PDF
Price $2.95
(incl. VAT)

Buy Linux Magazine

SINGLE ISSUES
 
SUBSCRIPTIONS
 
TABLET & SMARTPHONE APPS
Get it on Google Play

US / Canada

Get it on Google Play

UK / Australia

Related content

  • Raspberry Pi Pet Camera

    A Raspberry Pi, a Pi-compatible camera, and a mesh VPN are all you need to watch your pets from afar.

  • motionEyeOS

    Set up a professional video surveillance system armed with motionEyeOS and a Raspberry Pi.

  • Motion Detection

    The motion detector software, Motion, monitors the video signal from one or multiple cameras and is able to detect whether a significant part of the picture has changed, record and track movement, or launch arbitrary external commands to trigger other actions.

  • DIY Lenticular Camera

    You can take lenticular images with a homemade camera to re-create the "wiggle" pictures of your childhood.

  • Security Lessons: Secure Video

    Unless your surveillance cameras are wired directly to a video board, they are notoriously insecure. We show you how to keep your cameras from being compromised.

comments powered by Disqus
Subscribe to our Linux Newsletters
Find Linux and Open Source Jobs
Subscribe to our ADMIN Newsletters

Support Our Work

Linux Magazine content is made possible with support from readers like you. Please consider contributing when you’ve found an article to be beneficial.

Learn More

News