
Using QPxTool to check optical drives and media for errors
Full Control

Optical disks vary greatly in terms of quality. To use them optimally and avoid data errors, you need only two things: Linux and QPxTool.
Optical disks are still used for backups and multimedia applications because they are much less expensive than Flash media and their service life is reasonably well known. Blanks, however, vary greatly in quality, and not every burner is suitable for use with any CD-R. In the worst case, the backup ends up with errors on the disk, and you may be left without a copy in an emergency.
The QPxTool program [1] helps you avoid blanks that are incompatible with your drive. In most major distributions and their derivatives, you will find the tool in the repository, from which you can install with a single mouse click. To compile the source code manually, check out the instructions on the QPxTool homepage [2].
First Start
After starting, QPxTool first guides you to a somewhat cluttered application window that lists many parameters on the right in the Media R/W Capabilities and Generic Capabilities sections.
Because the application initially only selects one virtual drive, in the Device tab, it disables all technical parameters at first. Thus, you will first want to select one of the optical drives installed in your computer by clicking the unmount icon (small triangle over a horizontal bar) on the right. Then, select the device to be examined in the drop-down menu (Figure 1).
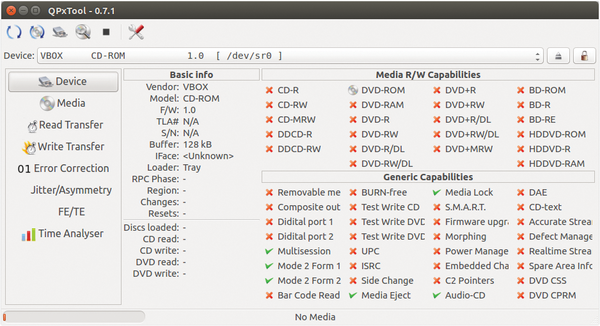 Figure 1: QPxTool shows you all the parameters of the optical drive installed in the computer.
After inserting a disk and selecting the drive, the display changes; the program visualizes the read and write capabilities of the drive as small silver and gold CD icons to the left of each parameter.
It also visualizes the general capabilities of the drive in the lower area of the window with a green check mark to the left of each parameter. The tool gives you basic information about the drive in the Basic info column; clicking on the Media tab provides in-depth details for the inserted medium (Figure 2).
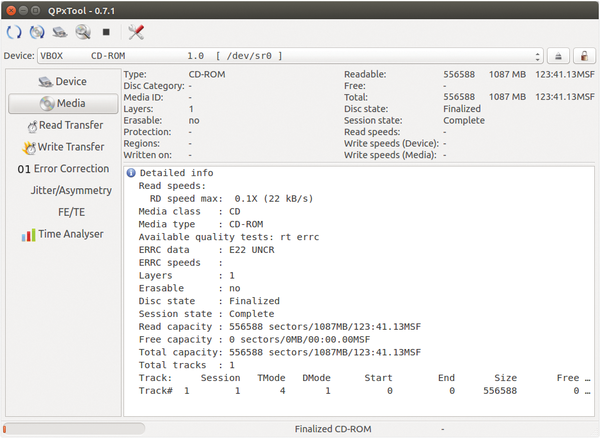 Figure 2: QPxTool gives you all the information you need for inserted media.
Configuration
To test different technical parameters, you are advised to configure the software in detail. You can reach the dialog with the settings either via the button with the stylized tools at top right in the toolbar or via Device | Preferences.
The first task is to go to the Common group to enable different test routines for written and blank optical data carriers. Industrially produced audio CDs and video DVDs are regarded as written. You also specify in this field, whether QPxTool simply logs the test results or logs them on the hard disk (Figure 3).
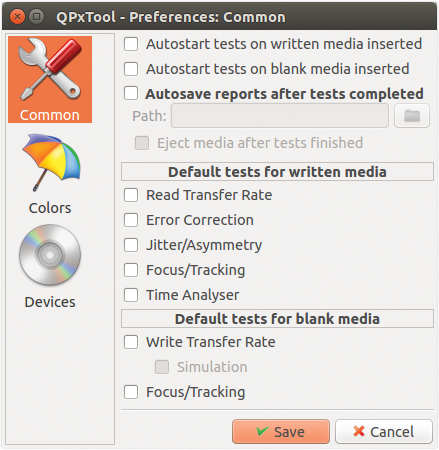 Figure 3: The Preferences options for the software are framed by an easily understood window.
The resulting data is of particular interest if you want to use many different media in the device and thus want to set the optimum parameters for the respective blanks in popular burning programs. After setting the options, click Save bottom right in the window.
In the Colors group, you can define a custom color scheme for the graphics in the test runs, if needed. Finally, you can add the optical drives installed in the computer to the software in the Devices group in this dialog. It supports internal devices, devices connected via a USB interface, and also those that you access as shares on the network.
Test Run
You can start the tests enabled in your settings by selecting Device | Run tests. Before the analysis starts, you can also select whether the test cycle is part of a series. The subsequent test run can take several minutes, depending on the speed of the drive, the size of the device being tested, and the efficiency of the software error correction built into the device.
The program displays the results of the tests as a graph in the main window (Figure 4). In the left column, you can toggle between the different analyses. If you chose to create a log and defined a path, the program saves the test results in this folder in the form of a PDF document, with the current date as part of the name.
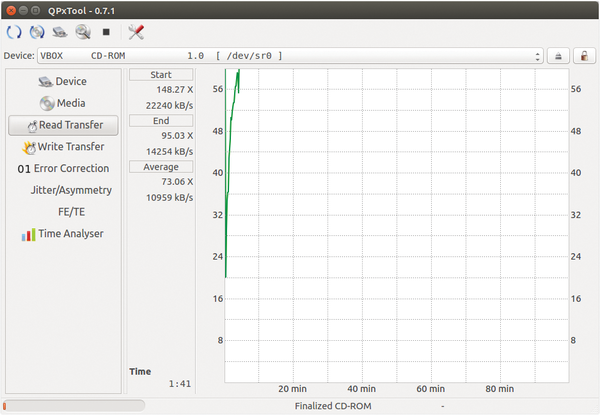 Figure 4: The linear progression of the measured values shows a correctly burned CD.
This function is especially important if you want to verify the integrity of a disk over a longer period of time. The File menu lets you additionally print or export the test reports as a HTML file.
After creating a series of tests with different media, you can select Device | Update media info to ensure that the application re-reads the information after each round. You can thus make sure that technical specifications that are no longer appropriate will not falsify the results.
Buy this article as PDF
(incl. VAT)
Buy Linux Magazine
US / Canada
UK / Australia
Subscribe to our Linux Newsletters
Find Linux and Open Source Jobs
Subscribe to our ADMIN Newsletters
Support Our Work
Linux Magazine content is made possible with support from readers like you. Please consider contributing when you’ve found an article to be beneficial.

News
-
Canonical Releases Ubuntu 24.04
After a brief pause because of the XZ vulnerability, Ubuntu 24.04 is now available for install.
-
Linux Servers Targeted by Akira Ransomware
A group of bad actors who have already extorted $42 million have their sights set on the Linux platform.
-
TUXEDO Computers Unveils Linux Laptop Featuring AMD Ryzen CPU
This latest release is the first laptop to include the new CPU from Ryzen and Linux preinstalled.
-
XZ Gets the All-Clear
The back door xz vulnerability has been officially reverted for Fedora 40 and versions 38 and 39 were never affected.
-
Canonical Collaborates with Qualcomm on New Venture
This new joint effort is geared toward bringing Ubuntu and Ubuntu Core to Qualcomm-powered devices.
-
Kodi 21.0 Open-Source Entertainment Hub Released
After a year of development, the award-winning Kodi cross-platform, media center software is now available with many new additions and improvements.
-
Linux Usage Increases in Two Key Areas
If market share is your thing, you'll be happy to know that Linux is on the rise in two areas that, if they keep climbing, could have serious meaning for Linux's future.
-
Vulnerability Discovered in xz Libraries
An urgent alert for Fedora 40 has been posted and users should pay attention.
-
Canonical Bumps LTS Support to 12 years
If you're worried that your Ubuntu LTS release won't be supported long enough to last, Canonical has a surprise for you in the form of 12 years of security coverage.
-
Fedora 40 Beta Released Soon
With the official release of Fedora 40 coming in April, it's almost time to download the beta and see what's new.