Getting the best performance from solid state drives on Linux

Tuned Up

© Lead Image © Tyler Olson, 123RF.com

© Lead Image © Tyler Olson, 123RF.com

Article from Issue 172/2015
Author(s): , Author(s):

Nothing accelerates a PC like transitioning to an SSD, but some special configuration might be in order if you want to get the most from your drive.

In 2011, the cost for an SSD drive was about EUR2 per gigabyte. SSDs now sell for a fraction of that price. A cheap SSD with 240GB disk space costs approximately EUR90 (or around $100), and, in addition to the cost savings, recent changes have made setting up and handling SSDs much easier.

No other single computer acceleration measure can compare with the benefit of installing an SSD. SSD transfer rates are up to 10 times faster than hard disks (Figure 1). SSDs between 64 and 128GB are normally big enough for personal computers. If you want to purchase a larger SSD, or even a USB SSD, for data storage, you will need to dig deeply into your pocket. However, with the next structural reduction to 12nm, the prices for large SSDs are likely to drop again.

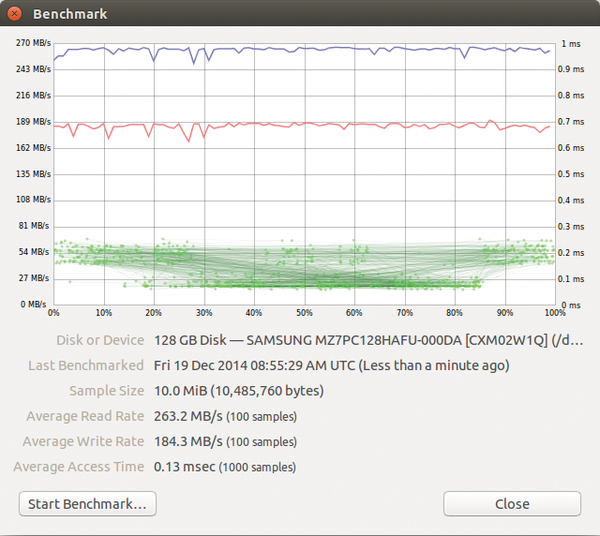
Figure 1: SSDs run significantly faster than conventional hard drives.

This article describes some configuration steps that will help your SSD reach its true potential.

Aligning the Partitions

To achieve maximum speed, it is especially important for SSDs with page sizes of 4096 or 8192 bytes that the partitions are aligned with meaningful boundaries on the disk [1]. If you have conventional partitioning on a HDD, a partition with a sector size of 512 bytes always automatically starts in the 64th sector. However, today many hard disks, and especially SSDs, work with physical sector sizes of 4KB or more.

If you set up a partition that starts in sector 64, then format this partition with a filesystem that uses a block size of 4KB, the 4KB filesystem blocks will not fit in the 4 or 8KB pages of the SSD. When saving a 4KB filesystem block, the memory controller has to write to two sectors (Figure 2). This displacement propagates across the drive and thus significantly slows down the SSD. Tests at IBM showed up to 25 times worse write performance for small files.

Figure 2: Partitions must be oriented on the SSD memory pages for optimal read/write performance. (Courtesy of Thomas-Krenn AG)

In 2011, you had to provide for the correct alignment yourself by passing in values using a tool such as cfdisk. Today, graphic partitioning tools such as GParted perform the alignment automatically. Adjust the start of the first partition to exactly 1MB. Check the SSD partitioning using fdisk or gdisk (Listing 1). The output shows the architecture of the whole disk. In the last line of Listing 1, you can see the start of the partition in sector 2048, which, after calculation, corresponds to 2048 sectors – 512 bytes per (logical) sector or 1,048,576 bytes, which is equal to 1MB – optimal alignment for SSDs.

Listing 1

gdisk Output

$ sudo gdisk -l /dev/sda
GPT fdisk (gdisk) version 0.8.10
Disk /dev/sda: 117231408 sectors, 55.9 GiB
Logical sector size: 512 bytes
Partition table holds up to 128 entries
First usable sector is 34, last usable sector is 117231374
Partitions will be aligned on 2048-sector boundaries
Number  Start (sector)    End (sector)  Size       Code  Name
1       2048              117229567     55.9 GiB   8300  Linux filesystem

TRIM Fit

Conventional hard disks continually overwrite deleted files with new files. Due to their internal structure and the NAND Flash storage medium [2], SSDs use a different method. The NAND chip first needs to selectively delete a file before new data can occupy the space.

The smallest writable unit on an SSD is a page. The memory control unit can read pages individually but groups the pages in blocks of 64 or 128 units when writing.

The smallest erasable unit is thus an "erasable block" with a memory size of 256 or 512KB. If a block contains data you want to erase, you must first copy all the data still in the block to the cache and then erase the block (Figure 3).

Figure 3: Data is written and stored in pages, but the smallest erasable unit is a block. If the drive needs to overwrite old, deleted data that resides on a block with current data, it must copy the block contents to cache (1), erase the block (2), copy the new data to cache (3), then write the new contents to the block (4). The effect of this complex process is that the new data simply replaces the deleted data in the block (5).

This need to copy and move data during a write operation leads to an effect known as write amplification [3], in which the total amount of data written is more than the logical amount the user intended to write (Figure 4). Two mechanisms work hand in hand when deleting data: on the drive side, the garbage collector, and at filesystem level, the TRIM mechanism [4]. These mechanisms support the writing process by helping select data to be deleted and releasing the space for reuse.

Figure 4: Write amplification causes unnecessary disk activity and wears down the drive [3]. (CC BY-SA 3.0)

As of kernel 2.6.33, Linux also has a TRIM command. The TRIM command tells the SSD controller which blocks it can skip from the operating system's point of view. The contents are thus no longer replicated, which accelerates write access to the drive and also enhances the lifetime of the storage medium. The memory controller tries to spread writes as evenly as possible over the SSD storage area. Wear leveling [5] ensures that the memory blocks are evenly worn, thus ensuring a longer service life for the disk.

The operating system must inform the filesystem how and when to issue TRIM commands. If the Logical Volume Manager (LVM) manages the filesystem, and if the system also encrypts with LUKS/Dm-crypt, TRIM must act on all three levels. For the encryption level, the /etc/crypttab file should contain the discard option (Listing 2).

Listing 2

crypttab

# <target name>  <source device>    <key file>  <options>
  sda1_crypt     /dev/sda1          none        luks,discard

Arm the TRIM function in the LVM configuration by activating trimming in the Devices section of the /etc/lvm/lvm.conf file with the issue_discards = 1 entry. Two techniques for trimming are online discard and batched discard (described in the next section). For online discard, add the discard mount option for the device in the /etc/fstab file (Listing 3).

Listing 3

fstab

UUID=uuid_number  /  ext4  defaults,noatime,discard,errors=remount-ro  0  1A

The noatime mount option is also important. Linux typically records the last file access time. This additional step of recording the access time means each read also leads to a write. This procedure is anything but beneficial for the SSD's service life. Therefore, you should specify the noatime mount option to avoid logging the access time. Alternatively, use the relatime option to only save the access time if the last access time was before the last file modification time.

Another mount method, lazytime [6], is planned for the next development branch (3.19) of the Linux kernel. The lazytime technique will store access times in RAM and therefore make this step of disabling logging unnecessary.

Discard: Online or Batched?

The discard mount option in /etc/fstab triggers the TRIM command each time you delete a file, and thus also triggers a copy and delete process on the SSD. This online discard process takes time and causes many writes that reduce the service life of the SSD, especially for motherboards with SATA chips prior to revision 3.1 and SSDs that do not support queued TRIM, which was introduced with kernel 3.12 [7].

Batched discard lets you decide when to physically remove files marked with the delete flag. In this case, you'll need the fstrim command from the util-linux package (Listing 4). The -v option stands for "verbose" and ensures that the trimmed data set is output. If you want to test fstrim and have used discard up to now, remove the discard option from the configuration file, restart the computer, and delete some files.

Listing 4

fstrim Command

$ sudo fstrim -v /
/: 6,3 GiB (6764573482 bytes) trimmed
$ sudo fstrim -v /home
/home: 1,1 GiB (1155702784 bytes) trimmed

Trimming always triggers write actions, so do not run the command too often. Best of all, use a cronjob to schedule the trim. Canonical has already automated the process with Ubuntu 14.10 and performs a weekly TRIM, provided the appropriate script /etc/cron.weekly/fstrim discovers an SSD on the system.

Listing 5 evaluates the kernel function discard_max_bytes. If this function returns a zero value, the tested storage medium is not an SSD; otherwise, the script executes the fstrim command.

Listing 5

fstrim Script

#!/bin/sh
for fs in $(lsblk -o MOUNTPOINT,DISC-MAX,FSTYPE | grep -E '^/.* [1-9]+.* ' | awk '{print $1}'); do fstrim "$fs"; done

If you want to run discard automatically on a daily or weekly basis, create a corresponding cronjob. If your computer does not run continuously, you are best off using Anacron: If the computer is not switched on at the scheduled time, the job will complete once the system reboots.

Using batched discard offers other advantages. If you use LVM or LUKS on the system and discard is not configured correctly, the call to the fstrim command returns an error. The corresponding mount option in the fstab file, on the other hand, tacitly accepts this configuration, which is why the hard disk will fill up. An accidentally deleted file can be restored using the appropriate tools, as long as the TRIM script has not been executed. If you use discard as a mount option in fstab, however, deleted files are irretrievably lost.

If your swap space is on the SSD along with the data partitions, you need to ensure correct trimming for swap. However, online discard can also cause performance degradation for swap partitions. In kernels later than 2.6.36, TRIM is therefore optional for swap partitions. You need to enable it manually using the swapon --discard option or via the fstab file and the discard mount option. This option always executes a discard when you mount the swap space, which should be quite sufficient for normal computers that only need to swap out memory from time to time.

Buy this article as PDF

Express-Checkout as PDF
Price $2.95
(incl. VAT)

Buy Linux Magazine

SINGLE ISSUES
 
SUBSCRIPTIONS
 
TABLET & SMARTPHONE APPS
Get it on Google Play

US / Canada

Get it on Google Play

UK / Australia

Related content

  • SSD tuning

    Solid state drives make everything run faster and more smoothly, but you can squeeze out even more performance with some practical optimization steps.

  • Parted Magic

    It's really annoying when a disk suddenly dies on you or a typo in a command deletes important data. The free Parted Magic Live distro offers help.

  • Choose a Filesystem

    Every Linux computer needs a filesystem, and users often choose a filesystem by habit or by default. But, if you're seeking stability, versatility, or a small performance advantage, it pays to take a closer look.

  • Ask Klaus!

    New fdisk behavior, booting Knoppix from USB, and using PHP mail() in Apache.

  • Migrating to an SSD

    Replacing your hard drive with an SSD is a sure way to speed up your system; however, migrating to an SSD is a little more complicated than you might imagine. We'll help you find your way through the pitfalls.

comments powered by Disqus
Subscribe to our Linux Newsletters
Find Linux and Open Source Jobs
Subscribe to our ADMIN Newsletters

Support Our Work

Linux Magazine content is made possible with support from readers like you. Please consider contributing when you’ve found an article to be beneficial.

Learn More

News