
Visualize time sequences with Timeline
On the Timeline

Timeline manages and visualizes time sequences in a simple and intuitive way.
Many good mysteries use a graphical representation of time, known as a timeline, to reconstruct the background of a crime. Even if you do not intend to start a career as a detective, however, a tool for visualizing time sequences can still be very useful.
The Python program Timeline [1] is a tool that lets you create, use, and modify timelines. A timeline essentially consists of a horizontal bar that symbolizes the passage of time in the direction of reading. On the bar, you can mark points in time, with time periods labeled on the horizontal axis.
Setting Up Timeline
Many distributions already have Timeline in their repositories, so you can install the program conveniently using the respective package managers. Alternatively, you can download the source code from SourceForge and follow the developers's instructions [2].
Timeline is pretty plain when it first launches. The only option it gives you is a Tutorial, which also comes in the form of a timeline (Figure 1). The structure of the Timeline window is simple: The timeline runs from left to right in the middle of the window. Above this line, you can insert single "Point Events" or timestamps. Below the timeline, you can set "Periods" – special event variants.
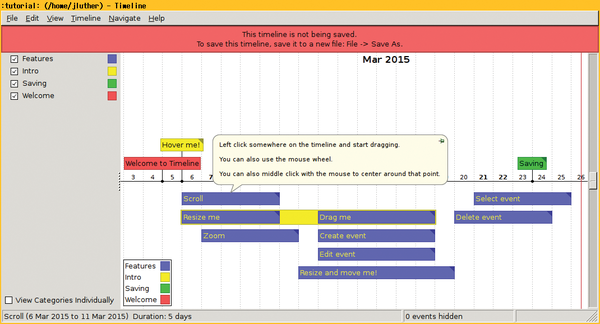 Figure 1: Timeline starts with a tutorial – in the form of a timeline, of course.
The rest of the tool's feature set is used primarily for organizing things or is purely cosmetic. Events can be divided into categories and even nested. Timeline shows these categories both on the left margin and – as a kind of legend – in the main window. The checkboxes on the left let you switch the individual categories on and off, which can improve the clarity of a complex timeline because the entries disappear from the window when you uncheck a category.
That basically sums up the key elements of Timeline. Because the program always marks the current time with a thin red line, you can use Timeline as a diary; it even has an integrated alarm function.
Currently, Timeline only works with the Gregorian calendar. In the future, the developers plan to support other time systems. Even relative times (e.g., 5 days later) and several nested timelines are on the agenda but are not yet implemented.
Ease of Use
Timeline is developed with intuitiveness as an essential design criterion. This is evident not only in the components of the timelines, which have been carefully reduced to the essential, but also in many other places. For example, basic use of Timeline has been made very simple: Grab the timeline with the mouse and move it as needed. While holding down the Ctrl key, you can adjust the horizontal unit continuously with the mouse wheel.
While holding down the Shift key, you can also move the display vertically, thereby achieving more clarity for more extensive timelines if many periods need to share space at the bottom. Double-clicking any event opens it for further processing. Once you've created a timeline, Timeline takes care of automatically saving it whenever you make changes to the entries.
Everything Is an Event
Events act as the central structural element for timelines. You can create, move, or otherwise adjust events and assign them to categories. Currently, timeline supports two different events: simple points in time and time periods defined by two points.
To create an event, you just double-click on the desired time somewhere near the time line. Timeline then opens the Create Event dialog (Figure 2). In the editor, you can create events or modify existing entries. You set the time of the event in detail with When. The button with the calendar sheet icon takes you to a small calendar in which you can select dates simply by clicking on them.
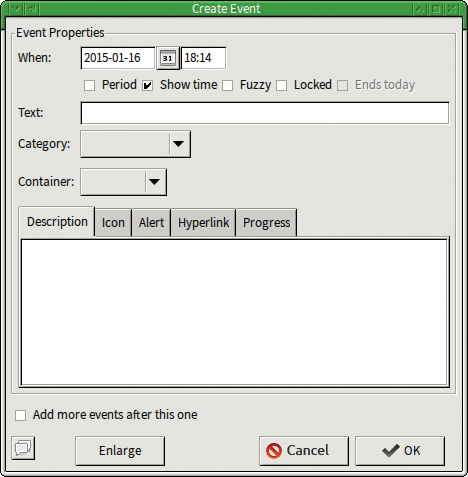 Figure 2: The Create Event editor creates and modifies events as time points by default.
The following row of checkboxes is of central importance: This is where you define the type of event. To specify periods of time instead of simple points in time, check Period. Timeline then requests the endpoint for the period in an extended dialog. To enter times for an event, check Show time. Sometimes, however, the precise start or end of an event remains unclear (e.g., morning …). In this case, you check Fuzzy to define a special form of the event, which Timeline then marks with pointed ends in the view.
Locked lets you create events that you cannot move retroactively. Again, Timeline has a special way of highlighting this: The event starts and ends with an empty circle. Finally, the Ends today option automatically sets the end time of an event to the current date and optionally to the current time.
In the mandatory Text field, you need to enter a short and intuitive name for the event – ideally only one keyword. Timeline always shows the entry for this field in the timeline. For a more detailed description, you then use the larger text box in the Description tab. Timeline only shows its content when you hover over an event; these entries thus do not normally use up any additional space in the timeline. For longer texts in the Description, empty lines create paragraphs.
The Category is the primary way of organizing your events. A click on the button pops up a list of all existing categories, which also contains two entries for creating new categories or modify existing ones. Timeline displays events assigned to categories in the category-specific color, which the program explains in a legend. You can thus use categories to group organizationally related events (Figure 3).
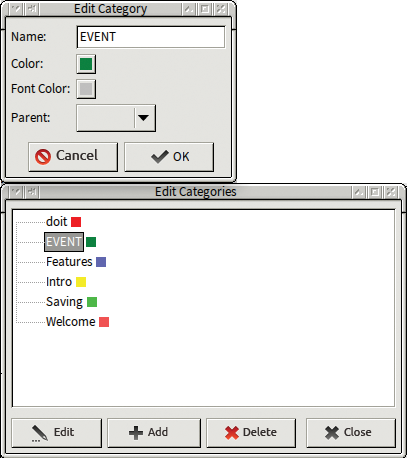 Figure 3: Categories structure events. In a separate dialog, you can create, modify, and assign colors to categories. Parent even lets you nest categories.
Warning: When you delete a category, you make "zombies" of any events in this category; the corresponding time points are grayed in the timeline. They remain unchanged, however, so that you can assign them a new category later on.
The Container structure provides a second option for grouping events in Timeline. This works like categories but is independent of them. A container can contain events from different categories. The special thing about containers is that Timeline always manages the events it contains as a unit; that is, it moves them in a single step. Thus, whereas categories reflect logical similarities, containers are designed for organizational similarities.
The largest field in the Create Event dialog is the Description. As already mentioned, this is where you add a more complex and comprehensive description of the event. Below Icon, you can specify an image that Timeline displays when you hover pointer over the event.
The Alert dialog provides an alarm clock function; Timeline then alerts you when you reach an event deadline. First, set the wake-up time (Figure 4). When you reach this point in time, Timeline shows you a window with the agreed message – provided that the program is actually running at the time.
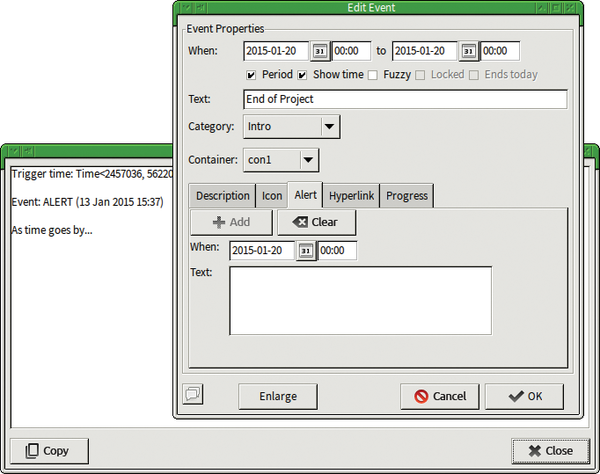 Figure 4: The Alert tab contains the settings for the integrated alarm clock. You can enter the associated text in the Text box.
URLs that you specify in the Hyperlink tab can be accessed in the timeline from the context menu of the associated event. The program then opens the links in your system default web browser.
In the Progress tab, you can manually set the extent to which the workflow of a project is defined by a point in time or a period has advanced. Timeline then indicates this as a progress bar in the event markers.
Buy this article as PDF
(incl. VAT)
Buy Linux Magazine
US / Canada
UK / Australia
Subscribe to our Linux Newsletters
Find Linux and Open Source Jobs
Subscribe to our ADMIN Newsletters
Support Our Work
Linux Magazine content is made possible with support from readers like you. Please consider contributing when you’ve found an article to be beneficial.

News
-
So Long Neofetch and Thanks for the Info
Today is a day that every Linux user who enjoys bragging about their system(s) will mourn, as Neofetch has come to an end.
-
Ubuntu 24.04 Comes with a “Flaw"
If you're thinking you might want to upgrade from your current Ubuntu release to the latest, there's something you might want to consider before doing so.
-
Canonical Releases Ubuntu 24.04
After a brief pause because of the XZ vulnerability, Ubuntu 24.04 is now available for install.
-
Linux Servers Targeted by Akira Ransomware
A group of bad actors who have already extorted $42 million have their sights set on the Linux platform.
-
TUXEDO Computers Unveils Linux Laptop Featuring AMD Ryzen CPU
This latest release is the first laptop to include the new CPU from Ryzen and Linux preinstalled.
-
XZ Gets the All-Clear
The back door xz vulnerability has been officially reverted for Fedora 40 and versions 38 and 39 were never affected.
-
Canonical Collaborates with Qualcomm on New Venture
This new joint effort is geared toward bringing Ubuntu and Ubuntu Core to Qualcomm-powered devices.
-
Kodi 21.0 Open-Source Entertainment Hub Released
After a year of development, the award-winning Kodi cross-platform, media center software is now available with many new additions and improvements.
-
Linux Usage Increases in Two Key Areas
If market share is your thing, you'll be happy to know that Linux is on the rise in two areas that, if they keep climbing, could have serious meaning for Linux's future.
-
Vulnerability Discovered in xz Libraries
An urgent alert for Fedora 40 has been posted and users should pay attention.