
Animate drawings with Pencil2D
Tutorial – Pencil2D
Pencil2D, an easy-to-use painting and 2D animation program, lets you create small animations quickly. Despite the simple user interface, you might need a little help getting started.
If you want a hand-drawn ball to drop elegantly from the ceiling in a YouTube video, Pencil2D [1] is the program for you. Thanks to this drawing program, artists can do more than just paint pretty comic figures, balls, or other objects on virtual paper; they can also animate these objects. If required, the tool imports bitmap images or photos for use as backgrounds.
Pencil2D is primarily intended for cartoon artists, but the software also lets you quickly create animated illustrations or diagrams. All you have to do is add a little of your own artistic talent. An impressive YouTube video [2] shows what professional animators have created with Pencil2D. The program is licensed under the GPLv2; the source code is available from GitHub [3].
Some distributions have Pencil2D in their repositories. Arch Linux users will find the tool in the pencil2d package in the Arch Users Repository (AUR). On current Fedora systems, you can fetch and install the package by typing:
sudo dnf install Pencil2D
Debian and Ubuntu users install the pencil2d package at the command line with:
sudo apt install pencil2d
If the animation program is missing from your distribution's software manager, or if you only find an older version stored there, you can use a Flatpak or AppImage package – most current distributions now support both formats. Pencil2D's Flatpak package is available from the Flathub repository. To retrieve and install it from Flathub, use the first two commands in Listing 1; the third command starts the animation program.
Listing 1
Installing the Pencil2D Flatpak
$ flatpak remote-add --if-not-exists flathub https://flathub.org/repo/flathub.flatpakrepo
$ flatpak install flathub org.pencil2d.Pencil2D
$ flatpak run org.pencil2d.Pencil2D
The AppImage is available directly on the Pencil2D website [1]. Click on Download, and then select the Current Stable Version. Below the penguin icon, select the version that matches your distribution. Then make the downloaded file executable (Listing 2) and launch it.
Listing 2
Installing the Pencil2D AppImage
chmod +x pencil2d-linux-amd64-<Version>.AppImage
Start Drawing
When launched, Pencil2D opens the main window shown in Figure 1. In the center, you can see the empty drawing area. In the top left corner, you'll find the drawing tools. The pencil draws thin lines; the brush makes thicker lines.
 Figure 1: On the left below Options, you will find additional settings for the selected tool (e.g., a brush's stroke width).
If you need a straight line, select the Polyline tool, the button that resembles an "M" (Figure 2). The first mouse click defines the starting point; clicking again adds a section. Double-click to end the drawing process. The eraser does pretty much what you would expect; the index finger smudges the area under the mouse pointer when you press the mouse button. The garbage can clears the complete drawing area without prompting.
 Figure 2: You do not need to navigate the menus to enable the painting and editing tools – all you have to do is press a shortcut key.
When painting, a grid can be placed over the drawing area using View | Raster. You determine the size of the individual boxes under Edit | Preferences | General | Grid section. To zoom in or out of the drawing, use the mouse wheel, or hold down Ctrl while pressing the up or down arrow key.
In the Color Box window, you can define the drawing color (Figure 3). First select the base color from the wheel and then choose the brightness from the inner square. Alternatively, click RGB and use the sliders to mix the three basic colors (red, green, and blue). To avoid having to define a color time and time again, you can add the color by pressing the plus symbol next to the Color Palette. Pencil2D automatically gives the color a name, which you can change by double-clicking on it. You can then select a color from the palette with a single click.
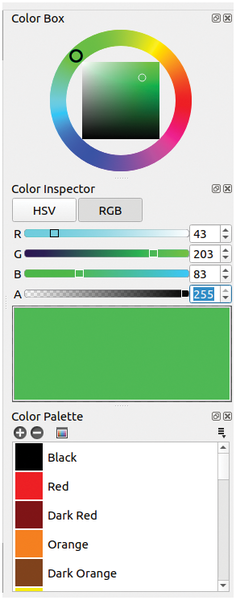 Figure 3: The A slider defines transparency. Translucent objects are especially important when using layers.
Moving Images
Using the timeline at the bottom, you can breathe life into your drawing. Pencil2D relies on the flip-book principle. An animation consists of a sequence of individual images that the tool somewhat inconsistently also refers to as keys. The following example of a ball dropping demonstrates how quickly an animation can be created in Pencil2D in this way.
First draw a circle at the top of the drawing area. We now want the ball to slowly drop. To do this, create a new frame by selecting Animation | Add Frame or by pressing the F7 key. You will now see a new empty drawing area, while the vertical red mark moves one position to the right in the timeline.
Using the . and , keys allows you to jump back and forth between the existing images. In the top line of the timeline, Pencil2D numbers the images consecutively. If you click on a number there, you are taken directly to the matching single screen. The Zoom slider lets you expand the timeline's width on screen and thus simplify navigation. In any case, the red bar marks the image you are currently viewing and editing in the drawing area. Make sure Pencil2D displays the second frame you just created and the new empty drawing area.
Onion Skin
To drop the ball, draw another circle slightly below the first one. This is not so easy since you can't see the ball from the first picture. To change this, you can press O, go to View | Onion skin | Previous, or click on the second button from the right in the top line under Display (see Figure 4).
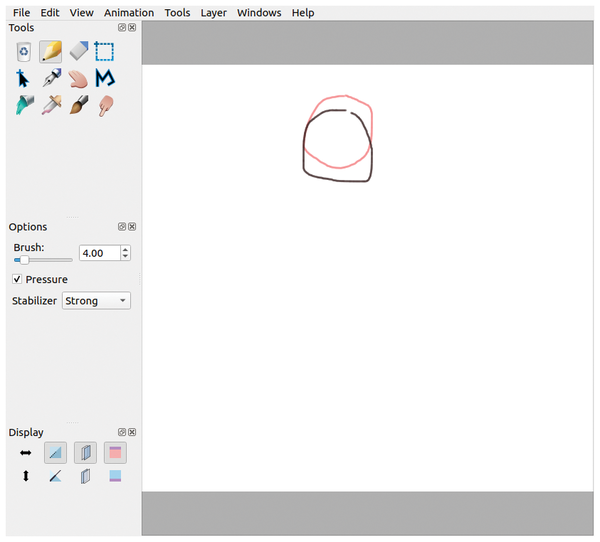 Figure 4: You can see two frames, which Pencil2D will play back one after the other. The black circle resides in the second frame; the circle in the first frame is bright red.
Now, the first image appears, colored light gray, in the drawing area. Pencil2D refers to this image as the onion skin. To make it more obvious that this is the ball from the previous image, you can color it red by clicking on the icon with the red box under Display. Now draw a new ball slightly below, which is colored black, as shown in Figure 4.
Repeat this procedure until the ball arrives at the bottom of the drawing area. To make your work easier, click on the Select tool (with the dashed rectangle) and draw a frame around the ball. You can grab the selection using the handles at the corners.
Select Edit | Copy to create a new frame. The selection rectangle should appear automatically. Move the mouse pointer into the rectangle until it turns into a circle. Now move the box a little to the right using drag and drop. Then use Edit | Paste to insert the copied circle at exactly the position shown in Figure 5. You can unselect by clicking anywhere on the drawing area.
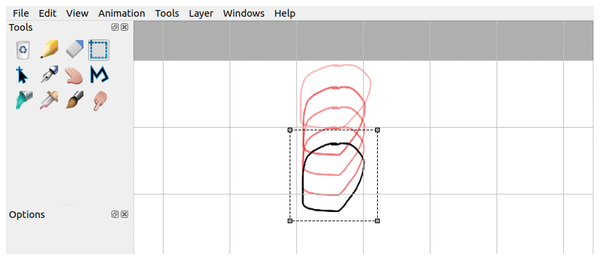 Figure 5: The Select tool helps you copy and move objects across multiple frames.
When fine-tuning more complex animations, you will often need a preview of the following image. To do this, simply click on the second symbol from the right in the bottom line on the left side under Display. The following images are now displayed as grey shadows. To help distinguish them, you can color them light blue, as shown in Figure 6, by clicking on the blue square icon under Display.
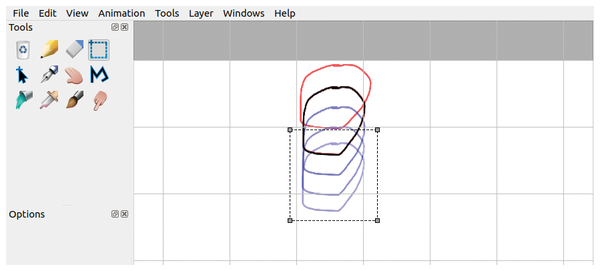 Figure 6: This figure shows a single frame selected from the middle of the animation. The previous circle is bright red, the current circle is black, and the three following circles are light blue. This makes it easy to follow the animation process.
Buy this article as PDF
(incl. VAT)
Buy Linux Magazine
US / Canada
UK / Australia
Subscribe to our Linux Newsletters
Find Linux and Open Source Jobs
Subscribe to our ADMIN Newsletters
Support Our Work
Linux Magazine content is made possible with support from readers like you. Please consider contributing when you’ve found an article to be beneficial.

News
-
So Long Neofetch and Thanks for the Info
Today is a day that every Linux user who enjoys bragging about their system(s) will mourn, as Neofetch has come to an end.
-
Ubuntu 24.04 Comes with a “Flaw"
If you're thinking you might want to upgrade from your current Ubuntu release to the latest, there's something you might want to consider before doing so.
-
Canonical Releases Ubuntu 24.04
After a brief pause because of the XZ vulnerability, Ubuntu 24.04 is now available for install.
-
Linux Servers Targeted by Akira Ransomware
A group of bad actors who have already extorted $42 million have their sights set on the Linux platform.
-
TUXEDO Computers Unveils Linux Laptop Featuring AMD Ryzen CPU
This latest release is the first laptop to include the new CPU from Ryzen and Linux preinstalled.
-
XZ Gets the All-Clear
The back door xz vulnerability has been officially reverted for Fedora 40 and versions 38 and 39 were never affected.
-
Canonical Collaborates with Qualcomm on New Venture
This new joint effort is geared toward bringing Ubuntu and Ubuntu Core to Qualcomm-powered devices.
-
Kodi 21.0 Open-Source Entertainment Hub Released
After a year of development, the award-winning Kodi cross-platform, media center software is now available with many new additions and improvements.
-
Linux Usage Increases in Two Key Areas
If market share is your thing, you'll be happy to know that Linux is on the rise in two areas that, if they keep climbing, could have serious meaning for Linux's future.
-
Vulnerability Discovered in xz Libraries
An urgent alert for Fedora 40 has been posted and users should pay attention.