Water your plants with a Raspberry Pi

Watering Pi

© Lead Image © agor2012, 123RF.com

© Lead Image © agor2012, 123RF.com

Article from Issue 267/2023
Author(s):

With a Pi Zero and a few components, you can build an inexpensive and reliable automatic watering system for your plants in next to no time.

Whether in an apartment, on a balcony, in a greenhouse, or in a garden, if you are not at home and want to water your plants remotely, an automated system is your only option. In this article, I show you how to harness the power of a Raspberry Pi Zero as a reliable helper to manage the watering system.

Design

Automatic irrigation is nothing new. These systems not only exist on a large scale in agriculture and horticulture but have also been available for many years for domestic use. Some providers attach their systems directly to the water supply. In this project, I'll instead draw water from a 200-liter tank reservoir with a supply that will last for a couple of dry days (Figure 1). The advantage of a tank is that you do not have to deal with a pressure line and you do not lose an uncontrolled amount of water in the event of an accident. The aim is to create a robust solution that you can tailor entirely to your own needs, thanks to the flexibility of the Raspberry Pi and your own hardware and software.

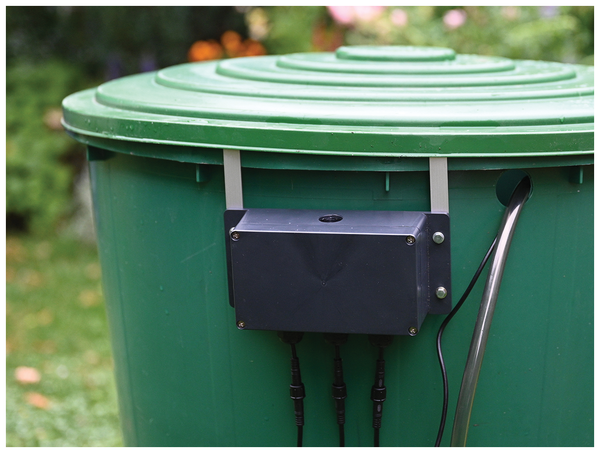
Figure 1: The control unit and supply line assembled on the 200-liter storage tank.

The storage tank for just a room can be much smaller; in fact, a water bucket is all you need, with a submersible pump and a riser to deliver the irrigation water. Two pipes supply water to plants through a branch distributor. The whole thing can be controlled on demand by solenoid valves. The project design also uses two moisture sensors to check that the water reaches the plants. (See the "Parts List" box.)

Parts List

  • Raspberry Pi Zero W (model 1 or 2)
  • Centrifugal pump with 1.2m head
  • Solenoid valves (x2)
  • Relay modules (x3)
  • ADC (ADS1115, or similar)
  • Moisture sensors (x2)
  • Plugin power supply (5V)
  • Housing, wiring
  • Various hoses and clamps
  • Adapters, control valves, ground spikes

Getting Started

To get the Raspberry Pi up and running, it's a good idea to download a new Pi OS image in the usual way and transfer it to a microSD card. With the screen and keyboard plugged in, the boot options and network settings can be configured. A desktop environment is not needed, which is why I went for automated login from the CLI with SSH enabled. All further settings can then be configured in a terminal window from a computer on the same network. The Raspberry Pi needs a hostname that reminds you of the task in hand (e.g., watering in this case). The next step is to create a separate folder for the project files in your home directory.

Structure

The main electronics of the control system will live in a ready-made housing with a rubber seal in the lid and a terminal strip, on which all the external wires will be patched (Figure 2). Two small support plates are bolted on inside to fasten all the modules securely.

Figure 2: Installing the hardware in the waterproof housing of the control unit.

The housing for the control unit holds the Raspberry Pi, an analog-to-digital converter (ADC) module, and three relays. The external power supply, connections for two soil moisture sensors, two solenoid valves, and the pump are routed in from below with three four-core lines. At the top, where I sealed the unused screw hole with transparent material, an LED indicates operational readiness.

The Raspberry Pi needs a total of four GPIO pins for the control PINs on the relay boards and the signal LED; the ADC is connected over the I2C bus. The internal terminal strip routes the converter's analog inputs with the humidity sensors and the switching outputs of the relays for the pump and solenoid valves to the outside. The schematic (Figure 3) and associated program files are on the GitHub page for the project [1] [2].

Figure 3: Project schematic.

Now it's time to connect the external hardware, pump, and solenoid valves to the hose material (Figure 4). Because no suitable distributor was available downstream of the pump, I soldered one myself from brass. The two control valves allow for a two-way system that can supply two groups of plants with different water needs.

Figure 4: Shorter paths: the simple connection layout for the water supply.

Thanks to the valves, the two main lines can also be reliably blocked against the reservoir being evacuated in idle condition. Distribution downstream can be done with a smaller hose diameter; T-pieces are used for more branches. Small regulators ensure that water reaches all the plant locations evenly; setting them up requires some trial and error. For an initial test, I first extended the connection on the centrifugal pump to allow immersion.

If everything works satisfactorily, you can then proceed to trim hoses and cables to the required lengths, route them correctly, and fasten them with ground spikes. Hose clamps around the thicker hoses reliably prevent them slipping off the connections while you are away.

Buy this article as PDF

Express-Checkout as PDF
Price $2.95
(incl. VAT)

Buy Linux Magazine

SINGLE ISSUES
 
SUBSCRIPTIONS
 
TABLET & SMARTPHONE APPS
Get it on Google Play

US / Canada

Get it on Google Play

UK / Australia

Related content

  • Charly's Column: PomodoPi

    Charly starts the tomato and dill season aboveground with a traffic light and underground with a soaker hose, along with assistance from two gardeners and the ubiquitous Raspberry Pi board.

  • Automated Irrigation

    An automated watering system comprising a Raspberry Pi Zero W, an analog-to-digital converter, and an inexpensive irrigation kit can help keep your potted plants from dying of thirst.

  • Perl: Linux-based Gardening

    In this month’s Perl column, we will introduce a system to water your plants while you are away from home. With a little help from Perl, a friendly, Linux-based irrigation system waters your plants twice a day.

  • Charly's Column – Mi Flora

    Columnist Charly Kühnast recently attached Mi Flora humidity sensors to his potted plants. At first, they only transmitted junk on Bluetooth, but armed with the right tools and a Rasp Pi, Charly now reaps a rich harvest of data.

  • The sys admin's daily grind – Yowsup

    Sys admin Charly likes to keep up with the state of his domestic strawberry plants, so he has outsmarted WhatsApp to allow status messages to be sent through the service from a PC or Raspberry Pi.

comments powered by Disqus
Subscribe to our Linux Newsletters
Find Linux and Open Source Jobs
Subscribe to our ADMIN Newsletters

Support Our Work

Linux Magazine content is made possible with support from readers like you. Please consider contributing when you’ve found an article to be beneficial.

Learn More

News