
Access Your Apps and Docs Remotely with FreeNX

Productivity Sauce
The ability to control your primary machine remotely can come in rather handy when you need to access your documents and applications using your netbook or laptop. While you might be tempted to go with a solution based on the popular VNC protocol, you should keep in mind that it has two serious limitations: it's both insecure and slow. A much better solution is to use the FreeNX server and an NX client, which offers a secure connection that works well even with a slow modem link -- a boon for users on the move.
The first order of business is to install the FreeNX server software on your primary machine. To do this on Ubuntu, you have to add the FreeNX Team PPA repository to the sources.list file. Open the file for editing using the sudo nano /etc/apt/sources.list command and add the following lines to it:
deb http://ppa.launchpad.net/freenx-team/ubuntu VERSION main
deb-src http://ppa.launchpad.net/freenx-team/ubuntu VERSION main
Replace the VERSION string with the actual Ubuntu version installed on your machine (e.g., "jaunty" for Ubuntu 9.04). Save the modifications and close the file. Next, add the public key of FreeNX PPA using the following command:
sudo apt-key adv --recv-keys --keyserver keyserver.ubuntu.com 2a8e3034d018a4ce
Update the repository info and install the FreeNX server:
sudo apt-get update && sudo apt-get install freenx
Run then the nxsetup utility to install and configure the server:
sudo /usr/lib/nx/nxsetup --install
The setup procedure automatically starts the FreeNX server, but you can always stop and start the server manually using the following commands:
sudo /etc/init.d/freenx-server stop
sudo /etc/init.d/freenx-server start
Once the server is up and running, it's time to install NX client software on your netbook or laptop. To do this, use the sudo apt-get install qtnx command which installs the QtNX NX client.
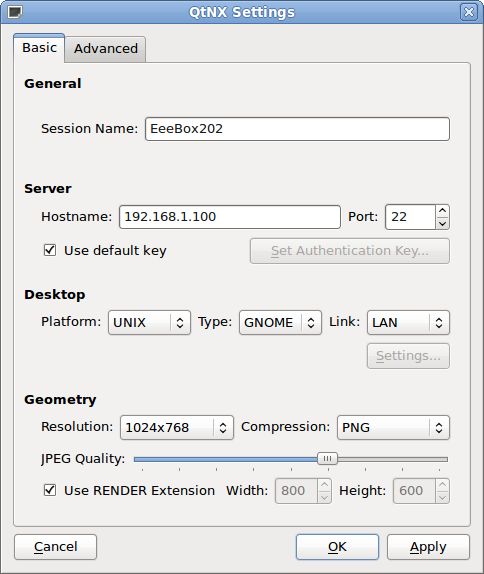
Launch QtNX, and select Create new session from the Session drop-down list to set up a new session. Most of the fields in the configuration window are self-explanatory, so you shouldn't have any problems configuring the session. Press OK when you are done, enter your user name and password of the user account on the remote host, hit the Connect button, and you should see the remote desktop in all its beauty.
Comments
comments powered by DisqusSubscribe to our Linux Newsletters
Find Linux and Open Source Jobs
Subscribe to our ADMIN Newsletters
Support Our Work
Linux Magazine content is made possible with support from readers like you. Please consider contributing when you’ve found an article to be beneficial.

News
-
Container-Based Fedora Hummingbird Designed for Agent-First Builders
Fedora Hummingbird brings the same approach to the host OS as it does to containers to level up security.
-
Linux kernel Developers Considering a Kill Switch
With the rise of Linux vulnerabilities, the kernel developers are now considering adding a component that could help temporarily mitigate against them… in the form of a kill switch.
-
Fedora 44 Now Gaming Ready
The latest version of Fedora has been released with gaming support.
-
Manjaro 26.1 Preview Unveils New Features
The latest Manjaro 26.1 preview has been released with new desktop versions, a new kernel, and more.
-
Microsoft Issues Warning About Linux Vulnerability
The company behind Windows has released information about a flaw that affects millions of Linux systems.
-
Is AI Coming to Your Ubuntu Desktop?
According to the VP of Engineering at Canonical, AI could soon be added to the Ubuntu desktop distribution.
-
Framework Laptop 13 Pro Competes with the Best
Framework has released what might be considered the MacBook of Linux devices.
-
The Latest CachyOS Features Supercharged Kernel
The latest release of CachyOS brings with it an enhanced version of the latest Linux kernel.
-
Kernel 7.0 Is a Bit More Rusty
Linux kernel 7.0 has been released for general availability, with Rust finally getting its due.
-
France Says "Au Revoir" to Microsoft
In a move that should surprise no one, France announced plans to reduce its reliance on US technology, and Microsoft Windows is the first to get the boot.
Printing support