
ADC Breakout
Use an analog sensor as a video game controller
ByWe put our Analog-to-Digital converter to work reading positions from an analog sensor (a potentiometer) and control a bat in a simple implementation of the classic Breakout game.
Below is the Break Out! video associated with this article.
In the previous issue [1] we explored how to read from an analog sensor to a Raspberry Pi. Unlike an Arduino, the Pi does not have any analog input GPIOs. This means you need something between your potentiometers, temperature sensors and light detectors that will translate their analog voltage signal to a digital output the Pi can work with.
You could of course do the sensible thing – buy a Grove or Adafruit ADC module for 12, 15 dollars and work with that; or you can go old school and buy the bare bones MCP3202 analog to digital converter chip (Figure 1) for a buck.
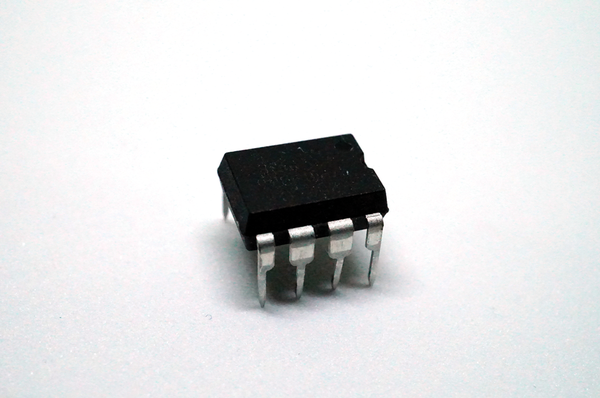 Figure 1: The unassuming MCP3202 analog to digital converter.
That is exactly what we did last time around. As it turned out, programming an ADC is not that hard, but, although we got to see how it worked, we didn't follow through by integrating it into an application.
Last time I suggested turning your potentiometer/ADC combo into a basic controller to play Pong. But to play Pong you need a friend, and friends can be annoying. Instead, I made something much better, a game that pits human against machine.
I made Breakout.
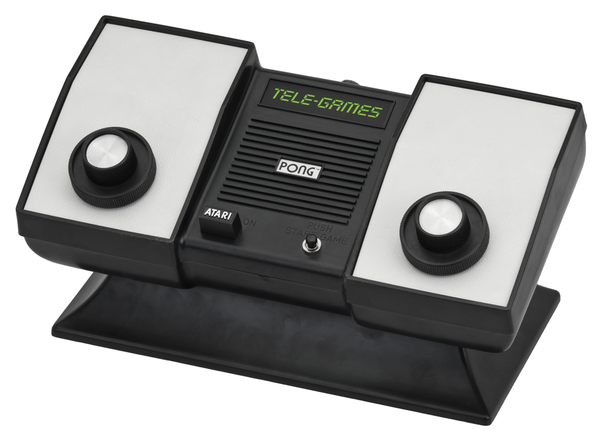 Figure 2: Two glorified potentiometers on either side of an antique game console. In 1977 such things were considered cool. Photo by Evan Amos for Wikipedia. Licensed under the CC BY-SA 3.0.
Dial the Library
The nice thing about Python is that it is easy to turn a script into a library (or module as they are known in Python). It is also very simple to test libraries.
Take what you can see in Listing 1. It is a variation of the adc.py program we saw in our last issue [1]. All we have done is packaged the functions within a Python class, which allows you to import discrete chunks of code within a bigger program, for instance with:
from dial import dial
Listing 1: dial.py
import spidev
class dial: def __init__(self, device=0, channel=0): self.conn = spidev.SpiDev(device, channel)
def bitstring(self, n): s = bin(n)[2:] return '0'*(8-len(s)) + s
def get(self): reply_bytes = self.conn.xfer2([128, 0]) reply_bitstring = ".join(self.bitstring(n) for n in reply_bytes) return int(reply_bitstring, 2)/2047.0"
if __name__ == '__main__': dial=dial() print dial.get()
In plain English, this means "From the file dial(.py), import the dial class".
The __main__ function (lines 16 to 18) has also been slightly modified from what it looked like in adc.py to compensate for the fact the functions are now modules in a class. The __main__ function exists so you can also test the module is working before you integrate it into your program. Try it out now.
Before continuing, make sure you have the spidev module installed in your Python environment:
sudo pip install spidev --upgrade
Make sure you also have configured your Pi to load SPI drivers for your GPIO pins – uncomment #dtparam=spi=on in /boot/config.txt by removing the # from the line and reboot your Pi. Read more about this in our previous article on ADCs at [1].
Set up your hardware as shown in Figure 3 – again refer back to [1] for an in-depth explanation of how this works. Figure 4 shows a closer, more detailed view of how you should connect everything.
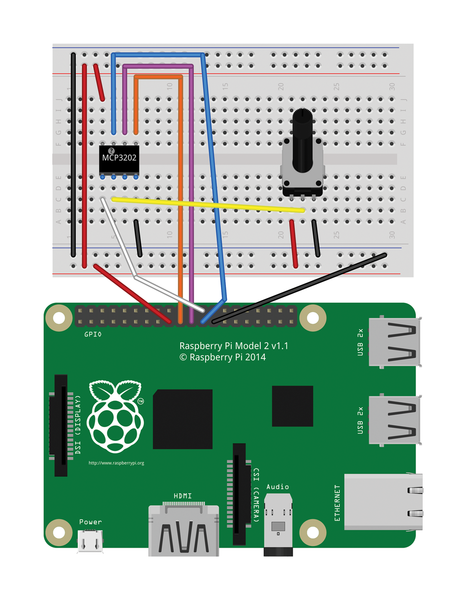 Figure 3: Pi, 3202 and potentiometer all wired up.
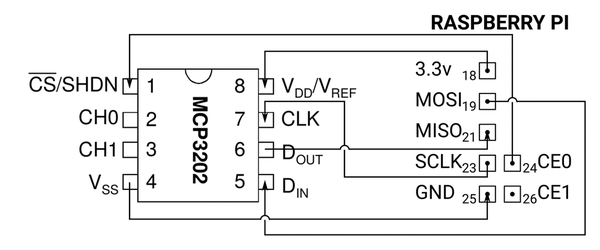 Figure 4: A detailed view of how to hook the 3202 to your Pi.
Visit the directory where you have stored the file and run:
$ python dial.py
The program will output a number between 0 and 1 (well, more realistically between 0 and 0.9999). This number gives you the position of the dial on the potentiometer. Twiddle the dial, try again, and you'll get another number, and so on.
The first advantage of converting the dial.py program into the dial.py library is that it helps break the project into manageable pieces.
The second advantage is that it makes code re-usable: dump dial.py into your project's directory or, better yet, copy it to a directory Python routinely scans for libraries, and it will be made available to all your apps. Create a directory for your modules in your home directory, for example:
$ mkdir -p $HOME/lib/python
Next copy dial.py into it.
Now add the line:
export PYTHONPATH=$PYTHONPATH: $HOME/lib/python
at the end of your .bashrc file and run
$ source .bashrc
to validate the changes.
When you execute
$ echo $PYTHONPATH
, if you see /home/pi/lib/python (or whatever your home directory is) on its own or among a bunch of other directories, then all's well.
Python scans PYTHONPATH to see what directories it has to search for libraries, so from now on when you write a new program, dial.py will be available immediately, without you having to copy it over to your new project's directory from elsewhere.
Writing your own libraries makes it easier to integrate snippets of code into the main program. This will make your programs shorter, clearer and easier to read, which, in turn will make them easier to debug.
Breakout
This brings me to Listing 2. This is the fully functional, albeit very basic, implementation of the classic Atari Breakout game. It uses the feedback from a potentiometer or, indeed any other analog sensor, to move the paddle. You could conceivably use a luminosity or temperature sensor to play, although good luck with that.
Listing 2: breakout.py
001 import pygame
002 import time
003 from dial import dial
004
005 screen_size = (400,640)
006 lv = min(screen_size)
007 pygame.display.init()
008 screen = pygame.display.set_mode (screen_size)
009
010 class ball(object):
011   def __init__(self):
012   self.pos = (screen_size[0]/2, screen_size[1]/2)
013   self.ball = pygame.draw.circle(screen, (200,200,255), (self.pos),5)
014   self.vx = int(screen_size[0]/lv)
015   self.vy = int(screen_size[1]/lv)
016
017   def move(self):
018   pygame.draw.circle(screen, (0,0,0), self.ball.center, 5)
019   self.ball.move_ip(self.vx, self.vy)
020   pygame.draw.circle(screen, (200,200,255), self.ball.center, 5)
021
022   def collision(self, obstacle):
023   hit=self.ball.collidelist(obstacle)
024   if hit != -1:
025   self.bounce(obstacle[hit])
026
027   return hit
028
029   def bounce(self, obstacle):
030   distx = abs(self.ball.centerx - obstacle.centerx)
031   if distx == (((self.ball.width+obstacle.width)/2)-1):
032   self.vx = -self.vx
033   else:
034   self.vy = -self.vy
035
036 class level(object):
037   def __init__(self):
038   self.court = [
039   "WWWWWWWWWWWWWWWWWWWW",
040   "W                  W",
041   "W                  W",
042   "WBBBBBBBBBBBBBBBBBBW",
043   "WBBBBBBBBBBBBBBBBBBW",
044   "WBBBBBBBBBBBBBBBBBBW",
045   "W                  W",
046   "W                  W",
047   "W                  W",
048   "W                  W",
049   "W                  W",
050   "W                  W",
051   "W                  W",
052   "W                  W",
053   "W                  W",
054   "W                  W",
055   "W                  W",
056   "W                  W",
057   "W                  W",
058   "W                  W",
059   ]
060
061   self.brick_size=(screen_size[0]/len(self.court[0]), screen_size[1]/len(self.court))
062   self.limits=(self.brick_size[0], (screen_size[0] - self.brick_size[0]))
063
064   self.wall=[]
065   self.bricks=[]
066
067   self.setup()
068   self.draw()
069
070   def setup(self):
071   y=0
072   for i in self.court:
073   x=0
074   for j in i:
075   pos_size=(x,y,self.brick_size[0],self.brick_size[1])
076   if j=="W":
077   self.wall.append(pygame.Rect(pos_size))
078   elif j=="B":
079   self.bricks.append(pygame.Rect(pos_size))
080
081   x += self.brick_size[0]
082   y += self.brick_size[1]
083
084   def draw(self):
085   screen.fill((0, 0, 0))
086   for i in self.wall:
087   pygame.draw.rect(screen, (255, 255, 255), i)
088
089   for i in self.bricks:
090   pygame.draw.rect(screen, (255, 255, 0), i)
091
092   def rm_brick(self, hit):
093   del self.bricks[hit]
094
095   self.draw()
096
097 class paddle(object):
098   def __init__(self, limits, brick_size):
099   self.paddle = []
100
101   self.limits = limits
102   self.paddle.append (pygame.Rect (((screen_size[0]/2) - brick_size[0], screen_size[1] - brick_size[1]), (brick_size[0]*2, (brick_size[1]/2))))
103
104   self.step = brick_size[0]/2
105
106   self.dial = dial()
107   self.dial_pos = 0
108   self.calibration()
109
110   self.draw((255,0,0))
111
112   def calibration(self):
113   while self.dial_pos < 0.45 or self.dial_pos > 0.55:
114   self.dial_pos=self.dial.get()
115
116   def place(self):
117   new_dial_pos = round(self.dial.get(),2)
118
119   if new_dial_pos != self.dial_pos:
120   self.draw((0,0,0))
121   self.paddle[0].x=(self.limits[1]-self.limits[0])-((((self.limits[1]-self.paddle[0].width)-self.limits[0])*new_dial_pos)+self.limits[0])
122   self.dial_pos=new_dial_pos
123   self.draw((255,0,0))
124
125   def draw(self, color):
126   pygame.draw.rect(screen, color, self.paddle[0])
127
128 if __name__ == ,__main__':
129
130   level=level()
131   level.draw()
132   ball=ball()
133   pygame.display.flip()
134
135   paddle=paddle(level.limits, level.brick_size)
136
137   while True:
138   if pygame.event.get(pygame.QUIT): break
139
140   paddle.place()
141
142   ball.move()
143   if ball.ball.y > paddle.paddle[0].y: break
144
145   if ball.collision(level.wall) != -1:
146   level.draw()
147   paddle.draw((255,0,0))
148
149   hit=ball.collision(level.bricks)
150   if hit != -1:
151   level.rm_brick(hit)
152   paddle.draw((255,0,0))
153
154   ball.collision(paddle.paddle)
155
156   pygame.display.flip()
157
158   time.sleep(0.01)
You can download all the code from [2].
You start by importing in the modules you'll need on lines 1 to 3. You'll be building the game using pygame, which is installed by default on Raspbian. PyGame simplifies writing games a lot. You will use Python's default time module to control the speed of the game. Finally you'll import our very own dial module, so you can read from the potentiometer.
Next, you set up the screen on lines 5 to 8. You can change screen_size to suit your needs. Later on you'll see how the program adapts the bricks and paddle to whichever size you choose. I personally like my classic games like I like my bread sticks: long and thin, so I have set up the screen to be in portrait mode at 400 pixels wide and 640 high. When running with those measurements, the game looks similar to Figure 5. Working out which side of the screen is shorter (line 6) comes in handy when you have to calculate the ball's horizontal and vertical velocity. More on that later.
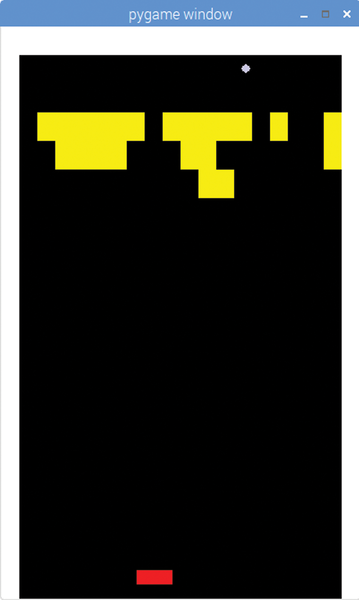 Figure 5: Our very simple Breakout game uses a potentiometer as an input controller.
You initialize the screen on line 7 and then display it on the next line.
Now we have to jump forward to the main module that starts on line 128. On line 130 we initiate a level object.
The building block (no pun intended) for the level class (lines 36 to 95) is PyGame's Rect() object [3]. A pygame.Rect() object lets you portion off sections of your screen that you can then manipulate individually. You can fill them with different colors or images, group several together, shrink or expand them, move them around, and detect if they are colliding with each other.
Bearing this in mind, when it comes to drawing the map of your level (lines 38 to 59), to make life easier for your level designers, you can use a simple list of strings of characters (dumped into court). A space indicates empty space, a W indicates an unbreakable chunk of wall, and a B indicates a breakable brick.
I made my screen into a 20x20 grid, because both 400 (the width of the screen you established on line 5) and 640 (the height of the screen) are wholly divisible by 20.
After working out the sizes of each brick (line 61), the leftmost and rightmost limit for the paddle (line 61), and initializing a couple of arrays to contain the bricks and wall data (lines 64 and 65), you use the setup() function (defined on lines 70 to 82) to actually transfer the data from court[] into the bricks and walls arrays. Each element in bricks[] and wall[] contains the position and size of each of its Rectangular blocks.
Drawing the court (lines 84 to 90) is just a matter of looping over all the elements in wall[] and painting them white (lines 86 and 87), then doing the same with the elements in bricks[] and painting them yellow (lines 89 and 90).
Using an array of bricks is also useful when one of them gets hit (see rm_brick(), lines 92 to 95), since all you have to do is remove that brick from the array (line 93). You then re-draw the court (line 95) and the brick will disappear from the screen.
Bouncing Balls
Getting back to the __main__ function, on line 130 you draw the court for the first time and then initialize a ball object using the ball class (lines 10 to 34).
Within the __init__() function you set the starting point of the ball as the center of the screen on line 11 and define the ball itself, a PyGame draw.circle object [4] on line 13.
On lines 14 and 15 you work out the ball's horizontal and vertical velocity (vx and vy). This is where knowing which side of the screen is shorter comes in handy. In this example the screen is higher than it's wide, so the vertical speed of the ball is faster than the horizontal speed.
The move() module (lines 17 to 20) is pretty self-explanatory. Each time the ball moves, you draw over the old image of the ball with the background color – in this case, black (line 18). Then you move the ball using the horizontal and vertical velocities (line 19), and redraw the ball in its new position (line 20).
The collision module (lines 22 to 27) is also self-explanatory. Look at lines 142 to 154. You'll see that, just after you move the ball, we check to see if the ball has collided with any part of the wall, any of the bricks, or the paddle. There is a very nifty PyGame module for this called collidelist() (line 23). Remember how you put all the blocks that make up the wall and all the blocks that make up the breakable bricks into lists? What you do in line 23 is ask the list if the ball has hit any of its elements. collidelist is also good enough to tell you which element you hit; you store this in the hit variable, so you can later work out which brick to delete from the screen… Presuming it was a brick you hit, of course.
Another thing that can happen when the ball hits an obstacle is that it bounces off (line 25). If it hits the top or bottom of a brick, the vertical velocity will change direction. Say its vy equals -1 (moving upwards). When it hits the bottom side of a brick it will change to +1 and start moving downwards. The problem is the collidelist just tells us if it has hit something, not where it's hit it. How then, do we figure out if the ball has hit a side, or top or bottom of an object? The good news is we can find out the horizontal and vertical center of any PyGame graphical object by looking at its centerx and centery attributes. Now look at Figure 6.
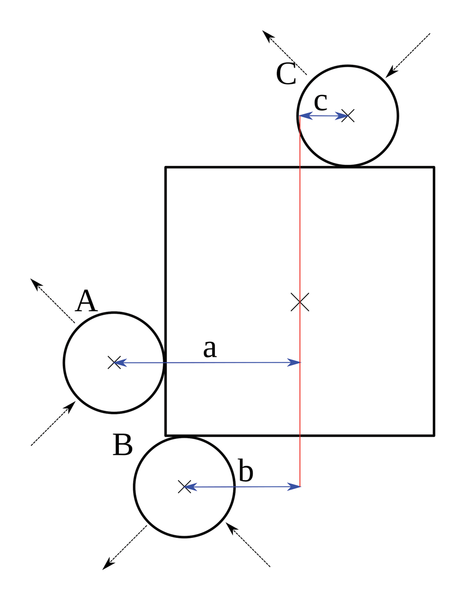 Figure 6: Calculating the horizontal distance between centers helps us figure out whether the ball hits a side or the bottom or the top of an object.
If the horizontal distance (line 30) between the centers of the ball and the object equals half the width of the ball + half the width of the other object (we can find out the width of an object by looking at its width attribute), that means the ball has hit a side (lines 31 and 32). Otherwise, the ball has hit the top or the bottom (lines 33 and 34). With that information, you can calculate which velocity you have to change.
Paddling Along
This is where your dial library comes into play… literally.
On line 135 you set up a paddle object within the __main__ module. Note that this is the last thing you do before you go into the game's main loop (lines 137 to 158). Remember this, as it will be important later.
The paddle class is defined from line 97 to 126. You initialize the object by creating a paddle attribute which is of type list (line 99). Why a list if there is only going to be one (1) paddle? This is because when you check what the ball is colliding with, you check against a list using PyGame's collidelist() (line 23). If we had the paddle as an individual object, then we would have to write a separate routine just for the paddle. That makes things too complicated! It's much easier to just make everything a list, have one module, ball.collision(), for everything, and be done with it.
Line 100 establishes the size of the paddle (relative to the size of the court and the bricks), makes a PyGame Rect object from it, then dumps it into the list you defined above.
On line 102 you set the horizontal limits for the court. You do this so the paddle doesn't go over the edge. On line 104 you set how much the paddle will move at each step when you twiddle the potentiometer.
Finally, you create a dial object on line 106! As you don't know at this stage what position the dial is in, you provisionally set it to zero (line 107) and move on to a calibration() module to figure it out (line 108).
The calibration() module (lines 112 to 114) is very simple – it is just a while loop that doesn't exit until the potentiometer is turned to its mid-point. Once that happens, you draw the paddle (line 110) and the main loop of the game, down in the __main__ function, starts (line 137).
When the program is run, it appears frozen to the player. You then twiddle the potentiometer looking for the mid-point. When you hit it, the paddle pops up and the ball starts moving.
The place() module in the paddle class (lines 116 to 123) calculates where the paddle is, based on the value read from the analog sensor on line 117. If the paddle has moved (line 119) you draw a black rectangle over the old paddle (line 120) to delete it, and call the draw() module from line 123 to re-draw the paddle in its new position.
Game Loop
The main game loop (lines 137 to 158) starts by calling paddle.place() to check and see if the paddle has moved (line 140); and then runs a bunch of tests to see what the ball has hit, if anything at all.
You test to see if it hit a wall on line 145, a brick on line 149 (if so you delete the brick on line 151), and if it hit the paddle on line 154.
On line 142 we check to see if the ball is lower down in the screen than the paddle. If that is the case it means the player has missed the ball and lost the game. You break out of the loop and the game ends.
On line 156 you re-draw the screen so you can see the changes each cycle of the loop brings.
Line 158 establishes the speed of the game. Make the number smaller for faster game play.
Gameplay
To play the game, make sure you have the dial.py library in the same directory as the breakout.py file, or in a Python library directory as explained above.
Run
$ python breakout.py
Remember the ball will not start moving until you twiddle the potentiometer and hit the mid-point.
For simplicity's sake, this is a very bare bones version of Breakout. There is no scoreboard; only one level; if you miss the ball, the program ends. When you destroy the last brick, you will have to continue playing in an empty court until exhaustion, boredom, or the unwillingness to continue living compels you to miss.
Perhaps the biggest sin of this game is that it is predictable. The ball will always hit the same bricks in the same place. The ball will bounce off every object in the same way.
You can easily change the program to figure out where the ball hits a brick or the paddle and change its trajectory, but that is an exercise I leave to you, the patient reader. I look forward to your variations.
Info
- A/D Tunnel, Raspberry Pi Geek Issue 21: http://www.raspberry-pi-geek.com/Archive/2017/21/Get-your-Pi-to-read-analog-data
- Download the code for this article: ftp://ftp.linux-magazine.com/pub/listings/raspberry-pi-geek.com/22/Breakout/
- PyGame's Rect object: https://www.pygame.org/docs/ref/rect.html
- PyGame's draw.circle: https://www.pygame.org/docs/ref/draw.html#pygame.draw.circle
next page » 1 2 3
Subscribe to our Linux Newsletters
Find Linux and Open Source Jobs
Subscribe to our ADMIN Newsletters
Support Our Work
Linux Magazine content is made possible with support from readers like you. Please consider contributing when you’ve found an article to be beneficial.

News
-
Hannah Montana Linux Is Back!
Developer Noah Cagle decided the world needed the once obscure but beloved Linux distribution and gave it a decidedly pink refresh.
-
System76 Refreshes the Lemur Laptop
If you're looking for a laptop with tons of power and battery, look no further than the latest iteration of the System76 Lemur Pro.
-
More than 43 Million Lines of Code in Linux Kernel 7.2
Using the cloc utility, Michael Larabel of Phoronix discovered that Linux kernel 7.2 has over 43 million lines of code.
-
Kubuntu Focus Goes Ultra
The Kubuntu Focus team has upped the performance ante of its M2 and Zr laptops with the latest, greatest CPUs from Intel.
-
Linux Gamers May Soon See Less Mouse Lag in KDE Plasma
Gamers using KDE’s Plasma desktop have been suffering from a slight input delay in mouse movement that could lead to getting fragged.
-
Three Lines of Code Improve Linux Storage Performance
A developer changed three lines of code, giving Linux storage performance a 5% bump.
-
AUR Hit Again with Malicious Packages
Once again the Arch User Repository is plagued by a high volume of malicious packages.
-
Alpine Linux 3.24 Features Fresh Desktops and a Newer Kernel
If you're a fan of Alpine Linux, it's time to upgrade because the latest version has been released with KDE Plasma 6.6, Gnome 50, and Linux kernel 6.18 LTS.
-
EU Open Source Strategy Plays Key Role in Tech Sovereignty Package
Comprehensive measures adopted by the European Commission aim to reduce dependency on non-EU countries.
-
Linux Foundation Report Indicates AI Driving Tech Hiring
Within growing security and skills gaps, AI has been found to be a positive driving force behind tech hiring trends in Europe.