
Processing Loops and More with Giada
Mean Music Machine
ByGiada is a small piece of musical software that can be used in many ways. Mainly designed for working with loops, Giada also can be used as a drum machine or be flexibly integrated into your workflow, thanks to VST and MIDI support.
Giada adheres to the recipe of a simple interface and minimal system load with maximum benefits. This concept is apparent when you start the program for the first time. What you see is basically a gray box with a few controls – an interface that looks quite different from many other music programs. Once you become more comfortable with Giada, however, you will learn to appreciate this functionality.
Installation
Giada does not just provide software for Linux users; it also offers finished packages to Windows and Mac users. Under Linux, you’ll find ready-made packages for the DEB system, including Ubuntu and others, in both 32- and 64-bit variants. The developers refer to the 64-bit variant as experimental; unfortunately, it does tend to freeze and crash. Other Linux distributions must make do with an installation from the source code, which is also provided. I even checked the usual RPM resources, where I mainly found older versions of Giada whose use I cannot recommend.
First Sounds
After you launch Giada, you will see the gray box mentioned above along with other boxes and symbols. To load the first sound, press Add new channel and then click Sample channel; otherwise, you create a MIDI channel for corresponding signals. A rudimentary file dialog appears and you can open the desired audio file. You will want to use an uncompressed format such as .wav or .aiff; .mp3 files do not work. Before you start to import the next sounds/loops, you can test the new sound and the connection to the sound system. To do this, play the sound and click on the leftmost square next to the sound – or channel, to use Giada-speak.
The First Beat
Above the channels is a bar with boxes, four by default, which represent individual beats in each measure. Above that is the control panel with the Play/Pause button and the Reverse button, which resets the playback position to the first beat. The circle is for recording events, and the dot is for audio recording (Figure 1). If you enable event recording and start playing, you can use the first button next to a channel to assign the start time for a loop to the individual beats. In this way, you can create an initial rough sequence.
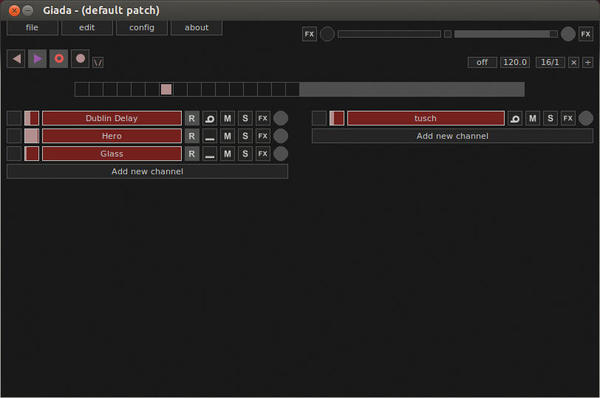 Figure 1: Giada’s basic control panel.
Sequence Settings
Giada does not limit you to the default four beats. You can set the timing and the number of beats for your sequence in the sequencer configuration above the beat display on the right. This is done either with numerical values via an input field or using the two switches beside the display, with which you can adjust the number of beats on the fly. If you choose, for example, a setting of 16/4, this gives you four bars with four beats, indicated by a simple marker. You can also add a metronome by pressing the inconspicuous button labeled off.
Loop and Channel Settings
Far more settings are provided in the individual channels or loops. The functions and controls are located directly in the respective display row. You can set the volume for a channel by pressing the inconspicuous circle at the end of the row. The box at the start of the row is used to start the loop. Right-clicking on the channel name opens the menu. Set key lets you assign the channel to a key on your computer keyboard, but not a connected MIDI keyboard. You can now optionally use this button to start the loop. The box next to the channel name lets you control the playback mode.
The M and S icons control the activity of the channel (Figure 2). The M icon lets you mute the channel; S stands for solo and mutes all the other tracks, as in many other audio programs. The last icon lets you enable the effect section. If you have already taken actions, a box with an R appears beside the channel name to indicate this, and it lets you enable/disable playing back the actions. If playback is disabled, the event channel is muted. However, if you start the channel or loop manually, the sound is output as configured, which is where the function differs from the mute function.
 Figure 2: The M and S icons control the activity of the channel.
Editing Actions
After right-clicking the channel name, select Edit Actions to start processing the channel actions. Three areas are displayed for an audio channel: start/stop, mute, and volume. In general, some start signals are displayed in the top row of simple recordings, and the other two tracks are empty. In the Action Editor, you can define start points and control the volume and muting very accurately and easily. The start/stop track has three states: key press, release button, and delete channel. A fourth variant is added if the channel mode is set to Oneshot press.
In the Action Editor, you can adjust the layout of the beats in an even more granular way. Just click on the number next to the Actions selection and select the desired value. You can now quantize the individual loops in more detail, which is especially interesting for drum sounds. Start/stop actions are added by first selecting the state. You can set new actions by clicking with the mouse, and the right mouse button deletes them again. You can also move individual events, but deleting and recreating them is typically quicker.
As you make changes in the Action Editor, you can easily play back the remainder of the sequence, which means you always have direct control over your inputs. If you use the Kill channel action, the loop stops at that point, regardless of the other settings. The other two tracks are somewhat similar in effect: Both adjust the volume. One of them only supports on and off states, but you can create envelopes to adjust the sound for the volume channel. In the mute channel, you can click to create a mute event with a start and end point, and you can move these points.
In the volume channel, the first click generates a start point and an end point, as well as a control point at the location clicked. You can add more control points to adjust the envelope. In all tracks, you remove actions and control points with the right mouse button. If you are editing a MIDI channel, the Action Editor only opens one track. This looks very much like a typical piano roll editor and can be used quite accurately (Figure 3). Notes (i.e., MIDI events) are shown as bars, whose position and length can be changed.
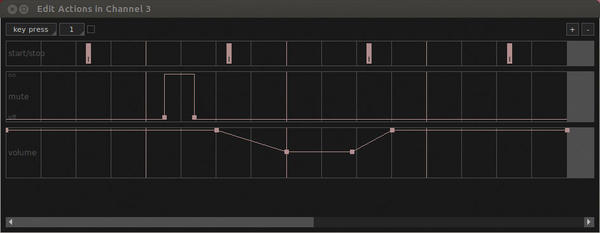 Figure 3: The Action Editor.
Audio Editing
Right-click on the channel name to access the Audio Editor (Figure 4). It enables processing of the audio signal, which is displayed in an envelope curve. Below this are some controllers that let you manage playback. In general, the most important tool will be the one for setting the start and end points of the loop. You can optionally define this through the input fields at the bottom, or slightly more intuitively using the two controllers in the envelope labeled s(tart) and e(nd). To find the appropriate locations as accurately as possible, you can change the view. Additionally, you can adapt the clip volume in the editor. You can decrease the volume via the volume sliders or increase it via the boost slider. However, some caution is required to avoid distortion.
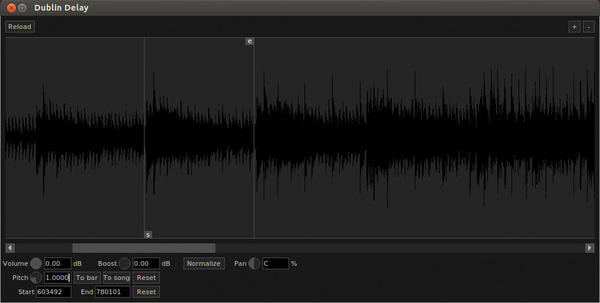 Figure 4: The Audio Editor.
The Normalize feature can be useful. It adjusts the envelope to match the loudest result in the sample, raising the volume of quiet passages more than that of loud ones. This function can help present a sample to better advantage in a sequence; however, it needs to be treated with some caution, because it can spoil a sound experience under certain circumstances. Remember that this function in Giada essentially means automating the boost control.
The third functional unit in the Audio Editor is the pitch control, which lets you adjust the pitch of the sample to suit your needs. The pitch is set manually via the small control, or you can let Giada adapt the speed to match the beat or the sequence. If you are not impressed by the results, there is also a Reset switch here, as well an option for setting the start and end points.
Configuration
In the configuration settings, you can define basic values for the hardware, that is, the input and output channels (Figure 5). You also define the sound system and the buffer size here. If you have more than one audio hardware device, select the desired device. This also applies to the MIDI system settings.
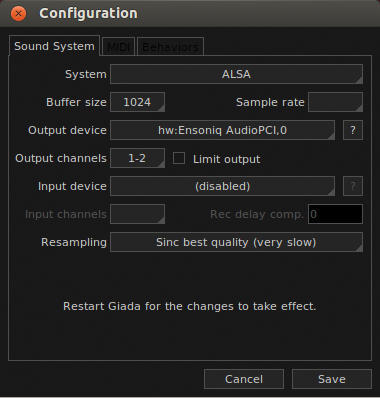 Figure 5: Configuration settings let you define input and output channels.
The third tab defines Giada’s behavior. Here, you can define whether channels should be stopped immediately or as soon as the channel itself or the sequencer is stopped, or whether to first play all activated sounds to the end. You also decide here whether the channels in which you have stored actions should be treated as loop channels, although the play mode is set to Shot.
Performance
In this article, I have explored working with Giada in preparing a performance or recording session. In the case of Giada and similar software, this is the part of the work that takes the most time. I have described in detail how to make a sequence and possibly create a complete beat.
Giada is also suitable for live use. For this purpose, you need to prepare a complete set of loops and other sounds. You can assign a corresponding key to each channel so that you can easily retrieve the channels/sounds with the computer keyboard. Once you have made all the settings, save the entire set as a Patch.
If you want to use your settings with all your loops on another device, you must save the whole thing as a Project. This saves the Giada settings and all your audio files in a shared folder; you can then transfer the results to the other device. This means you can exchange data between your workstation at home and the laptop that you use on the road, without seeing a message about missing audio files.
Conclusions
Giada feels a little clumsy when you first get your hands on it. The more you work with it, however, the more logical the program functions appear. Giada is suitable in its current form for both studio work and live gigs. However, I do hope that the application will become more stable; it occasionally freezes when you execute several steps in quick succession.
Subscribe to our Linux Newsletters
Find Linux and Open Source Jobs
Subscribe to our ADMIN Newsletters
Support Our Work
Linux Magazine content is made possible with support from readers like you. Please consider contributing when you’ve found an article to be beneficial.

News
-
Three Lines of Code Improve Linux Storage Performance
A developer changed three lines of code, giving Linux storage performance a 5% bump.
-
AUR Hit Again with Malicious Packages
Once again the Arch User Repository is plagued by a high volume of malicious packages.
-
Alpine Linux 3.24 Features Fresh Desktops and a Newer Kernel
If you're a fan of Alpine Linux, it's time to upgrade because the latest version has been released with KDE Plasma 6.6, Gnome 50, and Linux kernel 6.18 LTS.
-
EU Open Source Strategy Plays Key Role in Tech Sovereignty Package
Comprehensive measures adopted by the European Commission aim to reduce dependency on non-EU countries.
-
Linux Foundation Report Indicates AI Driving Tech Hiring
Within growing security and skills gaps, AI has been found to be a positive driving force behind tech hiring trends in Europe.
-
United Nations Open Source Portal Goes Live
A new open source portal seeks to coordinate and scale open source efforts across the United Nations system.
-
KDE Linux Drops AUR
KDE Linux developers have dropped the Arch User Repository from the build pipeline due to security concerns; other distributions should consider doing the same.
-
California May Exempt Linux from Its Age-Verification Law
After backlash from the Linux community, California may be backing off on its promise to force all operating systems to verify age, but one platform may still have to comply.
-
Another Logic Bug Found in Linux Kernel
Qualys has discovered a vulnerability in the Linux kernel that can be used to elevate standard user privileges.
-
Ubuntu Core 26 Offers Game-Changing Enterprise Features
Ubuntu Core 26 could be a game-changer for organizations looking for increased security and reliability.