
Sculpting Sound with SuperCollider
Super Sound Generator
BySuperCollider is a versatile and powerful sound generator that can be used to create, filter, and modulate sound. In this article, we tackle the basics.
SuperCollider is not all about particle physics, but it could be. Although described as “… an environment and programming language for real time audio synthesis and algorithmic composition,” it is much more than that, as you will see.
Installation
As usual, I chose to use a base Debian “Wheezy” with all updates applied. You can get precompiled SuperCollider packages for several operating systems and Linux flavors, or you can clone the development tree with
$ git clone https://github.com/supercollider/supercollider.git
So I could enjoy the latest features, I went for the clone, but as usual, you will also have to install some dependencies before you can get a clean compile. Installing on Debian, you will need the following:
# apt-get install cmake libsndfile1-dev libx11-dev libxt-dev libjack-dev libasound2-dev libqt4-dev emacs
For certain extensions and plugins, you might find that the following useful as well:
# apt-get install lame alsaplayer-jack
Once all of the above is installed, cd into the supercollider directory and create a build directory before building the packages:
$ mkdir build
$ cd build
$ cmake ..
During the build process, cmake may report the following error
nova-simd submodule is missing: please run 'git submodule init && git submodule update' from the toplevel of your git working tree
and then stop. The solution is quite easy: cd up out of the build directory and run
$ git submodule init && git submodule update
Then, you can re-enter build and run cmake again.
Once cmake has finished successfully, run make and, when done, run make install as root to copy all the bits and pieces into place.
One of the most important SuperCollider dependencies is the Jack sound server. Interestingly, SuperCollider installs just fine without the package that contains the Jack daemon (jackd) proper; it’s only when you try to run the SuperCollider server (more about this below) that it will bomb and inform you that Jack is missing.
Most Linux distros contain precompiled packages of Jack in their repos, so you can usually just install it using your software manager. In Debian, for example, you would do
# apt-get install jackd1
You also don't have to worry about running the jackd server by hand because SuperCollider (SC) will do that for you when you start the SC server.
What you will have to do is kill the Jack daemon when you exit SuperCollider:
$ killall jackd
If you don't, most of your audio programs (including Firefox when playing videos and so on) will freeze while they try to access PulseAudio or Alsa.
Boot Time
With the installation out of the way, you’ll find most of the important files under /usr/local and in your own home directory under .local/share/SuperCollider. The SuperCollider executables will be in /usr/local/bin, and some configuration files and documentation will be in /usr/local/share/SuperCollider.
As for the executables, SuperCollider installs scide, sclang, sclangpipe_app, scsynth, scvim, and supernova. The most interesting two are scide and sclang, but just for the record, sclangpipe_app is used by scvim, which in turn is a Vim-like front end for sclang, and scsynth is the server proper, which I’ll address shortly. Finally, supernova is an implementation of the SuperCollider server for parallel processing, although you won't need it for the purposes of this article.
On the other hand sclang, short for SuperCollider language, is a command-line interpreter similar to Bash or the Python terminal that works well if you just want to try things out but is not so useful for complex coding. You can run it by entering sclang in a terminal window.
Much more useful is scide, the SuperCollider IDE (Figure 1), which is also run in a terminal window.
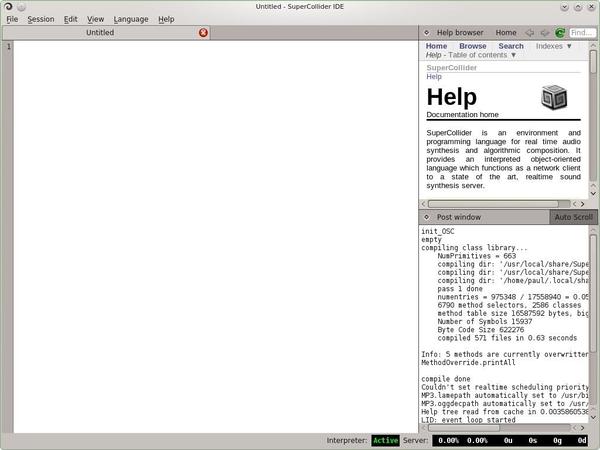 Figure 1: The SuperCollider IDE on startup.
The left pane is the workspace, which is where you write (and often run) your code. Several workspaces can be accessed via tabs across the top of the window. On the top right is the very useful SuperCollider Help system, which you’ll be using a lot. Below that, the Post window displays output, errors, and so on.
To run SuperCollider commands, type them into the workspace and press Ctrl+Enter while the cursor is on the same line. The SuperCollider language is an object-oriented functional language similar to Smalltalk, with syntactical characteristics borrowed from LISP and C++.
You can declare a single-character variable (which are all objects) just by setting it to a value:
a=3;
Note the semicolon that ends a command. Now you can access the value of a by calling the value method:
a.value;
If you press Ctrl+Enter while the cursor is on the first line and then do the same on the second line, a 3 should appear in the Post window for each command. Nearly all SuperCollider “commands” are really functions with a return value, and in this case, the only value the interpreter can find is the content of a.
Longer variable names are advisable because some single-character variables are used internally by the interpreter. To do so, use the var keyword. When using var, the variable must belong to a certain scope (i.e., a group of commands executed together).
For example, if you execute
var ab;
then
ab=3;
the Post window will print an error stating that the variable ab is not defined.
To create a scope so you can use ab, you have to group the commands between brackets:
(
var ab;
ab=3;
)
Now when you place your cursor anywhere within the brackets and hit Ctrl+Enter, the value is assigned to ab correctly.
Also try
"Hello".postln;
"World".postln;
and
(
"Hello".postln;
"World".postln;
)
and note how the output differs in the Post window. In the first example, you have to press Ctrl+Enter on each line for each word to output. In the second example, you just have to press Ctrl+Enter once while your cursor is on any of the lines to get both words of output.
I could go on, but writing about SuperCollider's programming language deserves a book in itself, and there a plenty of good ones online for free.
From now on, I’ll explain the language through examples. SuperCollider was created to engineer sounds, so I'll proceed to make some noise!
Making a Ruckus
Before you can begin, you have to run the SuperCollider server by entering
s.boot
in the IDE window (and hitting Ctrl+Enter). The s object is one of those internal single-character variables I mentioned earlier, and it represents the local server and has its own methods and attributes. (You can also use a remote server, if you like.) To stop the server, you would use s.quit.
From the menubar, you can run the server with Language | Boot Server, or using the keyboard, you press Ctrl+B. Check for any errors in the Post window and make sure the volume of your headphones is up, but not too high: Mistakes in SC code tend to make SuperCollider's output very noisy, indeed, and you don't want to damage your headphones, speakers, or, worse, your eardrums.
The simplest sound you can generate with SuperCollider is an unfiltered and unmodulated wave, and the shortest way to do that is with an unnamed function (curly brackets enclose functions in SuperCollider):
{SinOsc.ar(261.26, 0, 0.7)}.play;The SinOsc object calls a sine wave oscillator, similar to the image in the top left corner of Figure 2.
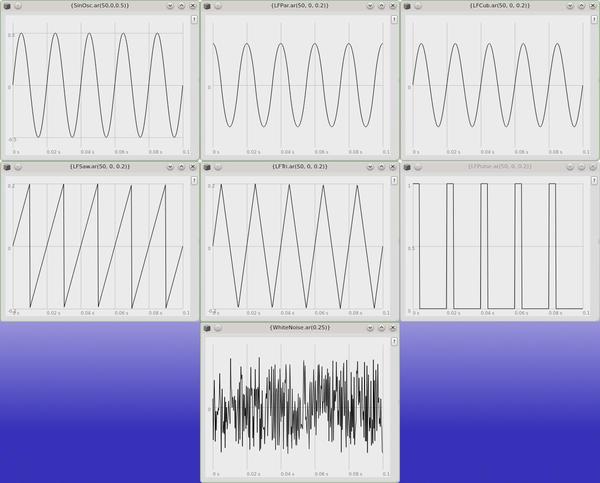 Figure 2: Different types of sound waves. Top row, left to right: simple sine wave, parabolic sine wave, and cubic sine wave. Middle row: sawtooth wave, triangle wave, and pulse wave. Bottom: white noise wave.
The ar method tells the interpreter to generate an audio signal. As you will see later, you can also generate control signals (kr), but for a smooth, high-quality sound, you need to call ar.
Parameters appear within brackets. The first value, 261.26, is the frequency or pitch, measured in hertz (i.e., phases per second). The higher the number, the higher the pitch (261.26, by the way, is middle C). In this case, the oscillator runs through 261.26 cycles per second.
If you are familiar with midi notation, you can give the value using the .midicps attribute:
{SinOsc.ar(60.midicps, 0, 0.7)}.play;The midi value 60 is middle C.
The second value in SinOsc is the phase offset in radians, which is the position from which the wave starts. If you look at the top left-hand corner of Figure 2 again, you’ll see that the wave starts at 0. If you used
{SinOsc.ar(261.26, pi, 0.7)}.play;the wave would start halfway though (i.e, cutting the 0 axis), but on the way down.
The third parameter is the multiplier and affects the volume of the wave. It varies from 0 (silence) to very loud. You probably don't want to go past 1.
Another way to pass parameters to a function is by naming them. In this case, you can place them in any order. For example:
{SinOsc.ar(261.26, pi, 0.7)}.play;is the same as
{SinOsc.ar(mul:0.7, freq:261.26, phase:pi)}.play;To silence the sound, press Ctrl+. (period). If you want to see what the wave looks like as it plays, try
{SinOsc.ar(261.26, pi, 0.7)}.scope;(Figure 3). To take a static snapshot, use:
{SinOsc.ar(261.26, pi, 0.7)}.plot;
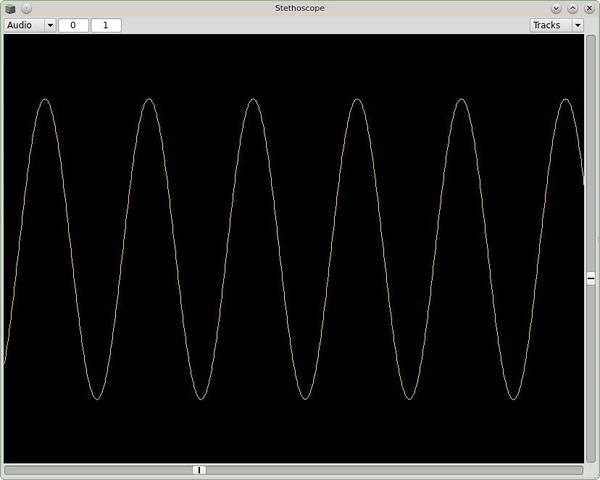 Figure 3: The scope method shows the wave as it plays.
All of these methods – play, scope, and plot – have their own set of parameters. If you try
{SinOsc.ar(261.26, pi, 0.7)}.plot(1);for example, you'll see a whole second of the wave instead of the default 100th of a second.
When using headphones, you can hear sound only through the left speaker because each channel is assigned independently through an array and channel 0 corresponds to the left speaker. If you enter
{[SinOsc.ar(261.26, pi, 0.7), SinOsc.ar(300, pi, 0.7)]}.play;you will hear a sine wave at 261.26Hz through your left speaker and a sine wave at 300Hz through your right speaker. This command can be shortened to
{SinOsc.ar([261.26, 300], pi, 0.7)}.play;which works with different volumes, too:
{SinOsc.ar([261.26, 300], pi, [0.7, 0.5])}.play;If you only want the right speaker, you can enter
{SinOsc.ar([0, 300], pi, 0.7)}.play;or:
{[nil, SinOsc.ar(300, pi, 0.7)]}.play;To assign a function to a variable and then free one channel at a time, use
x = {SinOsc.ar(261.26, pi, 0.7)}.play;
y = {[nil, SinOsc.ar(300, pi, 0.5)]}.play;
x.free;
y.free;
instead of shutting them all down with the Ctrl+. keystroke.
Piling ’em Up
Up until now, the examples have been pretty boring, but they are the basic building blocks of much more complex and interesting sounds. Because all functions and commands in SuperCollider return a value, you can use the output of one oscillator (e.g., sine) as a parameter for another oscillator. The line
{LFSaw.ar(200, 0, 1 * SinOsc.kr(1, 0, 1))}.scope;modifies the multiplier (volume) parameter of the sawtooth wave (Figure 2, middle row, far left; a twangy, guitar-like sound), with the sine oscillator. The scope at the end lets you see what’s happening. Note the kr method appended to SinOsc, which is a control function (i.e, it is modulating, not generating, a sound) instead of ar, which is much more CPU intensive. The sine oscillator frequency is set to 1Hz (1 cycle per second), so the saw oscillator's volume varies between 1 and -1 every second, rendering a siren-like sound.
Piling on as many functions as you like allows you to create really sophisticated effects. The following, for example, pans the sound from one speaker to the other:
{Pan2.ar( LFSaw.ar(200, 0, 1 * SinOsc.kr(1, 0, 1).abs), SinOsc.kr(0.5))}.play;The Pan2 function is used to pan between two channels – the Pan4 function handles four-channel output – and takes as arguments the audio signal and a number between -1 (left) and +1 (right). The default multiplier of the sine oscillator is 1, so in the second argument of Pan2 (SinOsc.kr(0.5)), you only have to specify the frequency. Now you will hear the siren on the right panning over to the left and back again every half second.
Mix and Match
Now I’ll look closely at the following line from the inside out:
{ Pan2.ar( Mix.fill( 8, { LFSaw.ar(200 + 200.0.rand, 0, 1 / 8) }), SinOsc.kr( 0.5 ) ) }.play;Among the confusing array of fences, the Pan2.ar function has two parameters: Mix.fill( <n>, { LFSaw.ar(200 + 200.0.rand, 0, 1 / <n>) }) and SinOsc.kr( <n> ).
- LFSaw.ar(200 + 200.0.rand, 0, 1 / 8), the innermost function of the first parameter, looks similar to an earlier example: the sawtooth wave generator. The rand method affixed to 200.0 (a float number) returns a random number between 0.0 and 200.0, thus generating a sawtooth wave with a frequency between 200 and 400. The pulse starts at 0 with an amplitude (volume) of 1/8.
- SinOsc.kr( 0.5 ), the second parameter of the Pan2.ar function. is also familiar. This function pans the sound wave between the right and left speaker every half a second.
- Mix.fill( 8, { … }) is new. The Mix function, as advertised, mixes two (or more) sound waves. In this case, its fill method mixes as many waves as indicated by the first parameter (8). The second parameter to Mix is the wave generator (i.e., the sawtooth oscillator). Here, eight slightly different sawtooth waves (i.e., with frequencies that vary randomly between 200 and 400Hz) are mixed to achieve something that sounds like a truck’s horn in a traffic jam. The volumes of mixed waves are additive, so each wave is assigned a volume of 1/8; with eight waves, the total mixed signal has volume of 1.
- Pan2.ar( … ), finally, pans the effect from one speaker to the other every half second.
Although piling up functions gives you very sophisticated results, it can also get confusing quickly, which is why grouping is useful. Listing 1 has exactly the same effect as the one-line instruction, but it is much easier to read. Plus, you can use a multicharacter variable to define how many waves (line 2) you want to mix.
Listing 1: Truck Horn
(
  var waves=8;

  {Pan2.ar
    (Mix.fill(waves,
      { LFSaw.ar(200 + 200.0.rand, 0, 1 / waves) }
      ),
      SinOsc.kr(0.5)
    )}.play;
)
SynthDefs
Once you have built your own building blocks, you will want to save them and turn them into a shortcut for creating more sophisticated soundblocks by using SynthDefs. For those familiar with OOP (object-oriented programming), think of SynthDefs as classes that you can then use to generate “objects” by instantiating the Synths.
Listing 2 is an example of building on a simple sine wave oscillator.
Listing 2: Sine SynthDef
(
SynthDef("sinewave",
  {arg myfreq=261.626, myvol=0.5;
  Out.ar([0, 1], SinOsc.ar(myfreq, 0, myvol))
  }).add;
)
Line 2 defines a SynthDef named ("sinewave") and declares some arguments that can be used later as parameters when called.
The new function in line 4, Out, writes a signal to a bus (channel). In this case, the first parameter is an array ([0, 1]) that indicates it will be writing to channel 0 (left) and 1 (right). The second parameter is the function that will be generating the wave (i.e., a simple audio (ar) sine wave).
Finally, on line 5, the SynthDef gets added to the server with add so it can be called from anywhere. If your SynthDef is really useful, you can save it for future sessions by changing add to writeDefFile and executing the block. Your SynthDef will then be loaded into the server every time it boots.
Now call the SynthDef (line 1) and pass it some parameters (line 2), or change the tone and volume as it plays:
x=Synth("sinewave");
x=Synth("sinewave", [myfreq:400]);
x.set("myfreq", 200);
Although the SynthDef structures are very useful, they have certain limitations compared with functions. For starters, a SynthDef is compiled, then the server runs the compiled, static version every time it is called. Therefore, if the SynthDef contains a random number generator, the random number will be calculated at run time, and the result is stored statically within the Synth, so it will not change any of the times the Synth is called.
You also can’t define dynamically the number of channels (buses) or waves you are going to use, again because this has to be compiled into the Synth.
Beyond the IDE
As mentioned elsewhere, SuperoCollider is a means to and end. Apart from an extensive vocabulary for sound, sclang offers a complete toolset that allows you to create your own interfaces. Listing 3, for example, creates the interface shown in Figure 4.
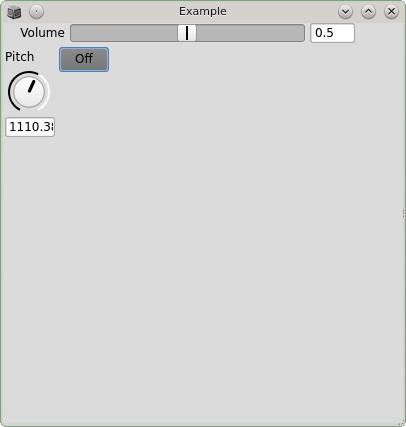 Figure 4: A simple graphic interface to change pitch and volume of a sine wave.
Listing 3: guiexample.scd
s.boot;

(
SynthDef("sinewave", {arg myfreq=261.626, myvol=0.5;
  Out.ar(0, SinOsc.ar(myfreq,0,myvol))
  }).send(s);
)

(
var awindow, myslider, myknob, mybutton;

awindow=FlowView.new(windowTitle:"Example");
myslider=EZSlider(awindow, label:"Volume",controlSpec:[0,1], action:{|mv| x.set("myvol",mv.value)}, initVal:0.5);
myknob=EZKnob(awindow, label:"Pitch",controlSpec:\freq, action:{|mn| x.set("myfreq",mn.value)}, initVal:261.626);

mybutton=Button(awindow, Rect(20,20, 50, 25))
  .states_([["Off", Color.black, Color.grey],
    ["On",Color.black,Color.yellow]])
  .action_({ arg vbutton;
     if(vbutton.value==1,
      {(
        x=Synth("sinewave");
        myslider.value=0.5;
        myknob.value=261.262;
         )}
     ,
    {x.free});
    });

mybutton.value=0;
)
This program recycles the sinewave SynthDef seen earlier and, from lines 9 to 31, creates a simple window with three elements – a slider, a knob, and a button – to control the wave. Line 12 creates the window with FlowView, setting the title to Example.
EZSlider in line 13 creates the volume slider, and its parameters set the parent window (i.e., the window that contains it), the values it can take (between 0 and 1), the action it controls (a volume change of x, which is an “object” of the sinwave SynthDef, set in line 22), and the initial value (0.5).
The EZKnob widget in line 14 is virtually the same as EZSlider, except it controls the frequency of x.
The Button widget in line 16 creates a multistate button (with the values "Off" and "On") and starts and stops the sound depending on whether it transitions from one state to the other or vice versa.
Finally, line 30 sets the button’s initial state; otherwise, the button will not show up in the window.
To run this program, first execute the sinewave SynthDef (take your cursor to somewhere within the brackets and press Ctrl+Enter) then the program proper (move down to line 10, for example, and repeat Ctrl+Enter), and the window will pop up. Press the On/Off button to start and stop the sound, and drag the slider to change its volume or twist the knob to change the pitch.
Quarks and Plugins
Extensions are called Quarks in the SuperCollider lingo. These comprise anything from musical games (e.g., Chordtris, a musical Tetris played with a midi keyboard; Figure 5) to graphical interfaces for live performances.
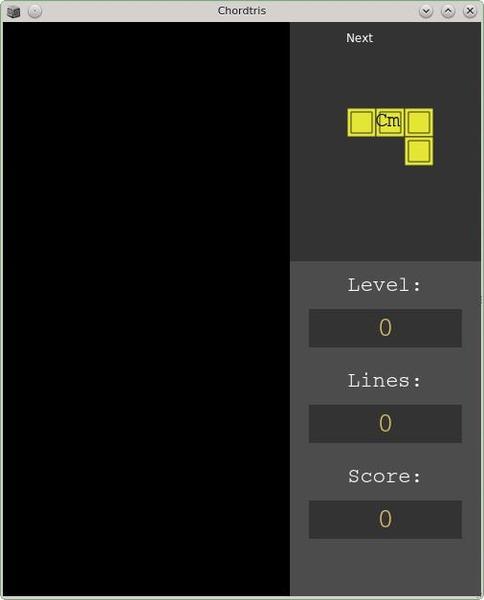 Figure 5: Chordtris is a Quark (extension) that allows you to play a musical version of Tetris.
SuperCollider comes with its own package manager, also named Quarks (Figure 6). To get a list of Quarks, type Quarks.gui in the SC IDE, press Ctrl+Enter, and click the Update Quarks Listing button in the window. If nothing happens in a reasonable stretch of time, check the SC IDE Post window for errors. It may instruct you to erase a directory, such as /home/[user]/.local/share/SuperCollider/quarks and run Quarks.gui again.
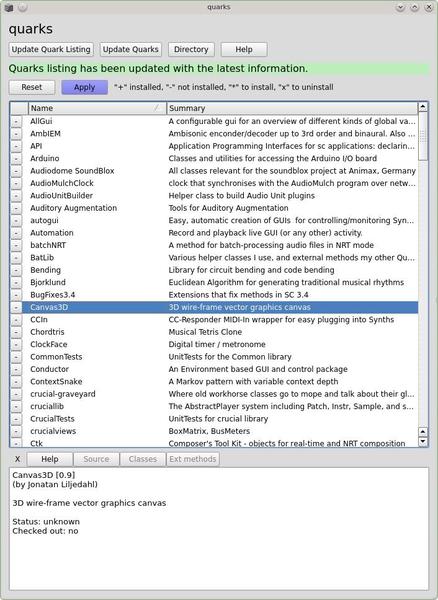 Figure 6: SuperCollider comes with its own package manager for extensions (Quarks).
After installing or deleting Quarks, you might have to update the libraries and help systems by clicking Language | Recompile Class Library.
Plugins enhance the environment and add functionality to the language. To download the latest set of plugins from GitHub, use
$ git clone https://github.com/supercollider/sc3-plugins.git
and then compile as you would any source code program.
Conclusion
SuperCollider is not for the faint of heart. As with particle physics, sound creation and manipulation is difficult. That said, SuperCollider is immense, and I have only covered the very bare basics in this article. SuperCollider broaches literally everything you will ever need for sound engineering, allowing you to use it at nearly any level of competence.
SuperCollider is useful for educational purposes (plot and scope are great to show students what happens when a sound is being produced), composing, and live performances. If you want to experiment, check out the MouseX and MouseY functions to create a two-dimensional virtual theremin on your screen with a couple of lines of code. Also see how easy it is to create a Vocoder or to develop your own tools for your personal recording studio.
Subscribe to our Linux Newsletters
Find Linux and Open Source Jobs
Subscribe to our ADMIN Newsletters
Support Our Work
Linux Magazine content is made possible with support from readers like you. Please consider contributing when you’ve found an article to be beneficial.

News
-
New Linux Flaw Lets Attackers Escape VMs
A 16-year-old vulnerability allows an attacker to escape a virtual machine, gain access to the host, and execute malicious code.
-
Hannah Montana Linux Is Back!
Developer Noah Cagle decided the world needed the once obscure but beloved Linux distribution and gave it a decidedly pink refresh.
-
System76 Refreshes the Lemur Laptop
If you're looking for a laptop with tons of power and battery, look no further than the latest iteration of the System76 Lemur Pro.
-
More than 43 Million Lines of Code in Linux Kernel 7.2
Using the cloc utility, Michael Larabel of Phoronix discovered that Linux kernel 7.2 has over 43 million lines of code.
-
Kubuntu Focus Goes Ultra
The Kubuntu Focus team has upped the performance ante of its M2 and Zr laptops with the latest, greatest CPUs from Intel.
-
Linux Gamers May Soon See Less Mouse Lag in KDE Plasma
Gamers using KDE’s Plasma desktop have been suffering from a slight input delay in mouse movement that could lead to getting fragged.
-
Three Lines of Code Improve Linux Storage Performance
A developer changed three lines of code, giving Linux storage performance a 5% bump.
-
AUR Hit Again with Malicious Packages
Once again the Arch User Repository is plagued by a high volume of malicious packages.
-
Alpine Linux 3.24 Features Fresh Desktops and a Newer Kernel
If you're a fan of Alpine Linux, it's time to upgrade because the latest version has been released with KDE Plasma 6.6, Gnome 50, and Linux kernel 6.18 LTS.
-
EU Open Source Strategy Plays Key Role in Tech Sovereignty Package
Comprehensive measures adopted by the European Commission aim to reduce dependency on non-EU countries.